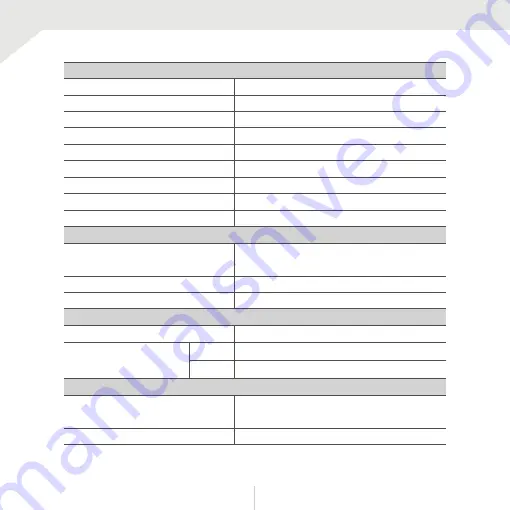
background image

ENVIRONMENTAL

Opera�ng Temperature

Opera�ng Humidity 
IP Ra�ng  
Other Cer�fica�ons

ELECTRICAL

Power Requirements 

Power Consump�on 

MECHANICAL

Housing Material and 

Dimensions
Weight 

DC12V / AC24V Dual Voltage
3.0W, 250mA, LED On : 4.44W, 370mA
2.7W, 160mA, LED On : 4.3W, 255mA

DC12V 
AC24V


-20°C ~ 50°C  (-4°F ~ 122°F)

No more than 90% (Non-Condensing)
IP66
FCC, CE, ROHS


Aluminum, 224.5 x 96.7Ømm 

(8.84 x 3.81Ø in)
1.43 lbs

OPERATIONAL (CONT.)

Digital Noise Reduc�on 

White Balance
Day and Night
Auto Gain Control

Mo�on Detec�on 

Privacy Zones
Sharpness
Gamma 
Remote Control

OFF / LOW / MIDDLE / HIGH
AUTO / AUTO-EX / PRESET / MANUAL
AUTO / COLOR / BW / EXTERN
0 ~ 10
ON/OFF (4 Zones)

ON/OFF (Box 16 Zones)

0 ~ 10
0.45 ~ 0.75
RS485 / Coaxial (UTC)

Specifica�ons

3

4

Summary of Contents for DWC-B6263WTIR

Page 1: ...ng and using the camera please read this manual carefully to keep it handy for future reference STAR LIGHT Universal HD over CoaxTM Bullet Camera DWC B6263WTIR 2 8 12mm vari focal lens gray housing DWC B2623WTIRW 2 8 12mm vari focal lens white housing DWC B2623WTIR650 6 50mm long range lens gray housing DWC B2623WTIR650W 6 50mm long range lens white housing ...

Page 2: ...ng the battery may cause an explosion fire electric shock or damage to the product 5 Do not connect multiple cameras to a single adapter Exceeding the capacity may cause excessive heat generation or fire 6 Securely plug the power cord into the power source An insecure connection may cause a fire 7 When installing the camera fasten it securely and firmly A falling camera may cause personal injury 8...

Page 3: ...to it Keep away from a location subject to excessive vibration or magnetic interference 3 Do not use this product near water 4 The product shall not be exposed to dripping or splashing and no objects filled with liquids such as vases shall be placed on the product 5 Avoid aiming the camera directly towards extremely bright objects such as the sun as this may damage the image sensor 6 The Main plug...

Page 4: ... a long time please cover the lens cap to protect the device from dirt 16 Use only attachments accessories specified by the manufacturer 17 Always use hardware e g screws anchors bolts locking nuts etc compatible with the mounting surface and of sufficient length and construction to ensure a secure mount 18 Use only with cart stand tripod bracket or table specified by the manufacturer or sold with...

Page 5: ...e user s authority to use the equipment Trademark acknowledgments Digital Watchdog DW DW Spectrum MEGApix and Star Light are registered trademarks or trademark applications of Digital Watchdog in various jurisdictions Apple Apache Bonjour Chrome Ethernet Internet Explorer Linux Microsoft Mozilla Real SMPTE QuickTime UNIX Windows and WWW are registered trademarks of the respective holders Java and ...

Page 6: ...nt or relocate the receiving antenna Increase the separation between the equipment and receiver Connect the equipment into an outlet on a circuit different from that to which the receiver is connected Consult the dealer or an experienced radio TV technician for help Canada This digital apparatus complies with CAN ICES 3 Class B The product shall be connected using a shielded network cable STP that...

Page 7: ...ATION Installa on Connec ng to Monitors Control Board Adjus ng the Camera angle 12 14 16 18 APPENDIX Troubleshoo ng Specifications 32 33 7 OSD MENU Menu Tree Exposure Color Day Night Function Motion Privacy Setup Exit 19 20 24 25 26 27 28 29 31 36 LIMITS AND EXCLUSIONS 37 WARRANTY INFORMATION ...

Page 8: ... with intelligent camera sync DWC B6263WTIR model 150 Smart IR with intelligent camera sync DWC B6263WTIR650 model Smart DNR 3D digital noise reduction True day night mechanical IR cut filter De Fog extreme weather image compensation Highlight masking exposure HME Auto sensing 24VAC 12VDC with line lock Easy icon driven OSD menu with built in joystick Programmable Privacy Zones Auto gain control A...

Page 9: ...k Setup Installation Guides Mounting Template Screws Plas c Anchors 4pcs Moisture Absorber Absorber Guide Star Wrench T 20 DC Plug Cable Sunshield Cover Adjus ng Screws Please check that all items below are included in the package 9 ...

Page 10: ... Adjus ng Screws IR Module Lens Sunshield Cover Cable Guide Rubber OSD Joys ck UTP Coax switch Pan Tilt Rotate Stopper Screw UNIVERSAL DC12V AC24V CVBS UTP BLUE DOT RS 485 ORG D DOT D ALARM Power Cable Universal Cable CVBS Cable UTP Alarm RS485 10 ...

Page 11: ...Unit inches mm 8 75 222 5mm 9 92 252mm 3 28 83 5mm 3 62 92 2mm 5 07 129mm 3 68 93 5mm Dimension 3 81 97mm 4 ø0 16 ø4 2mm 3 07 78mm 11 ...

Page 12: ... recommended that you install the moisture absorber when mounting the camera The moisture absorber prevents moisture from being captured inside the camera s housing which may cause image performance issues and damage the camera NOTE The camera will generate enough heat to dry moisture during operation In most cases it will not need the moisture absorber for more than the first day In cases where t...

Page 13: ...roof 1 Remove the sun shield and front case from the camera 2 Unlock the zoom or focus screws by rotating them counterclockwise 3 Use the wrench included to adjust the zoom and focus screws at the base of the camera module to achieve a clear image 4 Tighten the screws and close the front case by rotating it clockwise Focus Lever Far Near Zoom Lever Wide Tele Front Cover 13 ...

Page 14: ...en the installation is complete softly wipe the lens cover with lens tissue or a microfiber cloth with ethanol to remove any dust or smudges left from the installation process 1 2 3 NOTE Electrical junc on box and required screws sold separately Cable Guide Rubber Based on the installation environment remove the rubber plug on the side of the camera s bracket and use the gap as a cable guide to pr...

Page 15: ...ht Le Up UTP COAX Down UNIVERSAL DVR Power Connec on 12VDC 24VAC Dual Voltage Auto Polarity Detec on and Protec on All cameras are equipped with a test video output for on site configura on UNIVERSAL COAX CVBS UTP Coax switch UTP COAX 12VDC 24VAC NOTE When switching to UTP Coax switch to Coax the image will not be output when switched to UTP 15 ...

Page 16: ...n UNIVERSAL DVR Power Connec on 12VDC 24VAC Dual Voltage Auto Polarity Detec on and Protec on All cameras are equipped with a test video output for on site configura on UTP Coax switch UTP COAX Balun Receiver at DVR side UNIVERSAL UTP NOTE When switching to UTP Coax switch to UTP the image will not be output when switched to Coax 12VDC 24VAC CVBS 16 ...

Page 17: ...E DOT RS 485 ORG D DOT D ALARM OSD joys ck default HD A Image Mode Switches to HD TVI mode when press OSD Joys ck to le 5sec or longer Switches to HD A mode when press OSD Joys ck to right 5sec or longer Switches to CVBS mode when press OSD Joys ck to up 5sec or longer Switches to HD CVI mode when press OSD Joys ck to down 5sec or longer 17 ...

Page 18: ...S485 Connectors Connect the camera to a controller or the DVR using RS485 Orange RS485 Orange Dot RS485 UTP Cable Connect when using UTP video output mode Blue Blue Dot Alarm Output Cable Cable to output Mo on Detec on signal Brown Alarm Brown Dot GND 18 ...

Page 19: ...Tilt 90 Rotate 360 Pan 360 Adjus ng the Camera angle Warning Do not rotate more than 360 Do not unnecessarily twist too many times 19 ...

Page 20: ... 60Hz ENG CHN CHN S JPN KOR OFF ON COMMUNICA CAM TITLE IMAGE RANGE FREQ LANGUAGE INITIAL EXIT JUMP OFF ON 0 15 OFF ON 0 59 0 33 0 60 0 34 0 20 0 20 0 20 0 3 PRIVACY ZONE NUM ZONE DISP H POS V POS H SIZE V SIZE Y LEVEL CB LEVEL CR LEVEL TRANS EXIT JUMP PRIVACY SETUP 4 5 OFF ON 0 4 OFF ON 0 10 OFF ON OFF ON OFF ON MOTION DET WINDOW DET TONE MDRECT FILL SENSITIVITY MOTION OSD TEXT ALARM SIGNAL OUT EX...

Page 21: ...an outdoor environment Select FLC if the camera is experiencing some flickering in the image The shutter speed will be set to 1 100 for NTSC or 1 120 for PAL If Manual is selected set the shutter speed from the options 1 30 1 25 1 30000 LENS LEVEL ___ BRIGHTNESS 10 SHUTTER AUTO FOCUS ADJ OFF RETURN LENS AUTO BACKLIGHT OFF DRC OFF DEFOG OFF AGC 10 STARLIGHT X4 3D DNR HIGH EXIT JUMP EXPOSURE 910 05 ...

Page 22: ... higher the number the zone will move to the right V POS Move the Zone position up or down The higher the number the zone will move down H Size Reset the zone s size horizontally The higher the number the right side panel will move further to the right V Size Reset the zone s size vertically The higher the number the bottom side panel will move further down WDR Wide Dynamic Range If WDR is selecte...

Page 23: ...nd DRC levels adjusted automatically Set the DEFOG level from LOW MIDDLE HIGH DEFOG 0 10 AGC enhances the picture brightness in low light conditions A higher level AGC setting makes the images brighter however it could increase the amount of noise OFF LOW MIDDLE HIGH 3D DNR reduces the noise on the screen in low light conditions and allows for clearer images even at night OFF x2 x32 Default X4 Aut...

Page 24: ...500K and tigher than 12000K PRESET Preset fixes the white balance based on the current lighting automatically MANUAL Users can control the white balance manually by changing RED GAIN and BLUE GAIN see blow C TEMP Select the color temperature for the white balance setup If enabled the Red and Blue Gain settings will be set automatically according to the C TEMP selected RED GAIN 0 20 Adjusts the amo...

Page 25: ...margin is too low the camera will switch from color to B W and back WITH LED CDS Threshold Marks the light level at which the camera will switch between color and B W The lower the value the camera will require less light more darkness to switch to Night Mode CDS Margin The value added to the CDS Threshold Adjust this based on the environment in which the camera is installed If the margin is too l...

Page 26: ... 10 Sets the image sharpness The higher the number the sharper the image GAMMA 2 0 45 0 75 Select the desired gamma level 0 55 is default setting MIRROR FLIP 3 OFF MIRROR Reflects the camera horizontally FLIP Reflects the camera vertically Mirror Flip ON Flip ON Mirror ON Mirror Flip OFF OSD Menu_Function 26 ...

Page 27: ...color available 3 MDRECT FILL Color setting for operating motion zone 4 To use the motion detection settings be fore Motion is ON TEXT ALARM 6 7 Setup a text to appear on the screen when motion is detected explaining the alarm situation WINDOW MOTION Will appear when a motion alarm is detected CAMERA MOVING Will appear if the camera is shaken abruptly MOTION OSD 5 MOTION ZONE display MOTION OSD in...

Page 28: ...e down H SIZE Reset the zone s size horizontally The higher the number the right side panel will move further to the right V SIZE Reset the zone s size vertically The higher the number the bottom side panel will move further down Y LEVEL The higher the number the brighter the color will appear CR LEVEL The higher the number the more red tone will be added to the zone s color The lower the number t...

Page 29: ...e following options 2400 4800 9600 57600 115200 bps SET DONE Set the value of CAM ID and BAUDRATE 2 CAM TITLE Add a name to the camera Set the title by using the OSD joystick IMAGE RANGE Image Range allows you to set the proper Black and White levels according to the external display you use FULL Display all BLACK level and WHITE level without compression COMP Display BLACK level and WHITE level w...

Page 30: ...ANGUAGE Select from the following English Default Chinese Chinese S Japanese and Koran 6 INITIAL Reset the camera to its default settings Press and hold the select button for five 5 seconds COMMUNICA CAM TITLE OFF IMAGE RANGE FULL FREQ 60Hz LANGUAGE ENG INITIAL OFF EXIT JUMP SETUP 910 05 13 7 3 6 4 5 9 5 OSD Menu_Setup 30 ...

Page 31: ...1 2 SAVE EXIT 1 Exit the OSD menu after saving the recent changes Exit the OSD menu without saving any changes EXIT 2 SAVE EXIT EXIT EXIT 910 05 13 7 3 6 4 5 9 5 OSD Menu_EXIT 31 ...

Page 32: ... securely Check the power supply and make sure the camera has the proper voltage and current Check UTP COAX switch inside the camera s housing and confirm the switch s posi on matches the signal connec on type FOR OUT OF FOCUS VIDEO Check the Front case cover and the lens for dirt or fingerprints Use a so cloth and gently clean The use of a field test monitor is recommended 32 ...

Page 33: ... OFF HME BLC WDR OFF x2 x32 LOW MIDDLE HIGH VIDEO Image Sensor Ac ve Pixels Scanning System Freguency Signal Technology Synchroniza on Resolu on Minimum Scene Illumina on Video Output 1 3 CMOS Sensors 1944 H x 1092 V Progressive scan 60Hz 50Hz 2 0 Megapixel Universal Internal 1920x1080 1080p30fps F1 4 30IRE 0 03 Lux Color F1 4 30IRE 0 Lux B W Universal Coax UTP HD A HD TVI HD CVI CVBS CVBS 33 ...

Page 34: ... On 4 3W 255mA DC12V AC24V 20 C 50 C 4 F 122 F No more than 90 Non Condensing IP66 FCC CE ROHS Aluminum 224 5 x 96 7Ømm 8 84 x 3 81Ø in 1 43 lbs OPERATIONAL CONT Digital Noise Reduc on White Balance Day and Night Auto Gain Control Mo on Detec on Privacy Zones Sharpness Gamma Remote Control OFF LOW MIDDLE HIGH AUTO AUTO EX PRESET MANUAL AUTO COLOR BW EXTERN 0 10 ON OFF 4 Zones ON OFF Box 16 Zones 0...

Page 35: ...e OPERATIONAL Alarm Output Shu er Speed Backlight Sens up Wide Dynamic Range WDR 6 50mm P Iris Vari Focal 150 1 3 CMOS Sensors 1944 H x 1092 V Progressive scan 60Hz 50Hz 2 0 Megapixel Universal Internal 1920x1080 1080p30fps F1 6 30IRE 0 039 Lux Color F1 6 30IRE 0 Lux B W 55dB Universal Coax UTP HD A HD TVI HD CVI CVBS CVBS 1 Alarm Output 1 30 25 1 30 000 OFF HME BLC WDR OFF x2 x32 LOW MIDDLE HIGH ...

Page 36: ...A 2 7W 160mA LED On 5 5W 320mA DC12V AC24V 20 C 50 C 4 F 122 F No more than 90 Non Condensing IP66 FCC CE ROHS Aluminum 252 x 96 7Ømm 9 92 x 3 81Ø in 1 65 lbs OPERATIONAL CONT Digital Noise Reduc on White Balance Day and Night Auto Gain Control Mo on Detec on Privacy Zones Sharpness Gamma Remote Control OFF LOW MIDDLE HIGH AUTO AUTO EX PRESET MANUAL AUTO COLOR BW EXTERN 0 10 ON OFF 4 Zones ON OFF ...

Page 37: ...r limitation of incidental or consequential damages or limitations on how long an implied warranty lasts so the exclusions or limitations listed above may not apply to you This warranty gives you specific legal rights and you may also have other rights that vary from state to state If the problem is not handled to your satisfaction then write to the following address Digital Watchdog Inc ATTN RMA ...

Page 38: ...materials and workmanship which arise during normal use This warranty does not cover damages that occurs in shipment or failures which are caused by products not supplied by the Warrantor or failures which result from accident misuse abuse neglect mishandling misapplication alteration modification faulty installation setup adjustments improper antenna inadequate signal pickup maladjustments of con...

Page 39: ...use 16220 Bloomfield Ave Cerritos CA USA 90703 PH 866 446 3595 FAX 813 888 9262 www Digital Watchdog com dw tech digital watchdog com Technical Support PH USA Canada 1 866 446 3595 International 1 813 888 9555 French Canadian 1 904 999 1309 Technical Support Hours Monday Friday 9 a m to 8 p m Eastern Time ...

Reviews: