background image


DataPocket 

User’s Guide


4.


Powering DataPocket 

DataPocket is powered by the USB Port on your computer and in normal situations 
does not require external power. However, in some cases, your computer may not be 
able to provide sufficient power.   

Possible situations that may cause insufficient power are: 


Plugging DataPocket into a damaged USB Port on your computer that does 
not provide the standard power level. 


Plugging DataPocket into a USB Hub that is not powered by an external 
power adapter. 


Plugging DataPocket into a USB Hub that is powered by an external power 
adapter, but is connecting other devices with high power requirements. 

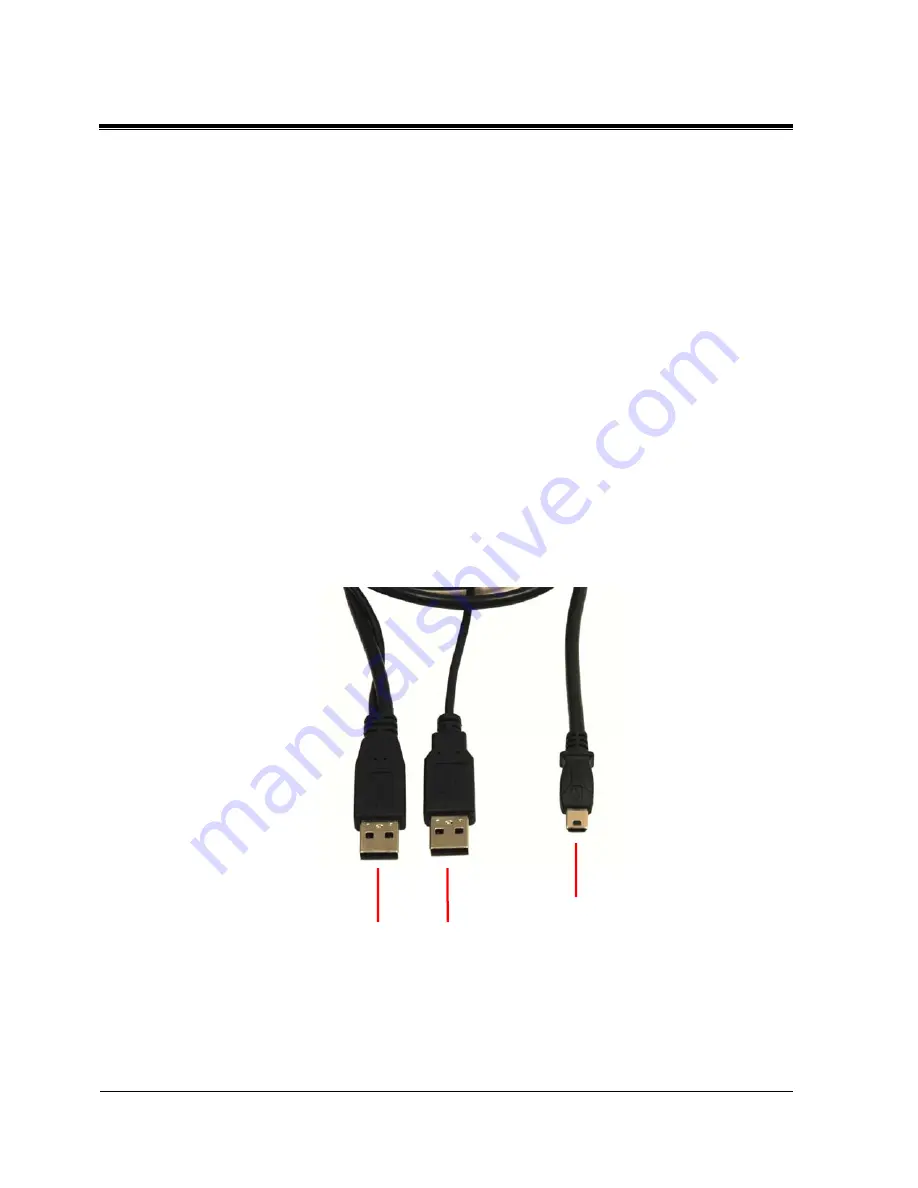
To correct this situation, there are two ways you can supply more power to 
DataPocket. 

1)


Plug the Power Only USB connector to a second USB Port on your computer 
while keeping the Main USB connector plugged in. 

Mini-USB 

Main USB 

(To Computer)

Power Only USB  (To DataPocket) 

(To Computer) 


Page 22


Revision 1.3 

Summary of Contents for DataPocket DPK-250

Page 1: ...DataPocket U UL LT TR RA A S SL LI IM M P PO OC CK KE ET T S SI IZ ZE ED D H HA AR RD D D DR RI IV VE E W WI IT TH H S SM MA AR RT T B BA AC CK KU UP P User s Guide...

Page 2: ...ci Inc All rights reserved This publication is intended for sole use by the owner of the associated device Neither this publication nor any part of this publication may be printed and distributed elec...

Page 3: ...igital Foci Inc makes for the Device To the extent allowed by Law no other warranty applies whether expressed implied or statutory including any warranty of merchantability of fitness for a particular...

Page 4: ...ight in a parked car or in other situations where the temperature may be above 140 F 60 C To prevent risk of short circuit and damage do not expose DataPocket to liquids precipitation or moisture To a...

Page 5: ...ckup Utility 12 3 2 Accessing DataPocket Smart Backup Utility Configuration Menu 13 3 3 DataPocket Smart Backup Utility Window Flow 14 3 4 Managing Your Backup Task List 15 3 5 Adding Editing and Dele...

Page 6: ...computers as well as carry your collection of music and photos with you right in your pocket 1 1 System Requirements 1 Computer running any of the following operating systems o Windows 98 SE Windows 2...

Page 7: ...nchronize files between multiple computers Archive important but infrequently accessed pictures music and other files Carry your personal library of photos music and videos with you to share with your...

Page 8: ...o use this additional USB connector To connect DataPocket to your computer plug in the USB connectors in the following order 1 Plug the Main USB connector to a free USB Port on your computer 2 Plug th...

Page 9: ...ze DataPocket See Section 5 Installing Windows 98 Driver on page 24 for instructions 2 4 Safely Removing DataPocket from Your Computer To properly remove DataPocket from your computer disable the devi...

Page 10: ...l drive letter may vary depending on your computer configuration 3 Select this hardware device by left clicking on the name 4 You will see a confirmation message telling you that it is safe to remove...

Page 11: ...2 Connect DataPocket to your computer For detailed instructions see Section 2 3 Connecting DataPocket to Your Computer on page 9 Note DataPocket must be connected to your computer during the DataPocke...

Page 12: ...nd corner of your screen Double click on the icon to open the main configuration screen of DataPocket Smart Backup Utility Note If the utility is not running you can start it by clicking on the progra...

Page 13: ...DataPocket User s Guide 3 3 DataPocket Smart Backup Utility Window Flow The following diagram explains the DataPocket Smart Backup Utility window flow Page 14 Revision 1 3...

Page 14: ...dow To add delete or edit tasks click Add Task Delete Task or Edit Task To clear all existing backup tasks and start from a blank list click Clear List To save the existing list of backup tasks click...

Page 15: ...ndow using the buttons on the right side of the window 3 5 1 Adding and editing backup tasks To add a new task click Add Task and the Task Settings window will open To edit an existing task select the...

Page 16: ...d their contents within the selected directory for the backup If Subdirectory is not checked only the files located in the selected directory will be backed up Overwrite Checking Overwrite will allow...

Page 17: ...g backup tasks From the Manage Backup Tasks window To delete an existing task select the task to be deleted and click Delete Task To delete all your existing backup tasks and start from a blank list c...

Page 18: ...tuations and run them only when the need arises Open the Active Task List window by clicking the Active Task button on the Manage Backup Tasks window From the Active Task List Window select the task a...

Page 19: ...Running Your Task List There are two ways to run your DataPocket Smart Backup 1 By pressing the Smart Backup Button on DataPocket Smart Backup Button 2 By clicking Run from DataPocket Smart Backup Ut...

Page 20: ...arning DO NOT disconnect the USB cable while data is being transferred between DataPocket and your computer Unplugging DataPocket while data is being transferred may crash your computer and cause data...

Page 21: ...es not provide the standard power level Plugging DataPocket into a USB Hub that is not powered by an external power adapter Plugging DataPocket into a USB Hub that is powered by an external power adap...

Page 22: ...Adapter Jack AC Adapter Specifications Output Voltage DC 5V Output Current 2 0A Plug length 0 38 9 6 mm Inner hole 1 3 Outer hole 3 5 Warning DO NOT use a power adapter that is over DC 5V Doing so ma...

Page 23: ...iver installation 5 Follow the installation instructions on the Install Wizard screens 6 After the Install Wizard has finished restart your computer to complete the installation 7 Once your computer h...

Page 24: ...depending on your level of computer activity Special Events You should always back up your computer right after special events where you significantly changed your computer contents For instance after...

Page 25: ...at you deleted or changed before the most recent backup If you keep multiple versions of the same backup task you have the option of going back two three or however many versions you keep to find the...

Page 26: ...the backup folder name If you prefer to view your backups grouped by name put the date code at the end Use special characters to organize your backup folder listing In addition to using numbers and le...

Page 27: ...ile it is connected to your computer and transferring data Second periodically run Error checking Scan Disk Defragmentation and other hard disk drive maintenance programs on DataPocket Your computer s...

Page 28: ...ction 4 Powering DataPocket on page 22 for more detail The data transfer between my computer and DataPocket is slow DataPocket might be connected to a USB 1 1 port instead of a USB 2 0 port DataPocket...

Page 29: ...r Computer on page Technic the device was disconnected in an unsafe wa DataPocket was not disabled before it was See Section 2 4 Safely Removing DataPo 10 for more detail al Support Contact re still h...

Page 30: ...E XP Home Pro Macintosh OS 9 x and 10 0 x and higher Linux OS kernel versions 2 4 x and higher Software DataPocket Smart Backup Utility Windows OS Only Dimensions L x W x H 5 4 x 3 1 x 0 6 in 138 x 80...

Page 31: ...stions don t help consult your computer dealer or an experienced radio TV technician for more suggestions is device complies with Part 15 of the FCC Ru 1 This device may not cause harmful interferenc...

Page 32: ...3111 Via Mondo Rancho Dominguez California United States 90221 Copyright 2005 Digital Foci Inc All rights reserved...

Reviews: