background image

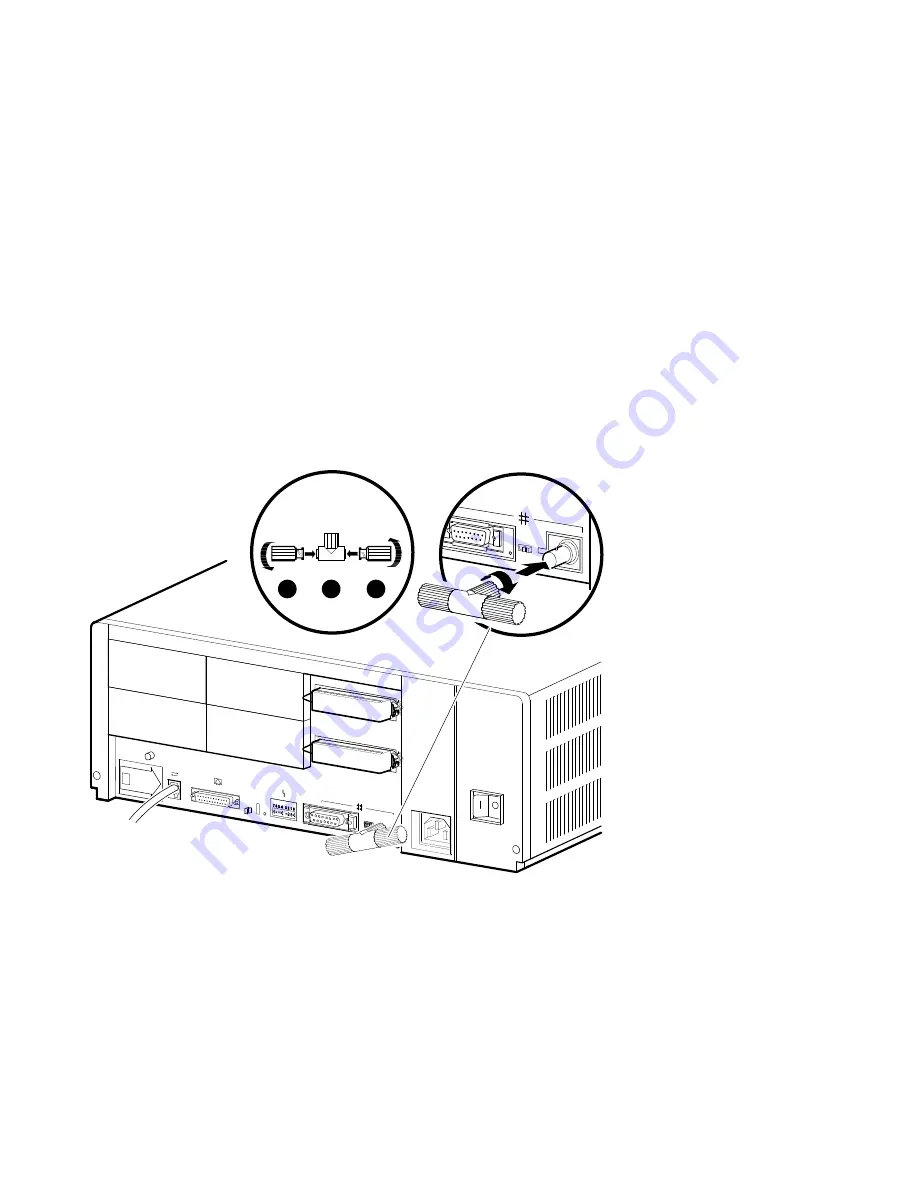
Step 4: Connecting the ThinWire Terminator

1.

Assemble the T-connector and the two terminators to form a ThinWire
terminator.

2.

Connect the ThinWire terminator to the system unit.

1

3

2

OPAO

1

2

2

MLO-012031

!

T-Connector

"

Terminator

1–4 Installation Procedure

Summary of Contents for MicroVAX 3100 Model 85

Page 1: ...tion Order Number EK A0716 IN C01 DATE 1995 This manual describes how to install and test the MicroVAX 3100 Model 85 Model 95 and Model 96 Revision Information This manual supersedes EK A0716 IN B01 Digital Equipment Corporation Maynard Massachusetts ...

Page 2: ...he user at his own expense will be required to take whatever measures may be required to correct the interference Warning This is a Class A product In a domestic environment this product may cause radio interference in which case the user may be required to take adequate measures This warning only applies to the MicroVAX 3100 Model 85 Achtung Dieses ist ein Gerät der Funkstörgrenzwertklasse A In W...

Page 3: ...ng the Standard Ethernet Loopback Connector 1 5 Step 6 Connecting the Power Cord 1 6 Step 7 Turning on the Console Terminal and System Unit 1 7 Step 8 Checking the Power Up Test Results 1 8 Step 9 Connecting the System to a Network 1 10 Step 10 Connecting External Options to the System 1 10 Step 11 Booting the Operating System 1 10 Figures 1 1 Successful Power Up Test Screen 1 8 1 2 Unsuccessful P...

Page 4: ......

Page 5: ...for anyone who wants to install the MicroVAX 3100 Model 85 95 96 It is written for both experienced and inexperienced users Structure of This Manual The procedure for installing the MicroVAX 3100 Model 85 95 96 is presented in only one chapter Each section in the chapter represents a major step in the procedure and contains detailed instructions to follow Additional Information See the MicroVAX 31...

Page 6: ...ntion Description MONOSPACE type Text displayed on the screen is shown in monospace type italic type Italic type emphasizes important information and indicates the complete titles of manuals Note A note contains information that is of special importance to the user vi ...

Page 7: ...it at least 1 metre 3 feet from heaters photocopying machines or other operating equipment Place the system unit in a well ventilated location Place the system unit on a work surface which is raised above the floor Keep the air vents on either side of the system unit clear Do not place the system unit on its side Do not expose the system unit to direct sunlight or abrasive particles Note A console...

Page 8: ...th all basic systems If you do not have all the parts listed contact your Digital Sales representative RE_EN06058A_91 1 2 3 4 5 6 7 System Unit DEC423 Terminal Cable BC16E 25 One ThinWire Ethernet T Connector H8223 and Two Terminators H8225 Standard Ethernet Loopback Connector 12 22196 01 RS232 to DEC423 Adapter H8575 A Power Cord Documentation and Software Licenses 1 2 Installation Procedure ...

Page 9: ...nd of the terminal cable to a DEC423 MMJ communications port on the console terminal If your terminal has only RS232 ports use the RS232 to DEC423 adapter H8575 A to provide an MMJ port on the terminal 3 If you want remove the label covering MMJ ports 0 and 1 1 3 2 OPAO 1 OPAO MLO 012030 2 Terminal Cable Label Installation Procedure 1 3 ...

Page 10: ...Wire Terminator 1 Assemble the T connector and the two terminators to form a ThinWire terminator 2 Connect the ThinWire terminator to the system unit 1 3 2 OPAO 1 2 2 MLO 012031 T Connector Terminator 1 4 Installation Procedure ...

Page 11: ...the Standard Ethernet Loopback Connector Connect the standard Ethernet loopback connector 12 22196 01 to the system unit 1 3 2 OPAO 1 MLO 012032 Standard Ethernet Loopback Connector 12 22196 01 Installation Procedure 1 5 ...

Page 12: ...that the on off switch is in the off O position 2 Connect the power cord to the system unit 3 Connect the other end of the power cord to an isolated grounded circuit 1 3 2 OPAO 2 1 MLO 012033 On Off Switch Power Cord 1 6 Installation Procedure ...

Page 13: ... test See the terminal documentation for more information 2 Check the terminal settings See the MicroVAX 3100 Model 85 95 96 Operator Information manual for the list of correct settings 3 Turn on the system unit by setting the on off switch to the on position 1 3 2 OPAO 1 MLO 012034 On Off Switch Installation Procedure 1 7 ...

Page 14: ...1 60 59 58 57 56 55 54 53 52 51 50 49 48 47 46 45 44 43 42 41 40 39 38 37 36 35 34 33 32 31 30 29 28 27 26 25 24 23 22 21 20 19 18 17 16 15 14 13 12 11 10 09 08 07 06 05 04 03 Tests completed Central Processing Unit CPU name Firmware version number and Virtual Memory Boot VMB version number Read Only Memory ROM based diagnostics countdown Status message Console prompt 1 Write down the error messag...

Page 15: ...0 cesr 00000000 intmsk 00 icsr 01 pcsts FA00 pcadr FFFFFFF8 pcctl FC13 cctl 00000020 bcetsts 0360 bcedsts 0F00 cefsts 00019200 nests 00 mmcdsr 01FE6600 mesr 00000000 58 57 56 55 54 53 52 51 50 49 48 47 46 45 44 43 42 41 40 39 38 37 36 35 34 33 32 31 30 29 28 27 26 25 24 23 22 21 20 19 18 17 16 15 14 13 12 11 10 09 08 07 06 05 04 03 16 MB RAM SIMM Set 0A 0B 0C 0D present Memory Set 0 00000000 to 00...

Page 16: ...Step 10 Connecting External Options to the System If you want to connect external options to the system see the MicroVAX 3100 Model 85 95 96 Operator Information manual Step 11 Booting the Operating System The system is supplied with factory installed software FIS on the system disk Boot the operating system following the procedures in the OpenVMS Factory Installed Software User Information 1 10 I...

Page 17: ... Digital Equipment Corporation P O Box CS2008 Nashua NH 03061 Puerto Rico Phone 809 781 0505 Fax 809 749 8377 Digital Equipment Caribbean Inc 3 Digital Plaza 1st Street Suite 200 Metro Office Park San Juan Puerto Rico 00920 Canada Phone 800 267 6215 Fax 613 592 1946 Digital Equipment of Canada Ltd 100 Herzberg Road Kanata Ontario Canada K2K 2A6 Attn DECdirect Sales International Local Digital subs...

Page 18: ......

Page 19: ...ity easy to understand Organization structure of subject matter Figures useful Examples useful Index ability to find topic Page layout easy to find information I would like to see more less What I like best about this manual is What I like least about this manual is I found the following errors in this manual Page Description Additional comments or suggestions to improve this manual For software m...

Page 20: ... FIRST CLASS PERMIT NO 33 MAYNARD MASS POSTAGE WILL BE PAID BY ADDRESSEE No Postage Necessary If Mailed in the United States DIGITAL EQUIPMENT CORPORATION Shared Engineering Services MLO5 5 E76 2 THOMPSON STREET MAYNARD MA 01754 1716 Do Not Tear Fold Here ...

Reviews: