background image

-11-

The HDD unit's installation and system data settings are as follows.

1)

 Install the HDD unit in the PS-B. Refer to 

2 Installation

 for details. If the

HDD unit is already installed, this step is not necessary.

2)

Connect a Display and PS/2 keyboard to the PS-B.

Use a display with SVGA (800 x 600) or more resolution and 16 bit
color or more.

3)

Turn on the PS-B unit's power supply and use the following steps to set up
the system data and recognize the HDD unit.

Normally, use the factory (initial) settings.

Your PS-B unit's system data screen menus may differ slightly from
these due to installation of newer software.

The following explanation uses the PS-B unit's factory settings.

3

Hardware Setup

4)

When the start-up screen appears, press your PC’s [F2] key to go to the
BIOS Setup Screen. In the Setup Screen, select [Standard CMOS Features],
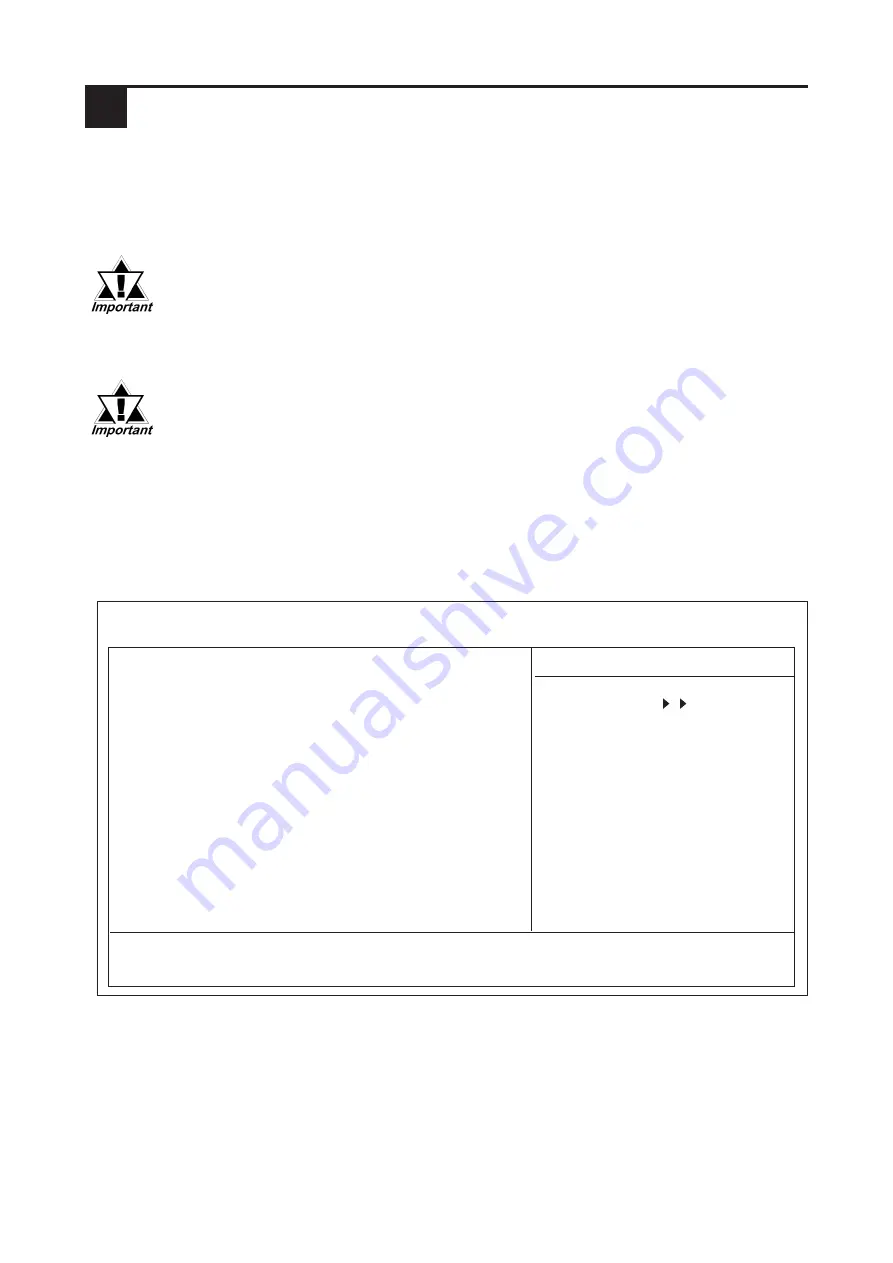
then select [IDE Primary Master].  The following screen will appear.

5)

 Confirm whether "AUTO" is selected for IDE Primary Master. Also, confirm

whether "AUTO" is selected for the [Access Mode].  If AUTO is not selected,
change these settings to AUTO with the + or - key.  If AUTO is selected in
both, disk parameters will be automatically read when the PS-B is turned ON.
The factory setting is AUTO and recommended for most users.

6)

 After all changes are made, press the ESC key and select [Save & EXIT Setup]

to save the settings.  The OS will then start.


IDE HDD Auto-Detection

[Press Enter]

   IDE Primary Master

[Auto]

   Access Mode

[Auto]

   Capacity

0 MB

   Cylinder

0

   Head

0

   Precomp

0

   Landing Zone

0

   Sector

0

↑↓→←

:

Move   Enter:Select   +/-/PU/PD:Value   F10:Save   ESC:Exit   F1:General Help

F5:Previous Values    F6:Fail-Safe Defaults     F7:Optimized Defaults

Phoenix- AwardBIOS CMOS Setup Utility

IDE Primary Master


Item Help

Menu Level

To auto-detect the
HDD's size, head...on
this channel

Summary of Contents for PS-2000B Series

Page 1: ...ge Preinstalled Hard Disk Unit Installation Guide The PS 2000B Series Windows XP Multi Language Preinstalled Hard Disk Unit is a set that includes the HDD drive with Microsoft corporation s preinstalled Windows XP operating system as well as other driver and utility software used when operating Pro face s PS 2000B Series computers hereafter referred to col lectively as the PS B Corresponding model...

Page 2: ...OR USE RIGHTS a Specific Use Digital Electronics Corporation designed this device for a specific use You may only use the software for that use b Other Software You may use other programs with the software as long as the other programs directly support the manufacturer s specific use for the device or provide system utilities resource management or anti virus or similar protection Software that pr...

Page 3: ... content these features send to Microsoft the type of operating system name and version of the software you are using type of browser and language code of the device where the software was installed Examples of these features are clip art templates online training online assistance and Appshelp You may choose not to use these web content features Windows Media Digital Rights Management Content own...

Page 4: ...ich a malfunction of the software would result in foreseeable risk of injury or death to any person This includes operation of nuclear facilities aircraft navigation or communication systems and air traffic control 10 NO WARRANTIES FOR THE SOFTWARE The software is provided as is You bear all risks of using it Microsoft gives no express warranties guarantees or conditions Any warranties you receive...

Page 5: ...ower is ON Do not use the HDD unit in locations where corrosive gasses are present since they can lead to a hard disk breakdown To prevent damage to file data be sure to shut down the PS B unit s OS before turning OFF the main power To prevent HDD memory leaks restart the OS periodically In order to extend the lifetime of the hard disk Pro face recommends you set the Windows Control panel Power Ma...

Page 6: ...ly and or prepare a backup HDD unit The HDD unit s lifetime will vary depending on the usage condi tions and environment The above value is calculated assuming an ambient temperature of 20o C and 333 hours of operation per month HDD access frequency of 20 or less Features Windows XP Multi Language Preinstalled HDD unit Capacity Average Seek Time AtStartup 4 5W TYP Read Write 1 6 1 6W TYP During Wa...

Page 7: ...disk s usage lifetime A wet bulb tem perature of 29o C or less is recommended This is equivalent to the following data In order to extend the lifetime of the hard disk Pro face recom mends you set the Windows Control panel Power Management option Turn off hard disks selection to turn the hard disk off when the unit is not being operated A setting of 5 minutes is rec ommended Environment Temperatur...

Page 8: ...stall the HDD unit in the PS B WARNINGS Shock Danger Be sure to unplug the PS B unit from its power supply prior to installing the HDD unit WARNING 1 Lay the PS B unit on its side and unscrew the four 4 cover attachment screws 2 Slide the cover horizontally in the direction shown by the arrow see diagram and lift it out from the PS B unit Go to step 3 Cover Step 2 Step 1 2 Installation Cover Step ...

Page 9: ...DD unit To do this please perform the following steps 1 Loosen the two 2 maintenance cover attachment screws 2 Tilt the maintenance cover up as shown by arrow a and lift it out in the direction shown by arrow b see diagram Go to step 3 b a Cover Screws Cover Screws b a ...

Page 10: ...iagram The torque should be 0 5 to 0 6 N m 5 Replace the PS B unit s cover and reattach all four 4 attachment screws The torque should be 0 6 to 0 8 N m If you used the maintenance cover replace that cover and fasten the its two 2 attachment screws The torque should be 0 5 to 0 6 N m IDE I F 1 Cable HDD unit Front of PS B unit ...

Page 11: ...een In the Setup Screen select Standard CMOS Features then select IDE Primary Master The following screen will appear 5 Confirm whether AUTO is selected for IDE Primary Master Also confirm whether AUTO is selected for the Access Mode If AUTO is not selected change these settings to AUTO with the or key If AUTO is selected in both disk parameters will be automatically read when the PS B is turned O...

Page 12: ...tents press Yes I accept if you agree and click Next to continue 3 The Help protect your PC screen will appear Choose whether to update Windows automatically To enable the Automatic Updates check on Help protect my PC by turning on Automatic Updates now recom mended To disable it check Not right now Click Next to continue 4 The What s your computer s name screen will appear After entering the comp...

Page 13: ...rosoft now If not check No not at this time Press Next 9 The Who will use this computer will appear Up to 5 names can be entered for a user s name After entering the user s name click Next to continue 10 The Thank you screen will appear Click Finish to complete the setting As for how to change BIOS Setting refer to the PS 2000B Series User Manual After changing the BIOS restart the Windows and mak...

Page 14: ...ice 3 Press the F10 key to save the setting and restart the PS B unit 4 After the PS B unit restarts the Symantec Ghost TM will automatically start 5 After the Symantec Ghost TM starts the Question dialog box will appear Partition sizes correct 6 The volume displayed in New Size will be recovered After confirming it press the Yes button To change it press the No button and go to the Destination Dr...

Page 15: ...up of important HDD unit data to either floppy disks or other type of suitable magnetic media is strongly recommended 9 After the recovery operation finishes Symantec Ghost TM finishes and the following message will appear After the message appears turn off the power supply of the unit Please turn off the computer 10 After turning on the power supply once again push the F2 key to go to the BIOS Se...

Page 16: ...0 5 JM A Note Please be aware that Digital Electronics Corporation shall not be held liable by the user for any damages losses or third party claims arising from the uses of this product Digital Electronics Corporation 8 2 52 Nanko Higashi Suminoe ku Osaka 559 0031 Japan URL http www pro face com ...

Reviews: