background image

13.

Functions - Video Mode / Music Mode
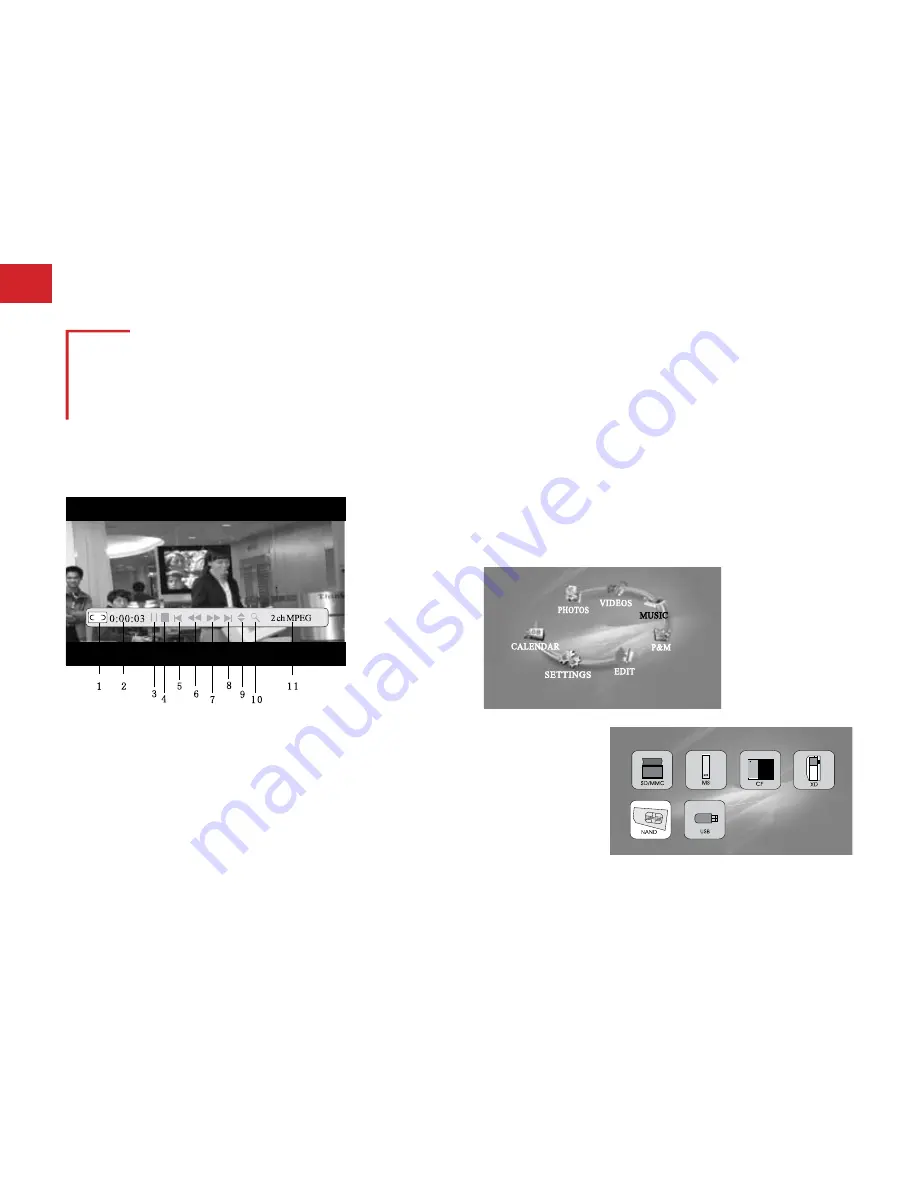
VIDEOS Mode:


While videos are being played, OSD button will activate  
“On Screen Display”.

1. Status 
2. Playing time 
3. Pause 
4. Stop 
5. Previous movies 
6. Fast forward 


7. Fast forward 
8. Next movie 
9. File information 
10. Enlarge 
11. Dual file view 
      

1. File information 

       2. Play mode

MUSIC Mode: 
Note:- The MUSIC button on the remote control will  
access your music files instantly.


On the main menu, move the cursor onto the “MUSIC” icon 
(words below icon will turn black) by pressing left and right 
buttons on the remote control or the onboard buttons.

Press Enter button to 
access Media Memory 
Device of choice.

C F

Select your Media Memory 
Device of choice.

14.

Functions - Music Mode / P&M Mode

Move the dark blue cursor onto the target file in the music 
format list by using up and down buttons and press enter.

After pressing enter button, 
the product will circularly 
play all music stored in the 
media memory device from 
the selected file.

1. Status 
2. Playing time 
3. Pause 
4. Stop 
5. Previous 
6. Fast rewind 

7. Fast forward 
8. Next music 
9. Music information 
10. File information 
11. Play mode

P&M Mode  
 Note:- The P&M button on your remote will 
play photos and music instantly from the  
internal memory. 

To access P&M Mode: On the 

main menu, move the cursor onto the “P&M” 
icon (the words below the icon will turn black) by 
pressing the left and right buttons on the remote 
control or onboard buttons.

C F

Press Enter button to access Media 

Memory Device of choice.

Move the dark blue cursor to select media memory device by 
using up and down buttons and press enter button to access 
photos, music and file folders.

Note:- Photos and music must be stored on the same media 
memory device (e.g. memory cards or internal memory).

Summary of Contents for DF-F7005b

Page 1: ...Bringingmemoriestolife Product User Manual Model No s DF F7005b F7006w F7007s F7008t The moment keeps going Jackie on holidays Great ocean road Melbourne 7 Centurian series ...

Page 2: ...d moments that you encounter through your journey are Now they can be treasured in high quality digital form Your DigiFrame is designed to bring your digital photos out of your computer and into your life It is packed with great features like movies functions to help you get the most out of your special moments 1 ...

Page 3: ...Jess Chris Friends forever What s inside Welcome 1 Safety Information 3 On board buttons 4 Accessories 6 Remote Control 7 Connection 8 Start up setting 10 Functions 11 Technical Parameters 19 2 ...

Page 4: ...es heat 5 Use only the accessories supplied with the product 6 Avoid leaving product live plugged in to power point for long periods of nil use 7 If you encounter any needs for service or repair for all non functions please return it to Digiframe Application for repair is only accepted when the product is damaged Non acceptable claims for repair include for example power supply cable or socket is ...

Page 5: ...4 On board Buttons Front cover Panel Remote control sensor Protection plastic ...

Page 6: ...Cont 1 Menu button 2 Enter button 3 Right button 4 Left button 5 Up button 6 Down button 7 Mini USB jack 8 Ear phone jack 9 AV out 10 DC power 11 Power switch 12 USB socket 13 CF card socket 14 SD MMC MS XD card sockets ...

Page 7: ...6 Accessories Standard Accessories 1 Power Adapter 2 USB Cable 3 AV Cable 4 Remote Control 5 Stand My favorite flower Grandad gardening ...

Page 8: ...r Right Button move cursor OK Button Confirm or Enter Stop Button Play Pause Button Auto Manual Slidehow Fast Rewind Button Fast Forward Button Previous Button Next Button Increase volume Decrease volume Enlarge photo by 5 times Rotate photo by 90 angle Display nine images in one screen Thumbnail view Return to main menu AV OUT Mode Access CALENDAR Mode 7 RemoteControl MUTE PHOTOS VIDEOS MUSIC P M...

Page 9: ...The stand can be installed in either vertical or horizontal orientation Below is an illustration of installing the stand in landscape horizontal orientation Connect the adapter to the power supply and to the machine as shown to the right 2 1 ...

Page 10: ...r DigiFrame to a computer Use the supplied USB Cable This function is only for models with an internal memory device Note Should be turned on when it is connected to a computer Cannot be operated when connected to a computer Should be restarted after USB cable is disconnected from a computer 1 2 3 ...

Page 11: ...right button Then press the enter button to go to the settings menu To access MAIN MENU push MENU Use the up and down buttons to go to the settings menu for languages pictures clock alarm start up video and default settings Press enter to go to the sub menu and use up down and enter buttons to make your selections After finishing settings press the left button to go back to previous menu or press ...

Page 12: ...e words below the icon will turn black by pressing left and right buttons on the remove control or onboard buttons Navigate through preview of photo files to select desired photo press enter to start slideshow from the selected file Move the dark cursor onto the target file in photo format by using up and down buttons C F Press Enter button to access or watch the Media Memory device of choice ...

Page 13: ... The VIDEO button on the remote control will access internal memory videos instantly To access VIDEOS Mode On the main menu move the cursor onto the VIDEOS icon words below the icon will turn black by pressing the left and right button on the remote control or the photo frame C F Press Enter button to access Media Memory Device of choice Navigate to desired video file and press enter to play video...

Page 14: ...mation 10 Enlarge 11 Dual file view 1 File information 2 Play mode MUSIC Mode Note The MUSIC button on the remote control will access your music files instantly On the main menu move the cursor onto the MUSIC icon words below icon will turn black by pressing left and right buttons on the remote control or the onboard buttons Press Enter button to access Media Memory Device of choice C F Select you...

Page 15: ... mode P M Mode Note The P M button on your remote will play photos and music instantly from the internal memory To access P M Mode On the main menu move the cursor onto the P M icon the words below the icon will turn black by pressing the left and right buttons on the remote control or onboard buttons C F Press Enter button to access Media Memory Device of choice Move the dark blue cursor to selec...

Page 16: ...ss enter until files in music format are displayed EDIT Mode To access EDIT Mode On the main menu move the cursor onto the EDIT icon words below the icon will turn black by pressing the left and right buttons on the remote control or onboard buttons C F 1 Music mode control 2 Photos mode control Only available memory devices can be accessed Press enter to access Media Memory Device of choice P M O...

Page 17: ... storage device you wish to copy from delete choose enter button to select Move the cursor onto the target file by using up and down buttons Press right button to mark it as a file to be copied A symbol will appear next to file name You can mark multiple files Press the left arrow button to return to memory devices page Navigate to the memory device you wish to paste to Press enter to open Media M...

Page 18: ...nish on the screen press enter button to finish the operation To delete a file choose EDIT icon from the main menu C F DELETE FILES Select the Media Memory Device of choice Press the OSD Calendar button and 3 icons will appear as below Navigate to paste and press ok ...

Page 19: ...mote and navigate to settings Navigate to Clock set push enter Use up and down arrows to adjust time date Use left right arrows to navigate between dates times etc Press enter button to go to the files and use up and down buttons to choose the file that is to be deleted Then press right button to mark icon will appear as a file to be deleted Press OSD button on remote control and choose delete bin...

Page 20: ...XD USB Multi media formats supported MP3 WMA JPEG JPG MPEG1 MPEG 2 MPEG 4 Divx Xvid Text formats supported TXT Ports Two USB ports one performs host function earphone device Power supply DC9V 1 5A Model Arcylic front cover These parameters are for reference only Any change shall be subject to products without further notice ...

Page 21: ...enjoy your Digiframe and all your special memories For additional hints tips visit us at www digiframe com au For repairs service please contact CUSTOMER SERVICE on 1300 559 881 or email support digiframe com au 20 ...

Reviews: