background image

888/24 I/O

20

The Calibration Process

Analog 

To calibrate the input level of an an-

alog device to a mixing console’s output 
level, you would typically send a 1 kHz 
tone at 0 VU from the console to the ana-
log deck and align the recording deck’s 
meters to read 0 VU. 

Digital 

With a digital recording device such 

as the 888/24 I/O, however, in order to al-
low for headroom, you must align a 0 VU 
tone from the console to a value less than 
zero on the 888/24 I/O, by exactly the 
amount of headroom that you want. 

For example, to have 12 dB of headroom 
above 0 VU with the 888/24 I/O, you must 
align the incoming 0 VU 1kHz tone to a 
level of –12 dB. For 18 dB of headroom, 
you would align it to –18 dB. (Since it is as-
sumed that you are using the 888/24 I/O 
with a +4 dBu console, a 0 VU signal level 
coming out of the console is actually equiv-
alent to a n4 dBu level signal.)

Calibrating The 888/24 I/O

If you are using Pro Tools 4.3.1 or earlier, 
you can use the Calibration Tool applica-
tion (available on your Pro Tools Installer 
CD-ROM) to calibrate the outputs and in-
puts of the 888/24 I//O.

If you are using Pro Tools 5.0 or later, refer 
to Appendix B: Calibrating the 888/24 I/O 
(Pro Tools 5.0)
 for calibration instructions.

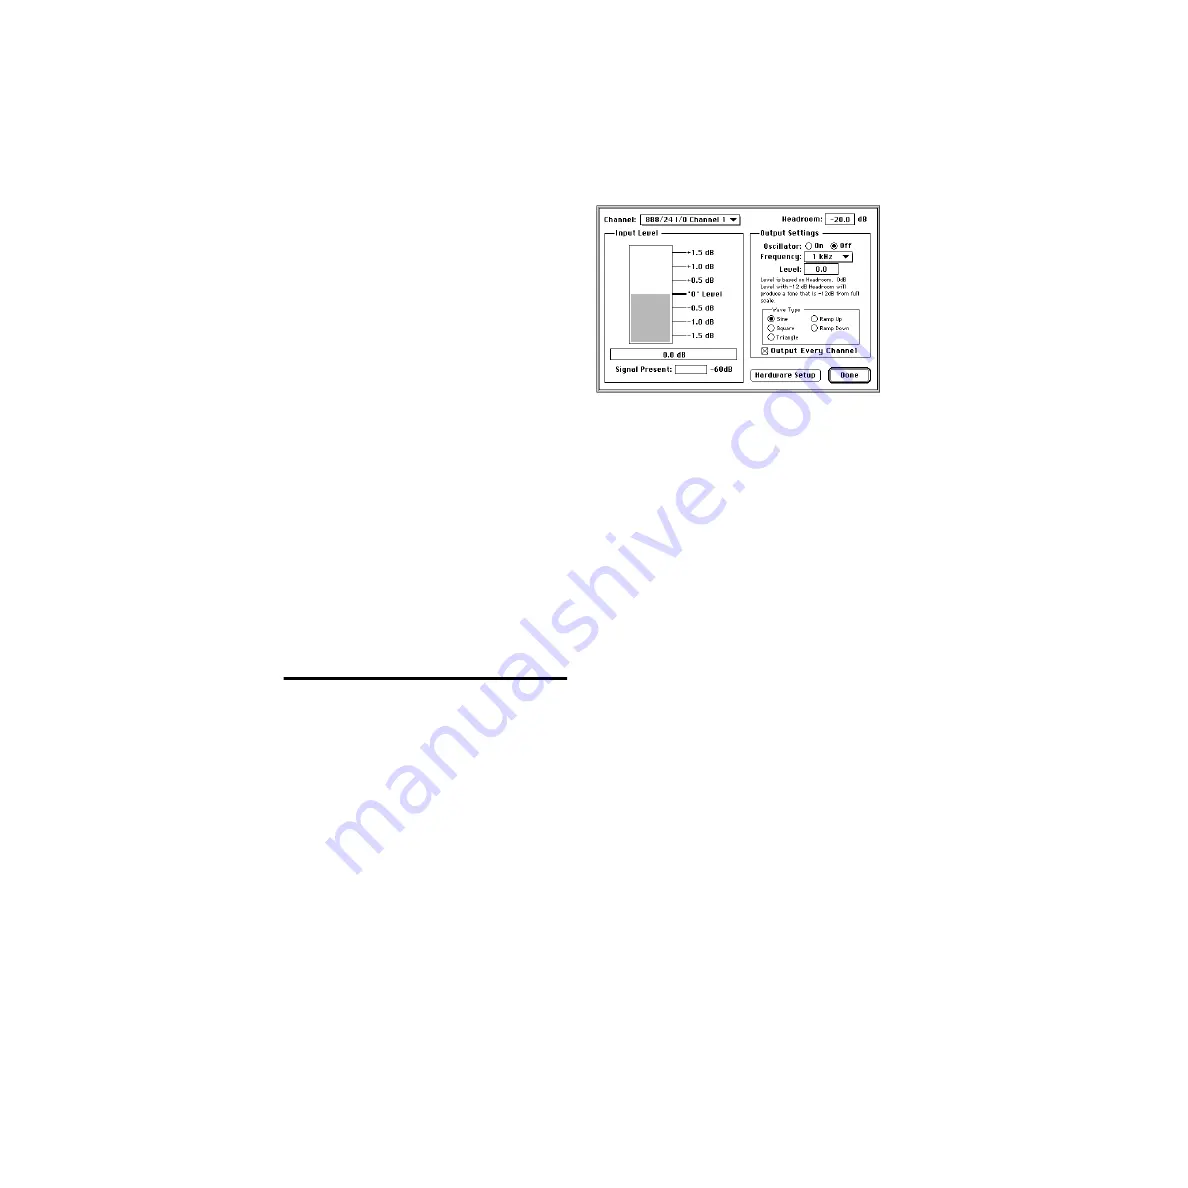
The Calibration Tool software

The Calibration Tool has the following 
controls:

Channel 

Use this pop-up to select the input 

channel for the input level readings.

Input Level 

Use this as a graphic and nu-

merical display of the dB level relative to 
the headroom you have specified on that 
particular interface. (In other words, the 
amount of dB below digital clipping, or the 
amount of analog headroom you wish to 
use in your system.)

Signal Present 

This indicates when a 

–60 dB signal relative to the headroom is 
present at the input. 

Headroom 

Use this field to enter an amount 

of headroom between your 0 dB level and 
the 888/24 I/O full scale digital value. Any 
values above the full scale digital value will 
cause digital clipping.

Oscillator 

Use this to turn the audio wave-

form generator on or off.

Frequency  

Click on this pop-up to select 

the output frequency of the audio wave-
form generator. You can choose a 100 Hz, 
1 kHz, or 10 kHz signal.

Summary of Contents for 888/24 I/O

Page 1: ...fax 650 842 7999 Technical Support USA 650 842 6699 650 856 4275 Product Information 650 842 6602 800 333 2137 Fax on Demand 1 888 USE DIGI 873 3444 World Wide Web www digidesign com Digidesign FTP Si...

Page 2: ...was tested for CISPR compliance under conditions that included the use of peripheral devices and shielded cables and connectors between system components Digidesign recommends the use of shielded cabl...

Page 3: ...t Sample Rate of the 888 24 I O in A D Stand Alone Mode 9 Changing the Default Word Clock Lock Port of the 888 24 I O in D A Stand Alone Mode 10 Muting the DAC Outputs of the 888 24 I O in A D Stand A...

Page 4: ...888 24 I O iv...

Page 5: ...endent stand alone 24 bit audio converter in your studio If you own a Pro Tools system most of the information in this guide is covered in your Pro Tools TDM Hardware Installation Guide The 888 24 I O...

Page 6: ...rst Pro Tools card in your system This Audio Interface will act as the master inter face in your system All other Audio Inter faces will be slaved to it Because some digital audio devices do not outpu...

Page 7: ...are monitored on screen in the Pro Tools software The 888 24 I O is factory calibrated so that a meter reading of 18 dB corresponds to the 888 24 I O nominal operating level which can be set to either...

Page 8: ...osen for that channel The 888 24 I O analog audio connectors are balanced XLRs with pin 2 wired hot or pin 3 cold or and pin 1 ground 3 AES EBU Digital Outputs 1 8 The 888 24 I O AES EBU output jacks...

Page 9: ...inuously ac tive on both the AES EBU and S PDIF out put jacks regardless of which digital input format is selected for channels 1 2 To avoid RF interference use 75 ohm coaxial cable for S PDIF transfe...

Page 10: ...dBu levels it should be placed over the rear two prongs For 10 dBV levels it should be placed over the front two prongs 6 After you have made the desired changes replace the top of the 888 24 I O 7 R...

Page 11: ...ut levels It is important that you determine which line level mode is appropriate for your stu dio In 4 dBu operating mode the 888 24 I O is a 24 bit digital audio device capable of producing audio si...

Page 12: ...erter 1 Turn off any digital devices that may send a word clock signal to the 888 24 I O channel 1 2 digital input ports 2 Turn on the 888 24 I O The 888 24 I O searches briefly for a word clock signa...

Page 13: ...ools Changing the Default Sample Rate of the 888 24 I O in A D Stand Alone Mode The default sample rate of the 888 24 I O in stand alone A D mode is 44 1kHz If you wish to change this default setting...

Page 14: ...2 With a Phillips screwdriver remove the screws from the top of the 888 24 I O 3 Using the 1 16 inch hex wrench in cluded with the 888 24 I O carefully re move the front four panel screws as noted on...

Page 15: ...tput mute setting of the 888 24 I O in stand alone D A mode 1 Make sure that your computer and 888 24 I O are turned off 2 With a Phillips screwdriver remove the screws from the top of the 888 24 I O...

Page 16: ...888 24 I O 12...

Page 17: ...s Sample Rate 44 1 kHz or 48 kHz 10ppm Clock Reference Super Clock 256x sample clock In Out BNC connectors additional clock refer ences supported via Digidesign s Universal Slave Driver SMPTE Slave Dr...

Page 18: ...01dB 1kHz 20 Hz 20 kHz band limited Maximum Output Level 26 dB channel bridging loads Frequency Response 1dB 20 Hz 20 kHz Physical Specifications Power requirements 90 260 VAC 47 63 Hz 30 VA auto swi...

Page 19: ...an interface such as the 888 24 I O the meters are calibrated in decibels below peak digital clipping level Headroom The concept of headroom is slightly differ ent for analog and digital devices Analo...

Page 20: ...ro Tools 4 x for calibration in structions The Pro Tools Installer includes several pre configured calibration session templates that cover most common calibration set ups You can use these in additio...

Page 21: ...gn the inputs to match the reference level When the level is properly matched the track name will stop flashing The Automatch indicator arrows on each track show the direction of adjustment re quired...

Page 22: ...888 24 I O 18...

Page 23: ...an interface such as the 888 24 I O the meters are calibrated in decibels below peak digital clipping level Headroom The concept of headroom is slightly differ ent for analog and digital devices Analo...

Page 24: ...lica tion available on your Pro Tools Installer CD ROM to calibrate the outputs and in puts of the 888 24 I O If you are using Pro Tools 5 0 or later refer to Appendix B Calibrating the 888 24 I O Pro...

Page 25: ...brate the 888 24 I O with Calibration Tool using an external source 1 Start the Calibration Tool application 2 In the Headroom field enter the amount of headroom you desire The default setting for the...

Page 26: ...I O with Calibration Tool using an external VU meter 1 In the Calibration Tool software select 1 kHz from the Frequency pop up menu and click the oscillator setting to On 2 Adjust the 888 24 I O Outpu...

Reviews: