background image

Software 

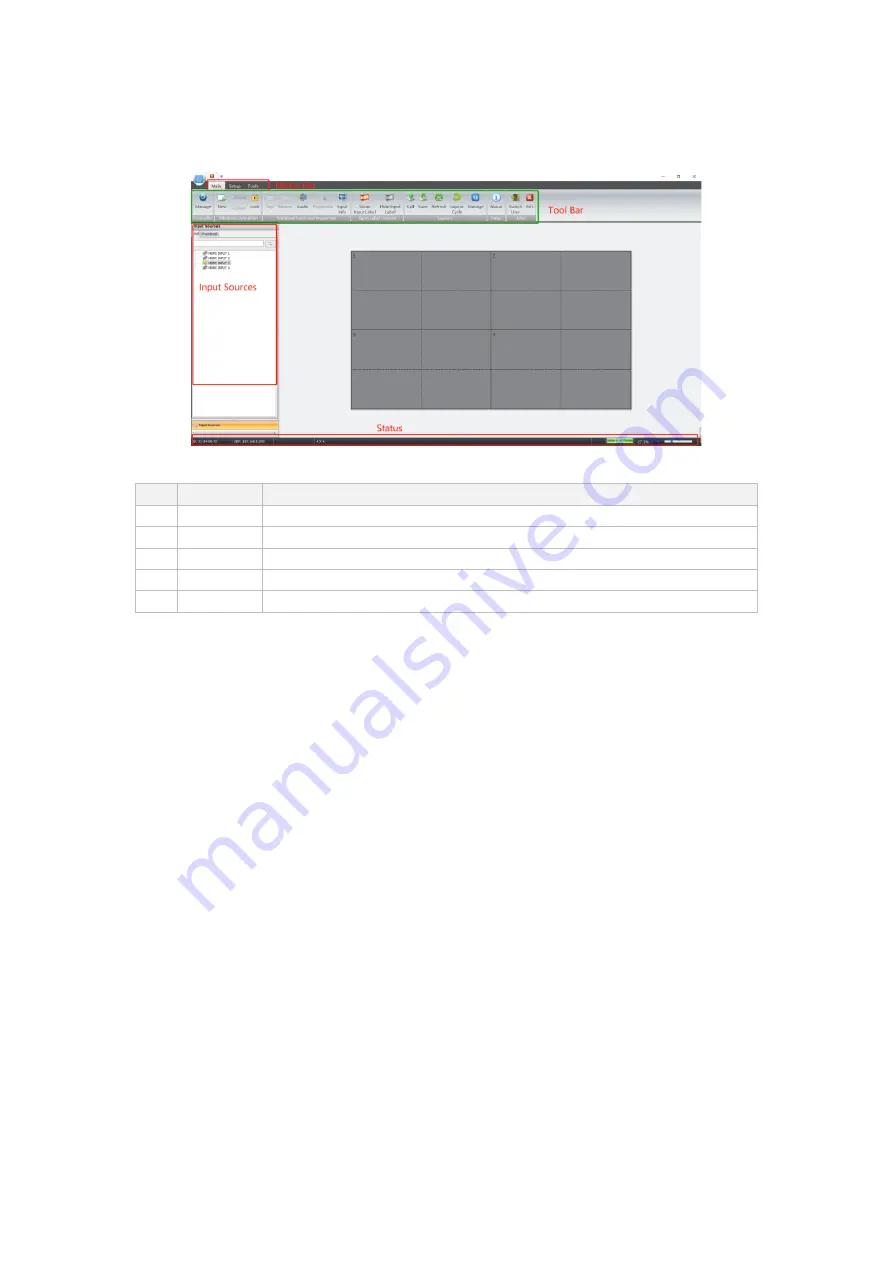
2.4. Software Interface 

With user-friendly interface, you can easily manage video wall display. 


Interface description 

No. 

Item   

Description 

Menu Bar 

Including Main, Setting and Tools 

Tools Bar 

Tools to achieve different functions 

Input 

Display all inputs in list or thumbnail 

Virtual VW 

Virtual video wall corresponding physical video wall   

Status 

Indicates operating status 


Summary of Contents for VWC2-ROC

Page 1: ...DigiBird Technology VWC2 ROC Video Wall Controller User Manual V1 0...

Page 2: ...Configuration 8 3 2 1 Create New Video Wall 8 3 2 2 Output Channel Setting 9 3 2 3 Customized Resolution 10 3 2 4 Video Wall Mode Setting 11 3 3 Video Wall Layout 12 3 3 1 Create Windows 12 3 3 2 Swit...

Page 3: ...2 4 3 1 Add User 28 4 3 2 Revise User Information 28 4 3 3 Delete User 29 4 4 Controller Management 29 4 5 Backup Restore 30 4 5 1 Backup 30 4 5 2 Restore 30...

Page 4: ...of configuration and operation This manual may subject to change without prior notice Conventions Note To help understand contents in the manual Notice Notices have to follow during operation Warning...

Page 5: ...igher flexibility for versatile applications such as meeting rooms small control rooms and digital signage 1 2 Hardware Interface VWC2 ROC series have 3x types of chassis 1 2 1 1U 0404 Front View Rear...

Page 6: ...put 1x Lan for control 1x Lan for preview 1 3 Modify IP via front panel User can obtain and modify IP address over push button at front panel Operation LCD 1 Initial 2 Press any 3 Switch to IP 4 Enter...

Page 7: ...s as below Item Minimum Requirements Recommended CPU Intel Core i3 Intel Core i5 and later RAW 2G RAM 4GB RAM HDD 150MB 5G and above Monitor 1366x768 1920x1080 and above 2 2 2 OS requirements Microsof...

Page 8: ...l display Interface description No Item Description 1 Menu Bar Including Main Setting and Tools 2 Tools Bar Tools to achieve different functions 3 Input Display all inputs in list or thumbnail 4 Virtu...

Page 9: ...n with controller via serial port or network Default connection is UDP communication TCP not support by this model at current stage 3 1 1 Device Communication 3 1 1 1 Network Communication For Network...

Page 10: ...t target controller 4 Confirm to complete setting If no controller has been detected please ensure whether PC IP and controller IP within same network 3 1 1 2 Serial Port Communication Connect control...

Page 11: ...lect target controller and click Advanced 3 Input new IP address and click Revise 3 1 2 2 Serial Port Communication 1 Connect controller to your control PC via serial cable 2 Select available port fro...

Page 12: ...rrectly via video cable 1 Navigate to Setup and Click Video Wall 1 Configure video wall parameters at Video Wall Configuration Refer 3 3 3 Parameter for more details 2 Allocate output channel to corre...

Page 13: ...ptions of LCD Wall Matrix LED wall Refer 3 2 5 Video Wall Mode Setting Bezel Under LCD mode can input bezel information as compensation Show Channel Display output channel number on screen to indicate...

Page 14: ...ured channel to available screen 3 2 3 Customized Resolution If offered resolution in library can not meet demand user can customize resolution upon demand 3 2 3 1 Add Resolution Click Add and input r...

Page 15: ...ion 1 Horizontal bezel indicates the space between 2x adjacent screens The space includes right bezel of left screen and left bezel of right screen and measured in pixels 2 Vertical bezel indicates th...

Page 16: ...pixel 3 2 4 3 Matrix Mode If you want to activate matrix functions need to select Matrix Mode Controller will auto detect all available output channel Please refer 3 7 Matrix Switching for more detail...

Page 17: ...f you want to create a window on existing window please press Ctrl and arbitrary create window Single Screen Select one input drag it to virtual video wall and release The window will auto fit the scr...

Page 18: ...ption 1 Name Display input source name 2 Coordinates To locate window position by pixel Take left top corner as valid 3 Size et window height and width 3 3 2 Switching Signal There are 2x methods to s...

Page 19: ...1 Window Button Through 4x buttons of top right corner you can manage window display Button description as shown in below table No Button Description 1 Zoom in this window to fit for occupied sub scr...

Page 20: ...to current sub screen Zoon window to fit to screen where window top left corner located 8 Fit to occupied screen Zoom window to fit to occupied screens 9 Full screen Zoom window to entire video wall...

Page 21: ...top 6 Bottom Set selected window to bottom 7 Properties To edit window properties 8 Input To check input resolutions 3 3 3 4 Sub screen Title Setting Sub screen title can be customized to help user de...

Page 22: ...saved as layout That information will be stored in hardware and maximum support 64x layouts 3 4 1 Save Save current display as layout Input preset ID and save If preset ID has been occupied before ne...

Page 23: ...Operation 19 3 4 3 Refresh Click Refresh to reload window information from controller 3 4 4 Management Click Management to call out preset management window...

Page 24: ...for layout 8 Default interval Presets will carousel by default intervals if have not been designated interval 9 Show preview dialog when call layout by button If enabled window preview will be shown w...

Page 25: ...o Main Menu and click Audio to enter into setting page Click output channel to switch audio output via 3 5mm mini jack Volume can be adjusted by dragging audio bar There are 2x options for audio outpu...

Page 26: ...n activated Click to activate current audio Red indicates audio has been disabled Click again can enable it 3 6 Input Source Setting Select one input from Input Source List right click call out settin...

Page 27: ...urce need to define which part to be cut off by inputting pixel information 2 Cropped source will display under original source 3 Operating of cropped source is same to regular input source 3 6 3 Labe...

Page 28: ...add background color for station logo 5 Text logo Select text logo type logo title select font and size 6 Customized Picture Support imports local picture as station logo 7 Zoom Select scale ratio 3 6...

Page 29: ...eed to be configured as matrix mode please refer 3 2 5 Video Wall Setting 3 7 1 Signal Switch There are 3x methods to switch signal 1 Select one output channel at virtual video wall double click one i...

Page 30: ...on 26 Source not supported under matrix mode 3 7 2 Clear Video Right click output channel and select Clear video to delete current displaying signal 3 7 3 Rename Right click output channel and select...

Page 31: ...llow below steps to revise IP address 1 Navigate to Setting and click Preview to enter into setting page Enter desired IP address subnet mask and gateway Trigger Display preview image on video wall yo...

Page 32: ...Select targeted input channel click Write EDID and import EDID file 4 3 User Management Default password of Admin account is blank Navigate to Setting click User to enter into setting page 4 3 1 Add U...

Page 33: ...k Delete and confirm to execute 4 4 Controller Management This software can manage multiple controllers at a time Navigate to Main Menu and click Management to enter into setting page Click Add and in...

Page 34: ...t click icon to manage this controller 4 5 Backup Restore 4 5 1 Backup Navigate to Tools click Back Up and save configuration file to your local PC 4 5 2 Restore 1 Navigate to Tools click Restoration...

Page 35: ...DigiBird Technology Co Ltd www digibirdtech com sales digibirdtech com...

Reviews: