Digi XBee Smart Plug Hardware Setup Manual Download Page 4

Configure The Digi Smart Plug

Open up the smart plug by removing the rubber sticky 

pads  from  the  screw  holes  on  the  back  of  the  plug, 

removing the screws, and separating the case. 

Remove the XBee chip from the smart plug and insert  

it into a Grove dev board (or other compatible board). 

Install  and  launch 

XCTU

  -  this  is  a  software  application 

that  you  will  use  to  configure  your  Digi  smart  plug  to 

connect to the Kosmos gateway. 

Connect  the  Grove  dev  board  to  your  computer  and 

then use XCTU to connect to the Xbee chip. 

Use  XCTU  to  install  the  firmware  support  on  the  Xbee 

chip  by  using  the 

Install  legacy  firmware  package


option. 

Enter configuration mode by clicking the gear icon on 

the  top  right  of  XCTU  and  then  load  the  configuration 

contained in 

this .xpro file

.

Write  the  updated  settings  to  the  Xbee  chip  and  then 

disconnect the Grove dev board from your computer. 

Close  out  of  XCTU,  remove  the  Xbee  chip  from  the 

Grove  dev  board,  return  it  the  Digi  smart  plug,  and 

reassemble the plug’s casing. 

Questions?

 [email protected]

Page 4

Summary of Contents for XBee Smart Plug

Page 1: ...mart Plug to connect to the Kosmos industrial IoT platform Once you ve finished these steps you ll be ready to start gaining valuable insights from your sensors actuators using Kosmos dashboards alert...

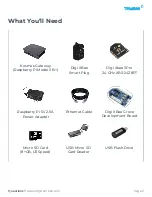
Page 2: ...er Ethernet Cable Digi Xbee3 Pro 2 4 GHz XB3 24Z8PT Micro SD Card 8 GB U3 Speed USB Micro SD Card Reader USB Flash Drive Digi XBee Smart Plug Questions support temboo com Page 2 Digi XBee Grove Develo...

Page 3: ...com Page 3 Before moving on to the next steps in this guide please make sure that you ve created your Temboo account and generated your Kosmos application files for your chosen hardware If you haven t...

Page 4: ...gateway Connect the Grove dev board to your computer and then use XCTU to connect to the Xbee chip Use XCTU to install the firmware support on the Xbee chip by using the Install legacy firmware packa...

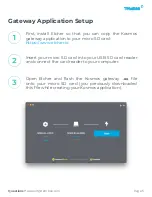
Page 5: ...way application to your micro SD card https www etcher io Insert your micro SD card into your USB SD card reader and connect the card reader to your computer Open Etcher and flash the Kosmos gateway x...

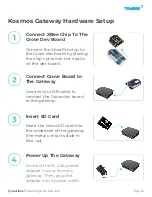
Page 6: ...oard Insert SD Card Insert the micro SD card into the underside of the gateway the metal contacts slide in face up Connect Grove Board to The Gateway Use a micro USB cable to connect the Grove dev boa...

Page 7: ...o_kosmos_config ini onto your USB drive Insert USB Drive Insert the USB thumb drive into any available USB port on your Kosmos gateway Connect Ethernet Cable Use the ethernet cable to connect your Kos...

Page 8: ...et Connect to power outlet Reset button Confirm The Plug Has Connected To Gateway The Outlet LED turns on as a solid yellow when user AC socket is powered The Associate LED turns on as a solid green w...

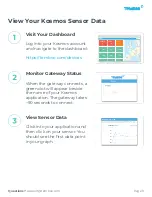
Page 9: ...devices Monitor Gateway Status When the gateway connects a green dot will appear beside the name of your Kosmos application The gateway takes 90 seconds to connect View Sensor Data Click into your ap...

Page 10: ...the WiFi network that you want your gateway to connect to see lines 14 15 in the screenshot below and then save your config file Eject the USB drive from your computer and insert it back into your Ko...

Page 11: ...the gateway to connect to Kosmos Wait at least 10 minutes after powering up your gateway for data to arrive in your graphs If you still don t see data double check that the power supply for your sens...

Reviews: