4
5
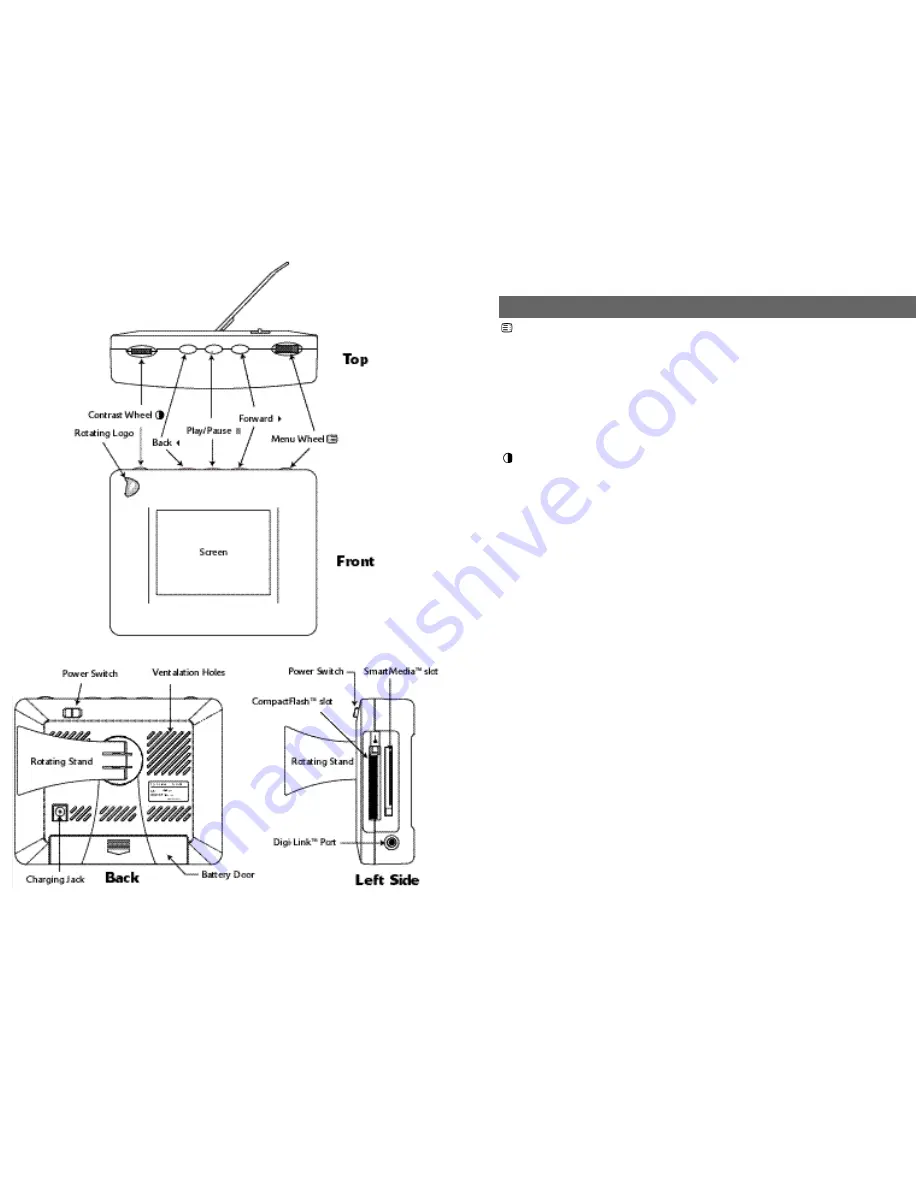
Menu Wheel
Rotate this control to navigate menus and lists. Push
(“click”) the control to select or act upon menu or list
items.
Forward
Use this button to advance to the next slide in a
slideshow.
Play/Pause
Use this button to pause or resume the slideshow at
any time. Press to exit menu system.
Back
Use this button to display the previous slide in a
slideshow.
Contrast Wheel
Rotate this control to adjust the picture contrast.
CompactFlash™ slot
Insert CompactFlash™ storage cards here.
IMPORTANT:
Always use the Eject button to
remove cards from the memory card slots.
WARNING:
Always turn off Digi-Frame™ before
inserting or removing cards.
SmartMedia™ slot
Insert SmartMedia™ (SSFDC) storage cards here.
IMPORTANT:
Always use the Eject button to
remove cards from the memory card slots.
WARNING:
Always turn off Digi-Frame™ before
inserting or removing cards.
Digi-Link™ port
Connect the Digi-Frame™ to your PC or Macintosh®
by attaching the serial link cable between this socket
and the computer’s serial (COM) port.
Power Supply Jack
Connects to the Digi-Frame™ charging adapter that
plugs into the wall.
Battery Door
Remove to change the batteries.
Power Switch
Turns the Digi-Frame™ on and off. Always turn off
the Digi-Frame™ before inserting or removing mem-
ory cards.
Rotating Stand
Supports the Digi-Frame™ for tabletop use, it can
rotate to support either a vertical or a horizontal
viewing position. It adjusts to change the angle of
the Digi-Frame™.
Screen
Displays your pictures in vivid color. Your Digi-
Frame™’s screen is made of glass and should be
treated with care. Use soft cloth and a recommend-
ed screen cleaning solution to remove fingerprints.
Rotating Logo
The “D” logo on the front of your Digi-Frame™ can
be rotated to match the current orientation of your
Digi-Frame™.
Digi-Frame™ Controls and Connectors
4
;
3
Summary of Contents for DF-390
Page 1: ...User Manual Model DF 390 ...


