background image

12

DIETZ GmbH // User manual, XXL products / tauron|dts // Version 1.0 EN 

3.4 BACKREST HEIGHT

1. 

 To adjust the backrest height, loosen the 

knurled nuts on the side elements and pull 

out the bolts (1, Fig. 9).

2. 

  There are three holes for adjusting the 

height of the backrest (410/435/460 mm). 
To adjust the height, pull both sides of the 
backrest up evenly (2, Fig. 9).

3. 

  Once you have set it to the required height, 

secure the backrest again with the bolts 
and knurled nuts. Make sure you insert the 
bolts from the front (1, Fig. 10) and that you 

fasten the knurled nuts securely on the rear 

of the product (2, Fig. 10).


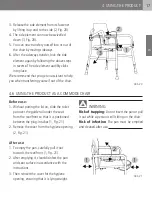
WARNING

Risk of trapping:

 Be careful of your hands/fin

-

gers during assembly. 

Risk  of  accident: 

The  product  is  only  to  be 

used with the backrest securely attached. 


2

2

1

Abb. 9

2

2

1

1

Abb. 10

3.5 SEAT DEPTH

You can mount the seat surface in one of two 

positions (450/510 mm). The seat depth is mea

-

sured from the backrest tube to the front edge 
of the seat surface (see Chapter 5.1).

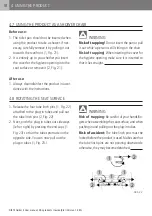
1. 

  Select the seat depth that is right for you 

(Fig. 11, 12). Please note that the select

-

ed seat depth also determines where the 
hygiene opening is located with the cover 
attached to the seat surface.


WARNING

Risk of trapping:

 Be careful of your hands/fin

-

gers  during  assembly  to  avoid  getting  them 

trapped in moving parts. 

Risk of accident:

 If you are able to lift the seat 

surface up at either the front or the back follow

-

ing  assembly,  it  means  that  the  plug-in  tubes 
have not been assembled correctly. 

Risk  of  accident:

 The  plug-in  tubes  must  be 

fully inserted and locked with the tube linch pins 
before using the product. If thetube linch pins are 
inserted from below, they will not lock properly. 


3 PREPARING THE PRODUCT FOR USE

Summary of Contents for tauron dts

Page 1: ...IT NL FR EN Heavy duty shower commode chair User manual version 1 0 EN Standard side element Abduction side element with standing aid Swivelling side element ...

Page 2: ...at you have these to hand if you have any queries about your product All the data can be found on the product label See Chapter 5 6 Product labelling Fig 31 Type model Item no REF Serial number 21 Date of manufacture Other information notes The identification data or product label may differ on custom made devices ...

Page 3: ... pro vide you with information to help keep your product in safe working order while ensuring it retains its value for as long as possible If you have any questions or require additional information please contact the specialist retail er which supplied the product to you You can always find the latest information about your product on our website For information or queries concerning product safe...

Page 4: ... description 2 1 Scope of delivery 8 2 2 Accessories 8 2 3 Structure of the tauron dts standard side element 9 2 4 Structure of the tauron dts abduction side element with standing aid 9 2 5 Structure of the tauron dts swivelling side element 9 3 Preparing the product for use 3 1 Assembly instructions 10 3 2 Tools 10 3 3 Seat width 10 3 4 Backrest height 12 3 5 Seat depth 12 3 6 Seat height 14 CONT...

Page 5: ...roduct 19 4 11 Transport 20 4 12 Accessories and add ons from external suppliers 20 5 Technical specifications 5 1 DIETZ s measurement system 21 5 2 Dimensions and technical information 22 5 3 Product tests 22 5 4 Further information 23 5 5 Materials 23 5 6 Product labelling 24 CONTENTS 6 Safety instructions 6 1 Safety instructions 25 7 Care and maintenance 7 1 Maintenance servicing 26 7 2 Mainten...

Page 6: ... to the toilet due to re stricted mobility The product is intended exclu sively for use indoors on a firm and level surface The product is suitable for use in old age and nursing homes hospitals rehabilitation centres day care centres and in private households It is not intended to serve as permanent seating and must not be used for this purpose If you have a custom made device it will have been l...

Page 7: ...o is less than 146 cm tall and or who weighs less than 40 kg BMI 17 1 5 SYMBOLS These symbols draw attention to passages of text that contain helpful advice for using and operating the product in everyday life WARNING It is mandatory to observe and comply with warnings They draw your attention to the fact that failure to comply may result in injury and or damage to the product or the environment N...

Page 8: ...kaging films can release toxic gases Risk of suffocation Keep plastic bags out of the reach of children 2 1 SCOPE OF DELIVERY Upon receipt of the goods please check imme diately that the contents are complete and un damaged The contents consist of t 2 side elements incl 4 telescopic legs and 4 rubber feet t 1 backrest incl backrest cushion t 1 seat cushion incl 2 plug in tubes 4 tube linch pins t ...

Page 9: ... STRUCTURE OF THE tauron dts ABDUCTION SIDE ELEMENT WITH STANDING AID Abb 2 2 5 STRUCTURE OF THE tauron dts FEATURING SWIVELLING SIDE ELEMENT Abb 3 Backrest cushion Backrest Rubber foot Telescopic leg Seat cushion Toilet pan optional Cover for hygiene opening Backrest cushion Swivelling side element Backrest Rubber foot Telescopic leg Locking lever Toilet pan optional Cover for hygiene opening Sea...

Page 10: ...dboard packaging and place them all on a level clean sturdy surface the floor or a table 2 The seat can be set to one of three widths 560 630 700 mm The backrest is pre as sembled for a seat width of 560 mm 3 The first step is to slot the backrest into the side elements 1 Fig 4 During assembly take care to ensure that the parts are all aligned correctly and facing the right way The side element so...

Page 11: ...backrest cushion 1 Fig 6 Tilt the backrest cushion down towards the floor 2 Fig 6 6 The bolts on the rear of the cushion are now readily accessible and can be easily pulled out of the cushion 1 Fig 7 7 The middle section inside the backrest is now free to move There are three holes on each side for setting the required seat width 560 630 700 mm To adjust the width pull the side elements outwards 1...

Page 12: ...tached 2 2 1 Abb 9 2 2 1 1 Abb 10 3 5 SEAT DEPTH You can mount the seat surface in one of two positions 450 510 mm The seat depth is mea sured from the backrest tube to the front edge of the seat surface see Chapter 5 1 1 Select the seat depth that is right for you Fig 11 12 Please note that the select ed seat depth also determines where the hygiene opening is located with the cover attached to th...

Page 13: ...lifting up the seat surface to check that it has been securely mounted You should not be able to lift it off the tube sockets at either the front or the back 5 Twist the plug in tubes so that the openings of the holes are pointing forwards and back wards Insert the four tube linch pins from the front and back 1 Fig 14 6 Finally lock the tube linch pins around the plug in tubes 2 Fig 14 NOTE If the...

Page 14: ...opic legs to the required length 2 Fig 15 ensuring that the holes of the inner and outer tubes are aligned with each other 3 Finally reinsert the bolts attach the nuts externally and tighten them WARNING Risk of trapping Be careful of your fingers when adjusting the telescopic legs Risk of tipping Set all 4 telescopic legs to the same length Risk of accident Make sure the bolts are firm ly seated ...

Page 15: ...g 17 add an extra 150 mm onto the seat width so that those who need considerably more space towards the front can sit comfortably on the chair The side elements curve up and round at the end closest to the user s hands for greater security when getting in and out of the chair 130 mm 150 mm Abb 17 4 3 TAURON DTS SWIVELLING SIDE ELEMENT The swivelling side elements on both sides Fig 18 enable easy t...

Page 16: ...serted so that it lies straight Risk of tipping Please note that body move ments shift the centre of gravity and can increase the risk of the product tipping over Risk of tipping Support yourself vertically on both armrests and not in any other way Risk of accident Do not stand with your feet on the seat surface Risk of slipping Do not allow any oily or high ly soapy substances to come into contac...

Page 17: ...T AS A COMMODE CHAIR Before use 1 Without putting the lid on slide the toilet pan over the guide rail under the seat from the rear front so that it is positioned between the plug in tubes 1 Fig 21 2 Remove the cover from the hygiene opening 2 Fig 21 After use 1 To empty the pan carefully pull it out towards the rear front 1 Fig 21 2 After emptying it clean disinfect the pan and seat surface in acc...

Page 18: ...on the chair Risk of trapping When inserting the cover for the hygiene opening make sure it is inserted so that it lies straight 4 8 ROTATING THE SEAT SURFACE 1 Release the four tube linch pins 1 Fig 22 attached to the plug in tubes and pull out the tube linch pins 2 Fig 22 2 Next push the plug in tubes out sideways left or right by pressing the end caps 1 Fig 23 so that the tubes protrude on the ...

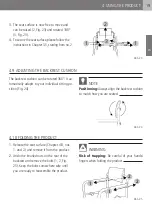
Page 19: ...y adapts to your individual sitting po sition Fig 24 NOTE Positioning Always align the backrest cushion to match how you are seated Abb 24 4 10 FOLDING THE PRODUCT 1 Release the seat surface Chapter 4 8 nos 1 and 2 and remove it from the product 2 Undo the knurled nuts on the rear of the backrest and remove the bolts 1 2 Fig 25 Keep the bolts somewhere safe until you are ready to reassemble the pr...

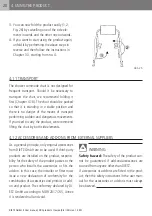
Page 20: ...u need to carry the product we recommend lifting the chair by both side elements 4 12 ACCESSORIES AND ADD ONS FROM EXTERNAL SUPPLIERS As a general principle only original accessories from DIETZ GmbH are to be used If third party products are installed on the product responsi bility for the safety of the product passes to the person who installs the accessories or fits the add on In this case the i...

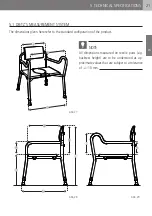
Page 21: ...imensions measured on textile parts e g backrest height are to be understood as ap proximate values that are subject to a tolerance of 10 mm 5 1 DIETZ S MEASUREMENT SYSTEM The dimensions given here refer to the standard configuration of the product Abb 27 Abb 28 Abb 29 ...

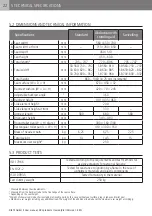
Page 22: ... Armrest length mm 580 680 580 Drive over height mm 343 493 Round toilet pan W H diam mm 300 160 300 Rectangular toilet pan L W H mm 410 300 160 Mass of heaviest part4 kg 6 25 6 75 7 25 Total weight kg 14 14 5 15 Maximum user weight5 kg 250 5 3 PRODUCT TESTS ISO 17966 Tested according to the requirements and test methods for assistive products for personal hygiene EN 1021 2 Tested for resistance t...

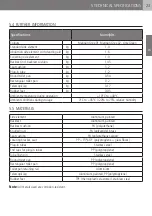
Page 23: ...0 C to 40 C Ambient conditions during storage 0 C to 45 C 20 to 75 relative humidity 5 5 MATERIALS Side element Aluminium painted Backrest Aluminium painted Backrest cushion PU polyurethane Knurled nuts PA polyamide brass Seat cushion PU polyurethane wood Locating bracket seat PP 15 GF polypropylene glass fibres Plug in tubes Stainless steel End caps for plug in tubes PP polypropylene Tube linch p...

Page 24: ...r In this case the product label warnings on the product and possibly also the intended purpose will differ compared to a standard device Please pay attention to the additional documentation n Product label DIETZ GmbH Reutäckerstrasse 12 76307 Karlsbad DE o 2021 05 tauron dts 720000 01 04260241687576 10 2100000 21 162000001 250 kg Abb 31 TYP Designation model REF Item number UDI Unique Device Iden...

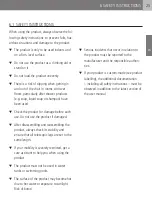
Page 25: ... damage before each use Do not use the product if damaged t After disassembling and reassembling the product always check its stability and ensure that all telescopic legs are set to the same length t If your mobility is severely restricted get a care assistant to help you when using the product t The product must not be used in water tanks or swimming pools t The surface of the product may become...

Page 26: ...in the maintenance schedule or further defects and functional impairments contact an authorised specialist retailer immediately WARNING To maintain the operational safety of the prod uct repairs must only be performed by specialist shops using DIETZ original spare parts The rele vant spare parts catalogue can be found on our website by looking under the information for the product concerned NOTE U...

Page 27: ...be guaranteed x Toilet pan Check for correct function and wear The pan should be easy to slide in and out In the event of functional or surface damage toilet pan guide rail the components must be replaced by a specialist retailer x Bolted connections Check for firm seating All fastening bolts must be firmly tightened Repeated loosening and re tightening causes self locking nuts and bolts to lose t...

Page 28: ...ening cannot be inserted The correct procedure for inserting the cover has not been followed Rotate the cover 180 and try inserting it that way round It is not possible to slide the toilet pan in out The guide rail has come loose on one side Tighten the bolts The toilet pan is damaged The guide rail is bent Consult an authorised specialist retailer It is not possible to lock unlock the swivelling ...

Page 29: ...s that come into frequent contact with hands skin such as the seat surface toilet pan backrest incl cush ion and side elements Please only use the following disinfectants use of other chemicals might damage the product t Aldehyde free disinfectants based on alcohol max 70 propyl alcohol WARNING Material damage During disinfection ob serve the use and application instructions issued by the cleaning...

Page 30: ...cked for damage and approved by a specialist retailer As part of this all the inspection points listed in the maintenance schedule must be checked on the product WARNING Risk of infection The product must be disin fected before each change of user This is import ant for avoiding cross contamination 7 8 STORAGE If you wish to store the product ensure that it is kept in a dry place protected against...

Page 31: ...g oils or greases 8 2 SERVICE LIFE The product has an expected service life of three years when used daily and exactly as intended This assumes compliance with the maintenance and safety specifications stipulated in this man ual The indicated service life does not constitute any kind of additional warranty 8 3 LIABILITY DIETZ GmbH only bears liability if the products are used under the specified c...

Page 32: ...se 12 76307 Karlsbad Germany Tel 49 7248 9186 0 Fax 49 7248 9186 86 info dietz group de www dietz group de Misprints and errors excepted Prices and products subject to change without notice DIETZ GmbH Karlsbad Not to be reproduced whether in part or in whole without the written permission of DIETZ GmbH Karlsbad ...

Reviews: