background image

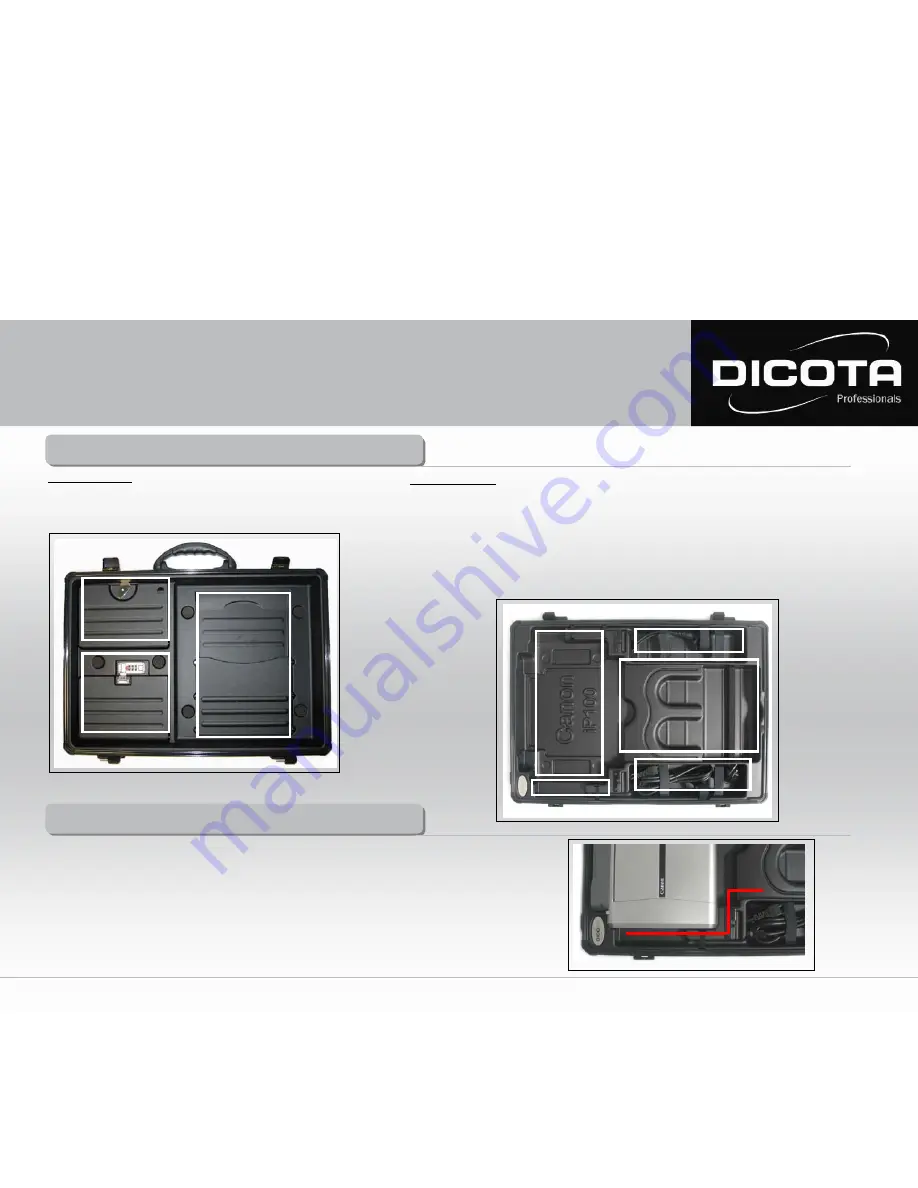
Interior equipment - DataDesk 100

Interior equipment - DataDesk 100

Case lid

(Fig. 1)

(1)

Document / printer paper compartment

(2)

Accessory compartment with combination lock

(3)

Accessory compartment

Case lid

(Fig. 2)

(1)

Fit for your printer (Canon iP100) 

(2)

Cable routing help

(3)

Stow-away pocket for printed paper

(4)

Stow-away pocket for Notebook power supply with plug for a Euro 8-socket (with / without ground wire)

(5)

Stow-away pocket for printer power supply with plug for a Euro 8-socket (with / without ground wire)

(6)

Notebook strap

Fig. 1

(2)

(3)

(1)

Installation of your mobile printer

7

Installation of your mobile printer

Open your DataDesk 100. 
1)

Remove the flap lid from the bottom part of the case, which functions as your Notebook workspace.

2)

Place the printer power supply in the front pocket of the bottom part of the case (pocket No. 6).

3)

Now connect the Euro 8 plug with the 220 V socket of the power supply (in pocket No. 6).
Secure the printer power supply with the two Velcro straps!

4)

Route the printer power cable through the designated groove (under the flap lid) and sideways past 
the printer (Fig. 3).
Pay attention to a clean cable routing to prevent damaging the printer cable (e.g. by pinching it off)!

5)

The power supply outlet plug is now connected to the printer.

User Manual DataDesk 100

(1)

(2)

(3)

(4)

(5)

(6)

(6)

Fig. 2

Fig. 3

Summary of Contents for DataDesk 100

Page 1: ...Gebrauchsanleitung DataDesk 100 Seite 1 User Manual DataDesk 100 Page 5 Mode d emploi DataDesk 100 Page 9 DataDesk 100...

Page 2: ...Installation Ihres Notebooks 4 Verbindung Notebook Drucker 4 User Manual English 5 Mode d emploi Fran ais 9 1 Allgemeine Hinweise DataDesk 100 Allgemeine Hinweise DataDesk 100 Arbeitsumgebung Bitte ac...

Page 3: ...au en zu gew hrleisten 2 Zahlenschloss DataDesk 100 Das Zahlenschloss Ihres Zubeh rfachs ist ab Fabrik auf 0 0 0 eingestellt Entfernen Sie den roten Kunststoff Stift bevor Sie Ihre Zahlenkombination e...

Page 4: ...ataDesk 100 1 Entnehmen Sie den Klappdeckel in der Kofferunterschale welcher als Ihr Notebook Arbeitsplatz dient 2 Legen Sie das Drucker Netzteil in das vordere Fach der Kofferunterschale Fach Nr 6 3...

Page 5: ...unds tzlich mit dem Klettband Transportsicherung auf der Deckeloberseite des Klappdeckels Abb 3 Abb 1 Abb 2 Verbindung Notebook Drucker 4 Verbindung Notebook Drucker Zwei Optionen um Drucker und Noteb...

Page 6: ...e bottom 7 Installation of your printer 7 Installation of your Notebook 8 Connection Notebook printer 8 5 General information DataDesk 100 General information DataDesk 100 Work enviroment Please make...

Page 7: ...ng instructions Combination lock The locks are set at the factory to open at 0 0 0 To set your own combination remove the red arrow before setting the lock 1 Choose 3 digits which you can recall easil...

Page 8: ...bile printer 7 Installation of your mobile printer Open your DataDesk 100 1 Remove the flap lid from the bottom part of the case which functions as your Notebook workspace 2 Place the printer power su...

Page 9: ...nsport always fasten your Notebook with the Velcro strap transport protection on the upper side of the flap lid Fig 3 Fig 1 Fig 2 8 Connection Notebook printer Connection Notebook printer Two options...

Page 10: ...ette 11 Fond de la mallette 11 Installation de votre imprimante portable 11 Installation de votre ordinateur portable 12 Connexion ordinateur portable imprimante 12 9 Informations g n rales DataDesk 1...

Page 11: ...e a combinaison Les serrures sont regl es la fabrique pour s ouvrir auy mum ros 0 0 0 R glez votre propre combinaison 1 Choisissez 3 chiffres que vous retiondrez facilement adresse t l phone anniversa...

Page 12: ...votre imprimante portable 11 Installation de votre imprimante portable Ouvrez votre DataDesk 100 1 Retirez le couvercle rabattable du fond de la coque Il vous servira d espace de travail 2 Disposez le...

Page 13: ...sur le dessus du couvercle en cas de transport figure n 3 Fig N 1 Fig N 2 12 Deux possibilit s de connections au choix 1 Raccordez votre imprimante Canon iP100 et votre ordinateur portable l aide du...

Reviews: