background image

EN

17

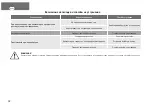
Malfunction

Probable cause

Remedy

When connected to the power grid, the fan does not rotate, does not respond 

to controls.

The mains supply is not connected.

It is necessary to consult a specialist.

Internal connection fault.

Low air flow.

The ventilation system is clogged.

Clean the ventilation system.

Increased noise or vibration.

The impeller is blocked.

Clean the impeller.

The fan is not fixed or incorrectly mounted.

Correct the installation error.

The ventilation system is clogged.

Clean the ventilation system.

ATTENTION!

The fan and the service controlling equipment has to be isolated from power supply during the installation time and service. 

Maintenance

• disconnect the fan from the mains;

• remove the fan by disconnecting it from the duct and removed from the installation 

place.

• in case of heavy soiling, remove the fan impeller;

• wipe all plastic components with a soft cloth soaked in soapy water, it is not allowed 

transfer of washing solution to the motor;

• wipe all surfaces dry;

• assemble a fan and set it in place. 

Storage and transportation

Keep the fan only in the packaging of the manufacturer in a ventilated room at a 

temperature of +5 ° C to +40 ° C and relative humidity of 80% (at T = 25 ° C). Keeping 

time - 5 years from date of manufacture. Products transported by any transport provided 

consumer protection or transport container from the direct effects of rainfall, lack of 

bias transport places during transport, the lack of mutual physical impact during 

transportation and preservation of fans. Transportation is carried out in force with the 

rules for this transport.

Utilization  

This appliance has a label in accordance with European Directive 2012/19/EU on 

waste electrical and electronic appliances (waste electrical and electronic equipment 

- WEEE). This order acts on rules on the territory throughout the EU and recycling of 

old appliances.

Service lifetime 

Established service period - 5 years

Warranty

Fans are made by LLC «ERA» in accordance with applicable regulations and standards.

Manufacturer guarantees the normal operation of the fan for 5 years from the date 

of sale in retail outlets subject to the rules of transportation, storage, installation, 

operation and other requirements of this instruction. In case of absence of the date of 

sale, the warranty period will be computed from the date of manufacture.

In case of finding failures in the work of the fan on the fault of manufacturer during the 

warranty period the consumer has the right to replace the fan in the factory that is the 

same serial numbers on the product and in the passport. An availability of branded 

factory nameplate on the device is required! Please make sure it is available and store 

it on the device during its lifetime. 

To confirm the date of purchase for warranty service or presentation of other legal 

requirements urge you need to retain proof of purchase (cheque, receipt, and other 

documents confirming the date and place of purchase). 

The good meets the requirements:

TR CU 004/2011 – «About safety of low voltage equipment»;

TR CU 020/2011 – «Electromagnetic compatibility of technical devices;

EAEU 037/2016 – «On the Restriction of the Use of Hazardous Substances in Electrical 

Products and Radio Electronics» 

Declaration of Conformity for domestic axial duct electric fans  

EAEU N RU Д-RU.HB11.B.03811/20. Validity period from 05.02.2020 till 04.02.2025.

EAEU N RU Д-RU.HB35.B.02657/20. Validity period from 16.06.2020 till 15.06.2025.

Evidence about certificate:

Certificate of Conformity No RU C-RU.AД07.B.00466/19. Validity period from 25.10.2019 

to 24.10.2024. Series RU № 0148998. Issued by the Product Certification Authority of 

VELES Certification Centre LLC. Address: Bolshaya Podyacheskaya st. 37, letter A, room 

5H, c. Saint-Petersburg, Russian Federation, 195009.

Certificate of Conformity No RU C-RU.КА01.B.01103/20. Validity period from25.06.2020 

to 24.06.2025. Series RU № 0250784. Issued by the Product Certification Authority 

of Atribut Certification Centre LLC. Address: office 412, 3/8, Ostapovsky proezd Street, 

Moscow, 109316, Russia

The decryption of serial numbers.

The serial number is located on the label with the characteristics of fan and consists of 

10 characters. The serial number is read from left to right, as follows:

Delivery set

• The assembled fan

• Passport/operation instruction

• Box packaging

• Dowel with screws – 4 PCs. (for fixing the fan) (except for PRO)

• Screws – 2 PCs (for mounting brackets) (except for PRO)

• Bracket – 1 PC. (except for PRO)

Manufacturer / Replacement will be made at the following address: 

«ERA» LLC, 390047, Novoselkovskaya street,17,Ryazan city, Russia

 tel. (4912) 24-16-00,e-mail: [email protected], www.era.trade

Thank you for choosing us!

Summary of Contents for AURA 4

Page 1: ...n Axial fan Белағаштық каналдық тұрмыстық электр желдеткіштері Электровентиляторы осевые канальные бытовые RU EN KZ RU EN KZ To identify the equipment intended to be used in countries having a warm damp equable climate Cимвол использования вентилятора в тропическом климате Тропикалық климатта желдеткішті пайдалану символы AR AR ...

Page 2: ...AR 2 ...

Page 3: ...AR 3 ...

Page 4: ...AR 4 ...

Page 5: ...AR 5 ...

Page 6: ...AR 6 ...

Page 7: ...AR 7 ...

Page 8: ...AR 8 ...

Page 9: ...AR 9 ...

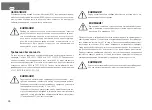
Page 10: ...Avoid the installation of the fan to one ventilation main line with smoke deflecting pipe from devices having fuel burners In case of maintenance diagnostics turn off the automatic breaker S1 in OFF position and call an electrician Attention All actions for connection set up maintenance and repair of the product have to be carried out only at mains voltage removed S1 in OFF position One phase main...

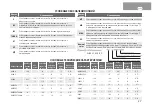
Page 11: ...hable multioption dual mode fan with built in Fusion Logic 1 1 controller EC Domestic axial duct fans with electric switch engine Name of color Domestic axial duct fan designed in Ivory Champagne Gray metal White carbon Black carbon Dark gray metal Chrome Gold Matt black Obsidian colours Example SLIM 5 C MR 02 RIO BREEZE MT EC TURBO 03 Characteristics Flange diameter mm Speed Efficiency m3 h Power...

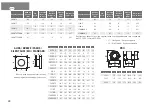
Page 12: ...RUS SILENT SLIM RIO STANDARD PRO B A F D C Model d A B X Y E F С AURA 4 100 155 155 135 135 70 7 24 AURA 5 125 175 175 155 155 78 8 5 24 AURA 6 149 5 205 205 183 5 183 5 108 28 BREEZE 4 98 175 220 135 135 74 6 44 BREEZE 5 123 190 237 160 160 79 6 52 PARUS 4 100 175 220 140 175 48 8 37 PARUS 5 125 219 275 175 220 54 10 42 RIO 4 98 170 170 135 135 74 6 38 RIO 5 123 200 200 160 160 79 6 38 SILENT 4 1...

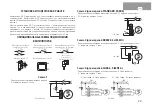
Page 13: ...ions is 0 5 mm SCHEMATIC DIAGRAMS OF ERA FAN S CONNECTION Scheme 1 of fan connectuion base model X terminal block 2 pairs Scheme 2 for STANDARD PARUS models of fan connection equipped with 02 option pull chain switch X2 terminal block 3 pairs Scheme 3 for BREEZE SLIM RIO models of fan connection equipped with 02 option pull chain switch X terminal block 2 pairs Scheme 4 for AURA 6 SILENT 6 models ...

Page 14: ...1 2 SLIM pic 3 4 STANDARD pic 5 6 remove the decorative front panel hold the power wire through the cable hole 1 in the case strip the insulation on 5 7 mm from the wire end insert wires into terminal box X and press them by tap screw for connection of AURA 6 SILENT 6 see fig 2 and electric scheme 4 fix the wires by means of cable clamp 2 combine clamps of the decorative panel with grooves in the ...

Page 15: ...c 10 PARUS 02 1 2 cover of terminal block 2 1 S3 cover of terminal block PRO Pic 9 11 remove the terminal block cover hold the power wire through the cable hole 1 in the case strip the insulation on 5 7 mm from the wire end insert wires into terminal box X and press them by tap screw fix the wires by means of cable clamp 2 install the cover of terminal block Install brackets of holders Install fir...

Page 16: ... The ventilation system is clogged Clean the ventilation system Increased noise or vibration The impeller is blocked Clean the impeller The fan is not fixed or incorrectly mounted Correct the installation error The ventilation system is clogged Clean the ventilation system Possible problems and solutions ATTENTION The fan and the service controlling equipment has to be isolated from power supply d...

Page 17: ...duct and in the passport An availability of branded factory nameplate on the device is required Please make sure it is available and store it on the device during its lifetime To confirm the date of purchase for warranty service or presentation of other legal requirements urge you need to retain proof of purchase cheque receipt and other documents confirming the date and place of purchase The good...

Page 18: ...ты бар электрик мамандары арқылы өткізіледі Желдеткіштерді белгіленіп көрсетілген температура аумағынан 1 C тан 40 C дейін тыс болған жағдайларда қолдануға болмайды Желдеткішті отын жанарғысы бар құралдардан түтін шығаратын түтігімен жабдықталған желдету магистраліне бірге орнатылуы рұқсат етілмейді Ақаулықтар табылған жағдайда автоматты өшіріп S1 бөлшегін OFF позициясына қойып электрик маманын ша...

Page 19: ...роллері бар тұрмыстық белағаштық каналдық қапталған мультиопциялық екі режимдік электр желдеткіштер EC Электрмен комутацияланатын түрмыстық арналы өстік элеткр желдеткіштері Name of color Сәндік орындалудағы Ivory Champagne Gray metal White carbon Black carbon Dark gray metal Chrome Gold Matt black Obsidian түсті тұрмыстық арналы өстік электр желдеткіштері Белгілеу үлгісі SLIM 5 C MR 02 RIO BREEZE...

Page 20: ...RA BREEZE PARUS SILENT SLIM RIO STANDARD PRO B A F D C Үлгі d A B X Y E F С AURA 4 100 155 155 135 135 70 7 24 AURA 5 125 175 175 155 155 78 8 5 24 AURA 6 149 5 205 205 183 5 183 5 108 28 BREEZE 4 98 175 220 135 135 74 6 44 BREEZE 5 123 190 237 160 160 79 6 52 PARUS 4 100 175 220 140 175 48 8 37 PARUS 5 125 219 275 175 220 54 10 42 RIO 4 98 170 170 135 135 74 6 38 RIO 5 123 200 200 160 160 79 6 38...

Page 21: ...кіштері желдету ауа өткізгіштерімен және дербес түрде орнатылып қойыла алынады S3 S1 қорғау автоматтың схемадағы белгіленуі S1 қорғау автоматы S2 сыртқы өшіргіші Ішіне құрастырылған S3 айырғыш тартпалы айырғышы S2 сыртқы өшіргіштің схемадағы белгіленуі S3 құрастырылған айы рғыштың белгіленуі ЖЕЛДЕТКІШТЕРІН ҚОСУ БОЙЫНША НЕГІЗГІ СХЕМАЛАРЫ 1ші схема Желдеткіштердііскеқосу базалықнұсқа X клемматақтасы...

Page 22: ...сындағы кабелді өткізу үшін арналған саңылауынан 1 өткізіңіз сымдар оқшаулауын 5 7 мм ұзындығында шешіңіз сымдарды Х клемма тақтасына енгізіп оларды бұрама арқылы қыстырыңыз AURA 6 SILENT 6 қосу үшін 2 суретті және 4 электр тізбегін қараңыз сымдарды қысқыш 2 көмегімен бекітіп алыңыз декоративтік тақтасының бекіткіштерін тұрқыдағысаңылаулармен үйлестірңіз панельвинт бұрамасымен бекітіңіз 2ші сурет ...

Page 23: ...8ші сурет BREEZE 02 RIO 02 9ші сурет PARUS PRO 10ші сурет PARUS 02 1 2 2 1 S3 PRO 9ші 11ші суреттер қорғау қақпағын шығарып алыңыз желі сымын желдеткіш тұрқысындағы кабелді өткізу үшін арналған саңылауынан 1 өткізіңіз сымдар оқшаулауын 5 7 мм ұзындығында шешіңіз сымдарды Х клемма тақтасына енгізіп оларды бұрама арқылы қыстырыңыз сымдарды қысқыш 2 көмегімен бекітіп алыңыз қорғау қақпағын орнына қай...

Page 24: ...үйесі ластанған Желдету жүйесін тазалаңыз Жоғары шу немесе діріл Қанатша ластанған Қанатшаны тазалаңыз Желдеткіш бекітілмеген немесе дұрыс орнатылмаған Монтаждау қатесін жойыңыз Желдету жүйесі ластанған Желдету жүйесін тазалаңыз Мүмкін болатын ақаулар және оларды жою тәсілдері ЕСКЕРТПЕ Желдеткіш пен көмекші тексергіш құрылғысы құрастырып монтаждау және немесе күту уақытында электр қуат көзінен ажы...

Page 25: ... ақаулықтар арқылы желдеткіш жұмысының бұзылуы пайда болса тұтынушыға желдеткіштің шығарушы зауытында бұйымдағы және бұйым паспортындағы сериялық нөмірі бірдей болғанда ауыстырылып берілуі тиіс Бұйымда міндетті түрде зауыттық тақташасында бар болуы тиіс Бұйымыңызда осы тақташасының бар болуын тексеріп оны бұйымның бүкіл қызмет мерзімі бойынша бұйымда сақтап жүріңіз Кепілдеме мерзімі бар болғанда б...

Page 26: ... элек триками имеющими специальный допуск к выполняемым работам Запрещается эксплуатация вентиляторов за пределами указанного температурного диапазона от 1 С до 40 С Запрещается установка вентилятора в одну вентиляционную маги страль с дымовыводящей трубой от устройств имеющих топливные горелки В случае обнаружения неисправностей отключить автомат S1 в положении OFF и вызвать электрика ВНИМАНИЕ Пе...

Page 27: ... MRH Электровентиляторы осевые канальные бытовые накладные мультиоп ционные двухрежимные со встроенным контроллером Fusion Logic 1 1 оборудованные фототаймером и датчиком влажности EC Электровентиляторы осевые канальные бытовые с электро коммутируемым двигателем Name of color Электровентиляторы осевые канальные бытовые в декоративном исполнении с наименованием цвета Ivory Champagne Gray metal Whit...

Page 28: ...V частотой 50 60 Hz AURA BREEZE PARUS SILENT SLIM RIO STANDARD PRO B A F D C Модель d A B X Y E F С AURA 4 100 155 155 135 135 70 7 24 AURA 5 125 175 175 155 155 78 8 5 24 AURA 6 149 5 205 205 183 5 183 5 108 28 BREEZE 4 98 175 220 135 135 74 6 44 BREEZE 5 123 190 237 160 160 79 6 52 PARUS 4 100 175 220 140 175 48 8 37 PARUS 5 125 219 275 175 220 54 10 42 RIO 4 98 170 170 135 135 74 6 38 RIO 5 123...

Page 29: ...РИНЦИПИАЛЬНЫЕ СХЕМЫ ПОДКЛЮЧЕНИЯ ВЕНТИЛЯТОРОВ Схема 1 Подключения вентиляторов базовая модель X клеммная колодка 2 пары Схема 2 для моделей STANDARD PARUS Подключения вентиляторов оснащённых опцией 02 тяговый выключатель X2 клеммная колодка 3 пары Схема 3 для моделей BREEZE SLIM RIO Подключения вентиляторов оснащённых опцией 02 тяговый выключатель X клеммная колодка 2 пары Схема 4 для моделей AURA ...

Page 30: ...ти сетевой провод через кабельное отверстие 1 в корпусе вентилятора и кабельный ввод вставить провода в клеммник Х зажать их винтами для подключения AURA 6 SILENT 6 смотри рис 2 и электрическую схему 4 закрепить провода при помощи кабельного зажима 2 совместить фиксаторы декоративной панели с пазами в корпусе закрепить панель винтом Рис 1 AURA SILENT 2 1 Рис 2 AURA 6 SILENT 6 Рис 5 STANDARD Рис 6 ...

Page 31: ...RUS PRO Рис 10 PARUS 02 1 2 2 1 S3 PRO Рис 9 11 снять крышку отсека клеммника вентилятора провести сетевой провод через кабельное отверстие 1 в корпусе вентилятора снять изоляцию проводов на длине 5 7 мм вставить провода в клеммник Х зажать их винтами закрепить провода при помощи кабельного зажима 2 установить на место крышку отсека клеммника и закрепить лицевую панель пу тем легкого давления Уста...

Page 32: ...од воздуха Засорена система вентиляции Очистите систему вентиляции Повышенный шум или вибрация Засорена крыльчатка Очистите крыльчатку Вентилятор не закреплен или неверно смонтирован Устраните ошибку монтажа Засорена система вентиляции Очистите систему вентиляции Возможные неполадки и способы их устранения ВНИМАНИЕ Вентилятор и вспомогательное контролирующее оборудование должно быть изолировано от...

Page 33: ... имеет право на замену вентилятора на пред приятии изготовителе при условии совпадения серийных номеров на изделии и в паспорте Наличие фирменной заводской типовой таблички на приборе обязатель но Пожалуйста убедитесь в ее наличии и сохраните ее на приборе в течение всего срока службы прибора Для подтверждения даты покупки прибора при гарантийном обслуживании или предъявлении иных предусмотренных ...

Page 34: ...KZ EN AR RU 34 For entries Жазбалар үшін Для заметок ...

Page 35: ...ia tel 4912 24 16 00 e mail sale era trade www era trade ЭРА ЖШҚ 390047 Ресей Рязань қ Новоселковская 17 тел 4912 24 16 00 e mail sale era trade www era trade Edition from 12 07 2021 ERA LLC reserves the right to make changes without notification ЭРА ЖШҚ ешбір хабарлама бермей отыра өзгертулерді енгізуге құқылы ООО ЭРА сохраняет за собой право вносить изменения без уведомления ...

Page 36: ...H EC Type Оption Sold Сатылды Продан Name of company shop stamp Сату орынның аты дүкен мөрі Наименование предприятия торговли штамп магазина Serial number Сериялық нөмірі Серийный номер __________________________ Sale date Сату уақыты Дата продажи ____________________________ Date manufacture Шығарылған уақыты Дата изготовления ________________________ Mark of Quality Department Техникалық бақылау...

Reviews: