background image


24

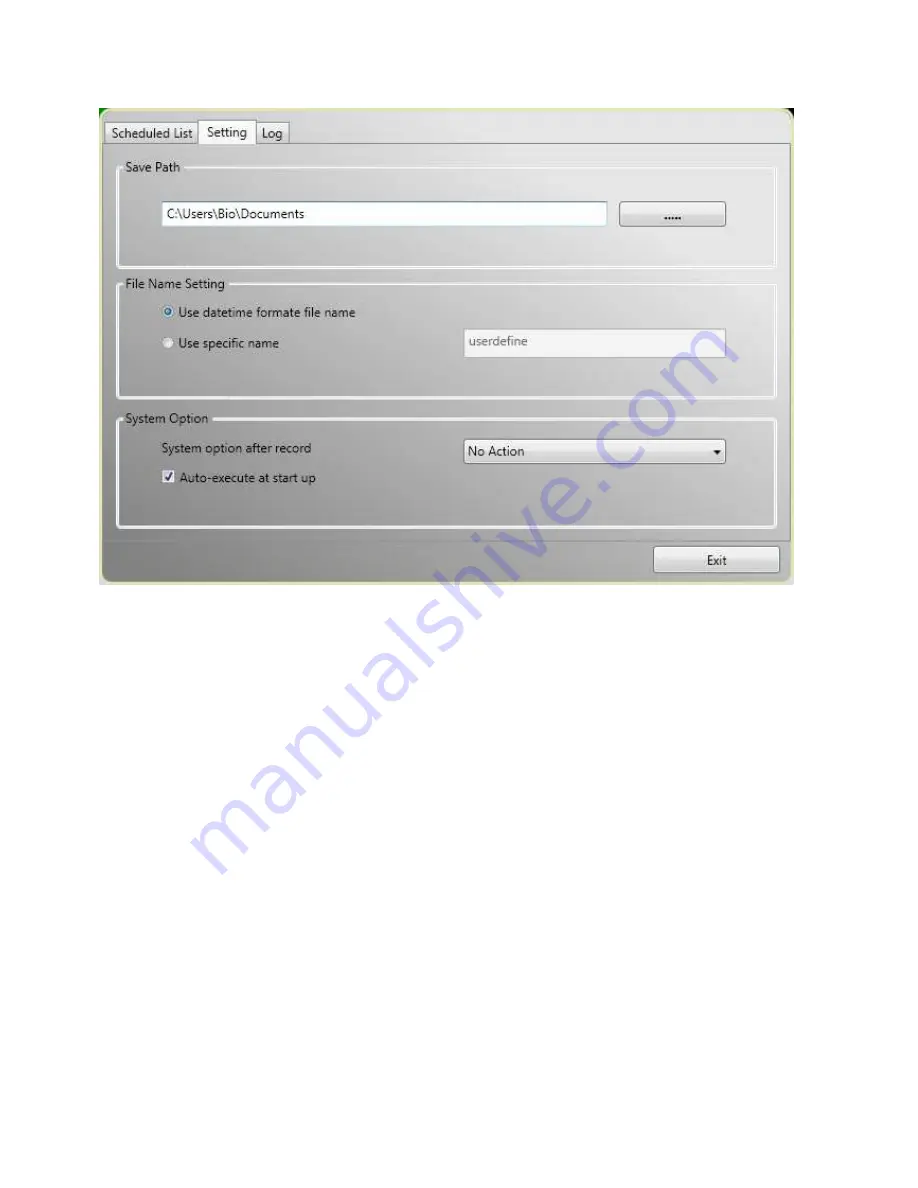
In Setting Tab. 


Save path

Indicate where to save the recorded file. 

File Name

2 options here, use specific name or default name. 

System Option

After record is completed, you can choose No Action / Suspend / Shutdown the PC…… 

Auto-execute at start up

To ensure the schedule record perform correctly, please enable the checkbox. 

Summary of Contents for HD Game Capture GC500

Page 1: ...1...

Page 2: ...1 The Driver Installation of GC500 Gaming Capture Box 4 2 2 Diamond Video Capture Application Installation 5 Chapter 3 FAQ 6 3 1 How to check if the driver has been installed successfully or not 6 3 2...

Page 3: ...equirements Pentium IV 1 6GHz or higher recommended 1024 MB RAM of system memory or above recommended One available GC5002 0 port Graphics Card Must support DirectX 9 0c Sound Card AC97 compatible sou...

Page 4: ...setup the Found New Hardware Wizard window will pop up Please click Cancel and you can make use of GC500 Gaming Capture Box Quick Installation for proper installation 2 The Quick Installation provides...

Page 5: ...llShield Wizard will guide you through installation of Diamond Video Capture application Click Next to continue 6 When the message as the one on the left image click Finish to end the installation 7 A...

Page 6: ...ck on the plus icon of Sound video and game controllers to open the device list You can find the GC500 Capture Device See Fig 1 below Fig 1 3 2 How to uninstall device driver Ans Click on Start on the...

Page 7: ...de located on the box 2 Installation CD Version printed on the CD label 3 The version of Windows that your system is running 4 The manufacturer and model of your computer 5 CPU type and speed example...

Page 8: ...NTY IS ONLY APPLICABLE IF PRODUCT REGISTRATION IS RECEIVED WITHIN 30 DAYS OF THE DATE THE PRODUCT IS PURCHASED TO BE ELIGIBLE FOR THIS WARRANTY YOU MUST REGISTER AT diamondmm com THE ORIGINAL SALES RE...

Page 9: ...jurisdictions may not allow the exclusion or limitation of incidental or consequential damages for products supplied to consumers or the limitation of liability for personal injury so the foregoing l...

Page 10: ...s V1 0 Chapter 1 Introduction 2 1 1 Software Features 2 1 2 Console Setup 2 Chapter 2 DM Cap 5 2 1 Main Panel 5 2 2 The Tool Menu 11 Chapter 3 Playback 15 Chapter 4 Setup 16 4 1 General Setting 16 Cha...

Page 11: ...ase notice that the multimedia functions may vary depending on the product you purchased 1 1 Software Features It s a multi functional graphical software application program that consumes less RAM spa...

Page 12: ...can see the capture device Click Next 3 Please select the video standard for your input source and click Next U S Standard leave Default Settings 4 Please select capture source and Click Exit to finis...

Page 13: ...here Analog Device YPbPr If you choose Analog Device YPbPr please make sure your game console display setting is 480i 576i Analog Device YPbPr HD If you choose Analog Device YPbPr HD please make sure...

Page 14: ...game consoles 2 1 Main Panel Buttons Capture Snapshot Display Ratio Volume Down Volume Up Mute Playback Setup Source Input Schedule Record Capture Click to capture the scenes you like Once you captur...

Page 15: ...6 Snapshot You can click the Snapshot icon to take snapshots When the screen shows Snapshot OK it means the image has been successfully taken into your file folder as picture files...

Page 16: ...the arrow at the right of this op tion There are Free 4 3 16 9 It is the same as you click on the Display Ratio function icon on the inter face Free The initial ratio when you start VivaTV and you ca...

Page 17: ...8 Volume Down Adjust DM Cap volume to be loud or quiet Volume UP Adjust DM Cap volume to be loud or quiet...

Page 18: ...9 Audio Mute Mode Turn DM Cap volume on or off Playback Playing recorded file from PC...

Page 19: ...10 Schedule Recording You can schedule your record process Source Input Setting your video source...

Page 20: ...11 Setup Setting functions 2 2 The Tool Menu Always On Top Apply To All Channels If you select this option the adjusted display ratio will be applied to all of your available channels...

Page 21: ...12 Display Ratio You can change your display ratio from free 4 3 16 9 Preview Windows You can setting Full Screen Source Input You can choose signal sources...

Page 22: ...u can choose to capture formats Snapshot Activate Snapshot function to take the photo You can also do the same if you click on the Snapshot icon on the main control bar Mute you can set the DM Cap no...

Page 23: ...14 Volume Up Increase the audio volume Volume Down Decrease the audio volume Exit Close Exit DM Cap window...

Page 24: ...15 Chapter 3 Playback When you click on this icon you can choose a recorded file for playback or a file from folders in your PC Performed the PIP mode when playback recorded file...

Page 25: ...up page Those can help you to improve your power saving scanning adjustment colorful UI and language and location 4 1 1 Sleep Timer You might watch TV but get sleepy after minutes later or leave your...

Page 26: ...17 4 1 2 User Interface 4 1 3 Other 4 1 4 Marquee Setting Here we can set the properties of the marquee such as moving distance interval the content and so on...

Page 27: ...18 4 1 5 Video Standard Here we can set Video Standard...

Page 28: ...19 4 1 6 Display Ratio Here we can set the display ratio Free 4 3 16 9 4 1 7 OSD Here we can set the OSD color show or not and adjust the position the font color...

Page 29: ...g Here we can adjust the brightness blue red contrast saturation the VMR type and preview windows size 4 1 9 Capture Here we can change video path capture name setting capture format capture bitrate a...

Page 30: ...21 4 1 10 Snapshot Here we can set the snapshot file format where to save the pics and the how many pics will be saved when using the snapshot function...

Page 31: ...epends on your signal source Capture Format Capture Size Audio option BitRate choose the proper option to meet your need Time Option setting You can set the Start End time Record Rule You can choose t...

Page 32: ...dule entry Clear All Clear All schedule entries S R P O Schedule Record in Power Off mode When click the S R P O system will enter hibernate mode and power off Because the S R P O need system hibernat...

Page 33: ...orded file File Name 2 options here use specific name or default name System Option After record is completed you can choose No Action Suspend Shutdown the PC Auto execute at start up To ensure the sc...

Page 34: ...25 In Log tab Here will show the log for schedule recording...

Reviews: