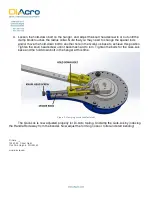
2. With the Clamp Block that corresponds to the radius collar installed onto the Quik-Lok, Index
the handle rod forward, as shown in Figure 2.
Figure 2: Handle Rod in the Forward, or Clamped, position
Page 1: ...der NOTE Read the entire procedure prior to setting up the Quik Lok A Model 2 bender is shown throughout this procedure All other Quik Lok assemblies will be set up in the same manner 1 Place the desired radius collar on your bender and mount the Quik Lok assembly so that the clamp block is parallel with the flat side of the radius collar as shown in Figure 1 below Leave the bolts slightly loose f...
Page 2: ...2 With the Clamp Block that corresponds to the radius collar installed onto the Quik Lok Index the handle rod forward as shown in Figure 2 Figure 2 Handle Rod in the Forward or Clamped position ...
Page 3: ...e this position Tighten the knurl head screw until it becomes hard to turn Tighten the bolts for the Quik Lok base and the hold down bolt in the hanger at this time Figure 3 Clamping pressure adjustment The Quik Lok is now adjusted properly for Di Acro tooling Unclamp the Quik Lok by indexing the Handle Rod away from the bender Now adjust the forming nose or roller and start bending Di Acro 12430 ...