FR
B34412442900
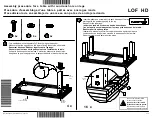
Instructions
Limite de Poids: 450 Lb / 204 Kg
Conseils utiles
●
Déplacez votre nouveau mobilier avec soin, nous recommandons deux
personnes pour soulever et transporter le mobilier vers son nouvel emplacement.
●
Votre mobilier DHP peut être démonté et reassemblé pour faciliter les
déménagements.
●
Certaines pièces ont été pré-assemblées pour ce produit. Ils sont illustrés sur
cette page et disponibles pour le remplacement.
●
Enlevez les tiroirs avant de déplacer votre lit.
Avertissement
Pour des raisons de sécurité et pour prévenir les blessures:
●
Ce lit n'est pas conçu pour être utilisé par des enfants de moins de 4 ans.
●
Interdire le saut et le chahut sur le lit.
●
Utilisez uniquement un matelas de 74" - 75" de long par 53" - 54" de large.
●
Ne pas utiliser rehausseur de lit sous ce produit.
Étape 1
Attacher
Z
et
F
à
C
avec .
Étape 2
Attacher
F
et
Z
à
D
avec .
Note:
Les orificies en
F
doivent etres orientés vers le haut.
Étape 3
Attacher
E
X 2 à
C
et
D
avec .
Étape 4
Attacher
I
à
B
avec .
Étape 5
5.1
Attacher
Z
X 2 à
A
avec .
5.2
Attacher
E
à
B
avec .
Étape 6
Insérer
G
X 2 dans
M
avec .
Étape 7
Attacher
G
X 2 à
A
et
B
avec .
Étape 8
Attacher
H
à
C
et
D
avec .
Note:
Les petites tubes sur
H
doivent etres tournés vers la pièce
B
.
Étape 9
Attacher
R
à
E
et
G
avec .
Étape 10
10.1
Insérer
P
dans
X
;
10.2
Presser
P
sur
E
et
F
, répéter la même procédure pour le côté opposé.
10.3
Insert extrémités de lattes
P
dans
Y
; presser
Y
dans
G
comme illustré.
Répétez la même procédure de l'étape précédente pour chaque ligne de lattes en
allant vers l'arriéré.
Étape 11
Attacher
N
X 2 à
S
et
L
avec .
Note
: Pour une meilleure appareance, les panneaux avec les agrafes doivent etres
orientés
vers l'exterieur.
Étape 12
Attacher
K
à
S
,
L
et
N
avec .
Étape 13
Attacher
Q
X 4 à
K
avec .
Étape 14
14.1
Attacher et à
J
où indiqué;
14.2
Attacher
S
à
J à
avec et .
Étape 15
Alignez les tiroirs et puis poussez-les vers l'intérieur.
Verrouillez le tiroir en insérant l'épingle dans la fente.
5
5
5
4
5
4
2
2
2
2
7
7
6
1
8
3
8
Summary of Contents for Maven 4124429
Page 3: ...3 B34412442900...
Page 9: ...9 B34412442900 Step 3 Attach E X 2 to C and D with X 4 E C D E E C 5 5...
Page 10: ...10 B34412442900 Step 4 Attach I to B with X 3 4 I B I B 4...
Page 12: ...12 B34412442900 Step 6 Insert G X 2 into M with X 2 M M G G G G 2 2...
Page 13: ...13 B34412442900 Step 7 Attach G X 2 to A and B with X 4 G G A B G A 2 2...