N
P
11
B34FF211605900
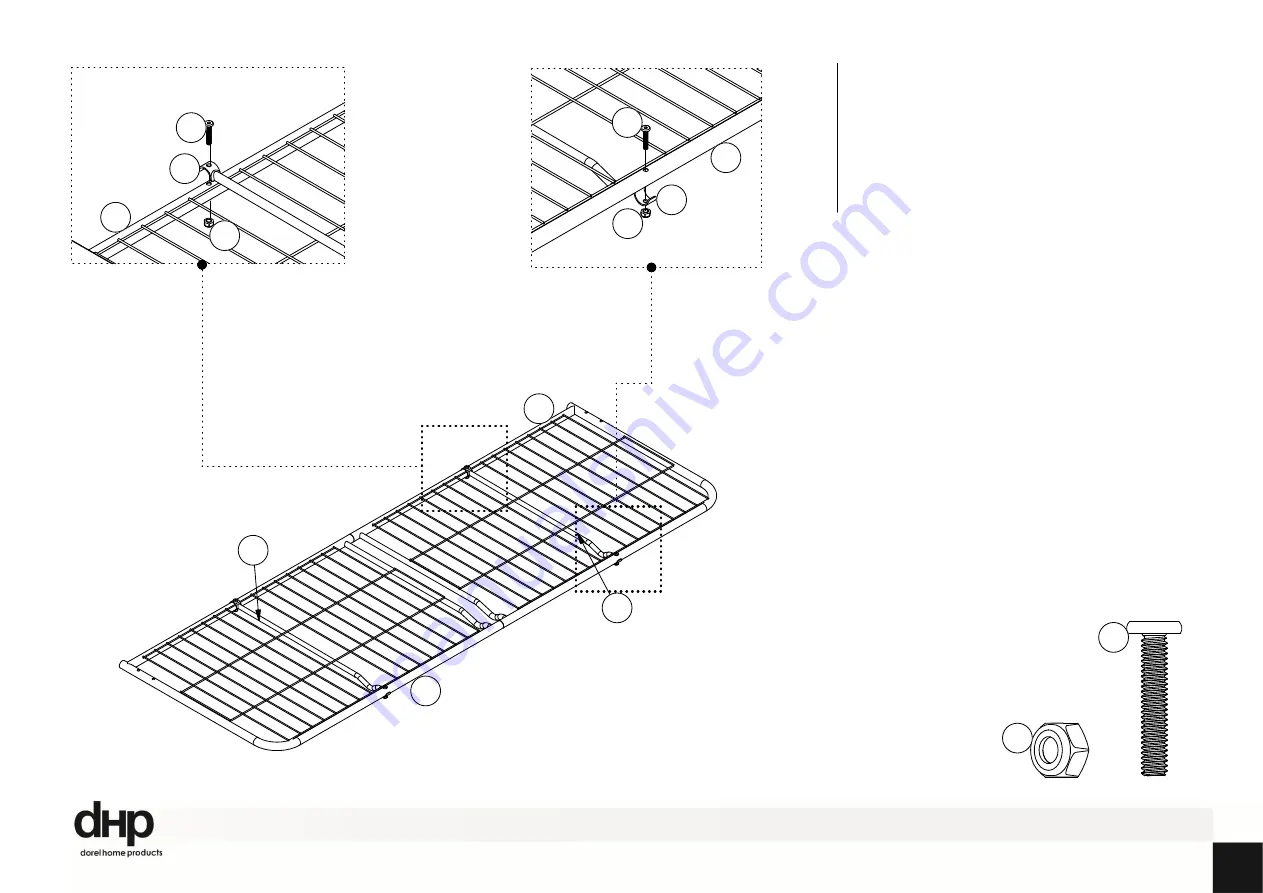
Step 6
For SEAT FRAME
Attach (Q) X 2 to (O & P) with BOLTS
2
and NUTS
5
.
X 4
O
Q
6.1
6.2
SEAT FRAME
Page 1: ...2016 01 06 If parts are missing or damaged we will gladly ship your replacement parts free of charge Lot Number Thank you for purchasing from DHP THIS INSTRUCTION BOOKLET CONTAINS IMPORTANT SAFETY IN...
Page 2: ...ty period only The defective components will be repaired or replaced without charge subject to the terms and conditions described above Visit www dhpfurniture com to view the limited warranty valid in...
Page 3: ...3 B34FF211605900...
Page 4: ...y Replacement Parts Visit www dhpfurniture com eng support home A Arm T617610 X 2 Mesh Panel 1 T613520 X 2 Mesh Panel 2 T613530 X 2 Left Mechanism T612380 X 1 Hook T612410 X 3 Retainer T613540 X 2 Bra...
Page 5: ...ly tighten all the hardware until the entire assembly is complete unless otherwise indicated in the step by step instructions 6 7 8 4 5 3 2 1 5 16 X 2 1 16 X 8 1 4 X 1 5 16 X 14 1 4 X 1 1 16 X 4 1 4 X...
Page 6: ...6 B34FF211605900 Step 1 Attach L to A with BOLTS 3 and NUTS 5 Attach R to A with BOLTS 3 and NUTS 5 X 4 X 4 3 A A 3 3 L 3 3 R 5 5 5 5...
Page 7: ...7 B34FF211605900 Step 2 Insert H X 2 to G x 4 with SCREW 7 X 8 G G G G H H 7 7 7 7 7 7 7 G H...
Page 8: ...8 B34FF211605900 Step 3 Attach D X 2 to H X 2 with BOLT 4 X 2 H H D D 4 4 4 D H 4...
Page 9: ...9 B34FF211605900 Step 4 4 1 Attach sub assembly G H x 2 from STEP 3 to A with BOLTS 1 and NUTS 6 4 2 Attach 8 to G H in the locations shown X 8 G G G G H H A A 1 X 4 6 X 8 8 8 H G 1 A 6 8 8 4 1 4 2 8...
Page 10: ...FRAME and BACK FRAME Join panels O X 2 and P X 2 by inserting E X 2 between both panels and securing with SCREWS 7 as illustrated Make sure that the wire mesh of both MESH PANELS is on the same side...
Page 11: ...11 B34FF211605900 Step 6 For SEAT FRAME Attach Q X 2 to O P with BOLTS 2 and NUTS 5 X 4 O P Q Q X 4 2 5 P Q 5 P 2 5 2 Q 6 1 6 2 SEAT FRAME...
Page 12: ...CN NUT 12 and BOLT 11 Regular BOLT 2 and NUT 5 X 2 O P Q Q X 2 2 5 X 2 X 2 11 12 O O 5 12 Q 11 Q 2 BACK FRAME For BACK FRAME Attach Q X 2 to O P with JCN NUTS 12 and BOLTS 11 Attach Q X 2 to O P with...
Page 13: ...mbled from the step 6 and BACK FRAME assembled from step 7 to L R using BOLTS 2 and NUTS 5 Hand tighten all 4 bolts and nuts on L R and then use the HARDWARE 9 and 10 to tighten securely X 8 O O P P R...
Page 14: ...14 B34FF211605900 Step 9 O P O P T T T 9 1 9 2 Lift the backrest until futon is in seat position and then attach T X 3 to O P as illustrated P P O O...
Page 15: ...15 B34FF211605900 Step 10 O P S O S 7 O S 7 X 4 Attach S X 2 to O P on the seat frame with screws 7 as illustrated...
Page 16: ...16 B34FF211605900 Step 11 Stick B C to A X 2 via velcro as illustrated sequence A B C A C A C 1 1 1 1 2 2 C A 3 Pinching Hazard Avoid finger being stuck when approaching to the Mechanism...
Page 17: ...17 B34FF211605900 Step 12 To use your futon...
Page 18: ...unit to its new location Your DHP furniture can be disassembled and reassembled to move Some parts have been pre assembled for this item They are illustrated on this page and available for replacement...
Page 19: ...ults remove mattress from packaging and lay mattress flat for 24 hours Clean the seat and back of the futon with a soft cloth do not use harsh chemicals or abrasive cleaners Move your new furniture ca...
Page 20: ...o trimestre en el que se realiza la compra Visite www dhpfurniture com eng register para m s detalles acerca de este concurso Registra tu producto y participa para ganar DHP garantiza que este product...
Page 21: ...or aseg rese de que las piezas esten fuera del alcance de los ni os No utilice herramientas el ctricas para ensamblar su mueble Este tipo de herramientas pueden rasgar o da ar las partes Partes Piezas...
Page 22: ...eferencias Riesgo de Pellizco Mantenga las manos alejadas de los mecanismos instalados en los lados derecho e izquierdo de los apoya brazos No utilice elevadores para cama con este producto Instruccio...