DGTEC DG-FV500PVR User Manual Download Page 10


9


ASSEMBLY AND PARTS LIST 


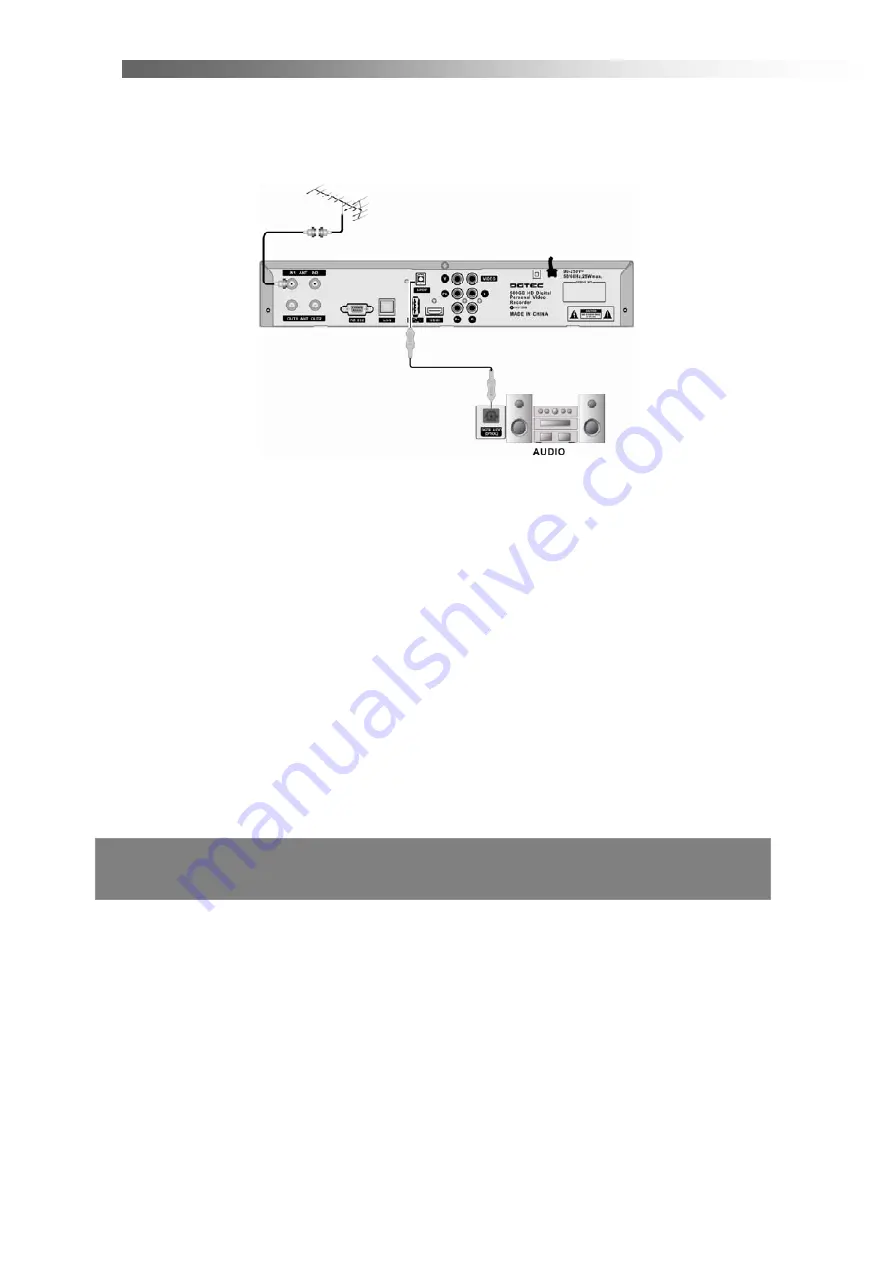
Option 3- Video connection 

4. 

Connect the

 yellow 

video lead and 

AUDIO L/R (white and red lead)

 out 

connectors on the STB to the 

AV IN

 on the back of the TV. 

Optional: 

Connect 

Optical S/PDIF

 out connector on the HDTV STB to the Audio-Amplifier using 

optical cable.


Note: Please ensure that your TV is set to the correct input channel depending 

on your connection type.


Summary of Contents for DG-FV500PVR

Page 1: ......

Page 2: ...ntrol Unit 6 1 5 Installing the batteries in the remote control 7 1 6 Connecting to Equipment 8 GETTING STARTED 10 2 1 MENU INFORMATION 12 2 2 FAVORITES 13 2 3 STANDBY 14 2 4 PARENTAL CONTROL 14 2 5 T...

Page 3: ...his product or require set up assistance please contact the DGTEC Service Centre The call is free from anywhere in Australia Our operators will assist you in plain English without the technical jargon...

Page 4: ...ectrical shock do not expose the appliance to water Ensure that objects filled with liquids such as vases are not placed on the apparatus If an object or liquid gets into the unit disconnect the plug...

Page 5: ...concerning current operation such as CH number and recording information 3 Volume Left Right Button Moves the cursor left right when in the menu or adjusts the volume level 4 CH Up Down Button Moves...

Page 6: ...nects to an External Audio Amplifier with S PDIF Optical Digital Audio 6 USB USB port is used for viewing external files on a memory stick and for possible software upgrades to be advised by DGTEC tec...

Page 7: ...ccess recordings Press to directly enter the RECORD menu 8 RED GREEN YELLOW BLUE Special keys in the menu such as system settings and so on 9 EXIT Press to escape from the current mode 10 BACK Press t...

Page 8: ...teries or batteries of a different type 4 If you don t intend to use the remote controller for an extended period remove the batteries to prevent possible leakage and corrosion 5 Do not drop apply sho...

Page 9: ...small loop cable diagonally from IN2 to OUT1 Option 1 YPbPr connection Cable not supplied 2 Connect the YPbPr out connectors and AUDIO L R out connectors on the back of the STB to the COMPONENT IN on...

Page 10: ...O L R white and red lead out connectors on the STB to the AV IN on the back of the TV Optional Connect Optical S PDIF out connector on the HDTV STB to the Audio Amplifier using optical cable Note Plea...

Page 11: ...The channels already found will be stored Now you are ready to watch digital TV channels and radio broadcasts In case you skip the First Time Installation screen you can press MENU key to bring up th...

Page 12: ...is transmitted 2 Press BACK EXIT key to close the teletext Note That Teletext service is available on the 7 network only EPG Electric Program Guide 1 Press GUIDE key to view the EPG information that...

Page 13: ...r 2 Channels should already be scanned if you followed the quick start wizard 3 All fields are already set for you Press MENU key the main menu will be displayed Menu Information Main menu consists of...

Page 14: ...dio list in this menu Choose the sub menu by keys then press OK to enter the channel list Once you have entered the channel list you can add or delete channels by using the color keys on the remote co...

Page 15: ...n menu then press OK button to enter the PARENTAL CONTROL menu You can change the PIN Code Parental Control Settings Parental rating Lock TV channels and Lock radio channels in this menu PIN Code The...

Page 16: ...input a correct PIN code to watch programs that you ve locked Lock radio channels The default password is 0000 Lock the radio channels stored in the receiver The method of operation is the same as tha...

Page 17: ...is mentioned below Press key to enter the channel list and then select the channel which you want to record using keys Press key the following screen will appear You can start your recording by press...

Page 18: ...particular channel for the next 8 days Press the RED button to record a program of your choice A red dot will appear next to the program highlighted Pressing the GREEN button will access an informatio...

Page 19: ...ting the file renaming the file locking the file to restrict viewing and protecting the file will not allow you to remove During playback mode there are certain functions that can be utilised To STOP...

Page 20: ...r frequency If the signal bars top right hand corner are colored when Tune is pressed then signal is present on that particular frequency 2 9 USB In the USB menu you can look or play the files in the...

Page 21: ...es Other files may not be compatible You can enter the options by pressing the RED key In the options menu you can create directory copy selection or remove selection Tag the file of your choice by pr...

Page 22: ...e menu Video settings Set the parameters about the video such as video format resolution and so on Audio settings Set the parameters about the audio such as audio mode audio output and so on Disk sett...

Page 23: ...nd TELETEXT You can navigate by pressing Press key to enter the shortcut of Volume You can change the volume by pressing Press key to enter the Time Shift shortcut Use the navigation keys to stop paus...

Page 24: ...ite List in Simple mode If you press key on the remote controller the channel list is displayed Use key to select the channel press OK then you can watch the channel your choice You can enter the favo...

Page 25: ...onnections Picture quality will vary compared to HD ready TV s however accessing the additional HD stations is still applicable What are the added benefits of a HD PVR STB The added benefits of a HD P...

Page 26: ...Power Check the power cord for defects Check mains power switch is on Press power button on RCU Check toggle switch on front of unit is on No Reception Check the Signal Strength Indictor and check the...

Page 27: ...YPbPr HDMI Video SD Video Output Type CVBS Algorithm MPEG 1 layer I and II Ac3 Frequency Response 20Hz 20k Hz 0 6dBu Sampling Frequency 32 44 1 48KHz Audio Output Type Stereo RCA photo jack Audio Digi...

Reviews: