background image

FRONT AND 

BACK PANELS

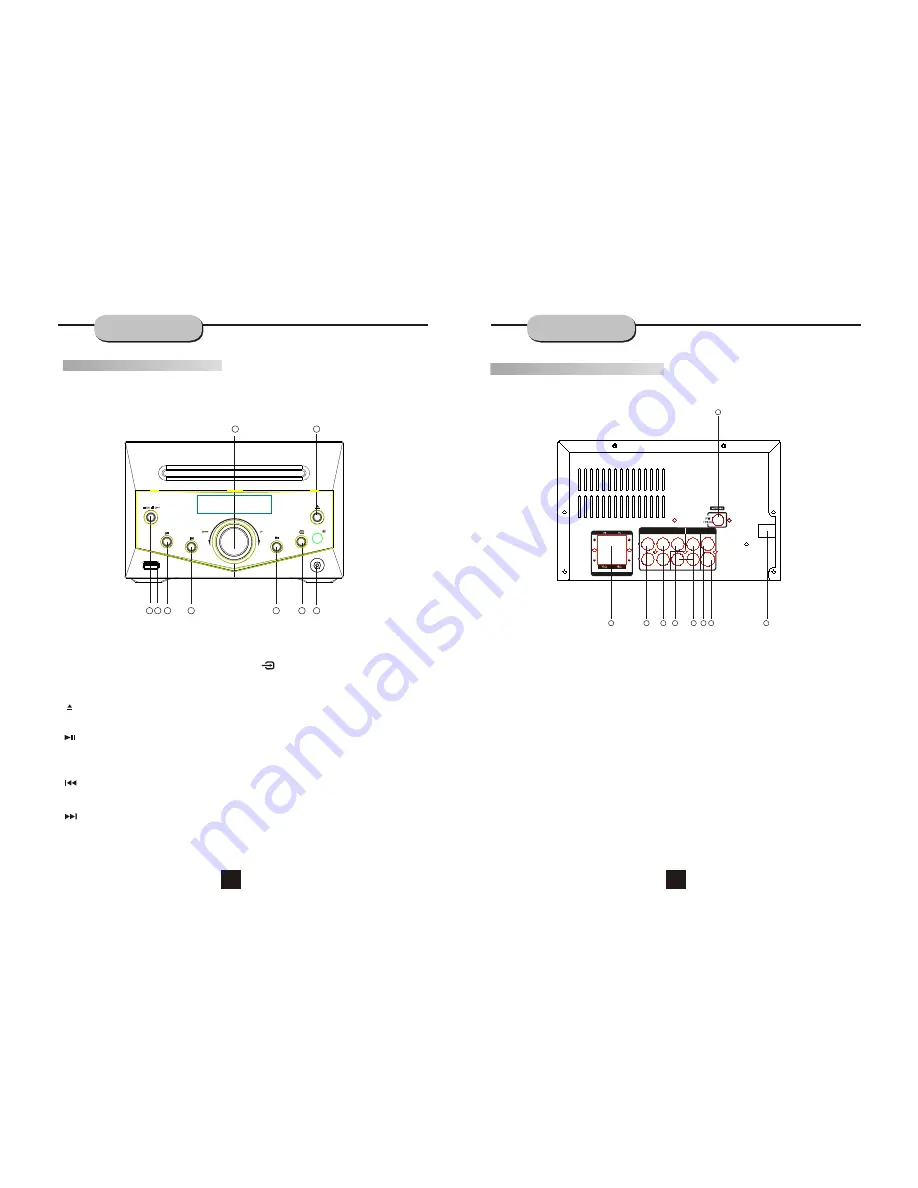
Back Panel Functions

8. ANTENNA


Use  to  connect  the  provided indoor FM  

     antennas.

9.  100-240V~  50/60H

Z

Front Panel Functions

6.  

 NEXT

    While  in  the  DVD  status,  press this button for

next  track.     

2. VOLUME


Use  this  button  to  control  the  unit's volume. It 
controls 2  channels simultaneously.


Use this button to open and close the disc tray


while in DVD mode. 

3.     OPEN/CLOSE

5.  

 PREV

    While  in  the  DVD  status,  press this button for

previous track. 

1.PHONE

7. 

 INPUT SIGNAL SOURCE


Use  this  button  to select the proper input signal 
source. (Note: The selected input will correspond to 
the selected input terminal on the rear panel.)

8. USB CONNECT 

    Use only USB Memory Device

9. POWER

FRONT AND 

BACK PANELS


Use this button to begin play function while in 
DVD mode.


Use  this  button  to  pause  play  function while in 
DVD  mode.

PLAY /

    PAUSE

4. 

2. AUX INPUT


Use to connect input for  auxiliary   
music source.

3. LINE 


 OUT

7. S-VIDEO OUTPUT

1. FRONT/MAIN

    Use  to  connect  the  four terminals of the left 

and right front or main speakers.

4. COAXIAL DIGITAL AUDIO OUTPUT

6. VIDEO  OUTPUT

5. Component Videos Output
(Y,Cr/Pr,Cb/Pb)

SPEAKERS  IMPEDANCE  

AUDIO

VIDEO OUTPUT

COAXIAL

VIDEO

Y

S-VIDEO

Pb/Cb

AUX IN

LINE OUT

Pr/Cr

    100-240V~
         50/60H

Z

8

9

1

2

3

4

5

6

7

       Before  plugging  the  power  cord  into  the AC  
outlet, check to make sure all of the connections 
have been properly completed. When they have been, 
carefully plug power cord into outlet.
       Press the POWER button on the front panel  to 
power the unit. The display panel will light.
       When the unit is initially powered, a brief surge of 
electricity may cause  interference  with  other 
electronic equipment on the same circuit. If this occurs, 
connect the unit  to an  outlet on  a  different 
circuit. 

3

2

4

5

6

7

8

1

9

7

8

Summary of Contents for DG-6107IP

Page 1: ...INSTRUCTION MANUAL DG 6107iP Mini Combo DGTEC DG 6107iP...

Page 2: ...t Panel 7 Back Panel 8 Remote Control 9 Operating the remote control 10 Connections 11 Basic DVD operation 13 Playing the Radio 17 MPEG4 MP3 PLAYBACK 20 System Setup 21 LANGUAGE Setup 25 AUDIO SETUP 2...

Page 3: ...AVIS RISQUE CHOC ELECTRIQUE NE PAS OUVRIR 3 4...

Page 4: ...this copyright protection technology must be authorized by Macrovision Corporation and is intendedfor home and other limited viewing uses only unless otherwise authorized by Macrovision Corporation R...

Page 5: ...e this button to pause play function while in DVD mode PLAY PAUSE 4 2 AUX INPUT Use to connect input for auxiliary music source 3 LINE OUT 7 S VIDEO OUTPUT 1 FRONT MAIN Use to connect the four termina...

Page 6: ...the and signs on the batteries and inside the batteries compartment match up 3 Replace the battery compartment cover Notes Do not mix batteries from different manu facturers nor old ones with new If...

Page 7: ...DEVICES 1 2 3 4 1 TV set or screen 2 Front or main left speaker 3 Front or main right speaker 4 Viewer s location CONNECTING DEVICES SPEAKERS IMPEDANCE AUDIO VIDEO OUTPUT COAXIAL VIDEO Y S VIDEO Pb C...

Page 8: ...BASIC DVD OPERATION BASIC DVD OPERATION 13 14...

Page 9: ...usb Source to select the desired sound source 2 Pree source botton to switch to the fm Tuner the last station listened to will play Volume Control The volume may be adjusted by either turning the larg...

Page 10: ...ning state press the MEMO button The memory storage number will blink for four seconds in the display Press MEMO again to store the station Memory number Wave band Station frequency FM MHZ 1 To play p...

Page 11: ...ill not function correctly under the following condition 1 The disc is badly scratched damaged or dirty 2 The disc is not finalized 3 The recording format is not supported by the player When MPEG4 and...

Page 12: ...to play a disc When the disc is in the player user can enjoy USB Pressing the USB button on the remote Not all USB Devices are supported by this system 1 Setup Menu a Press thesetup button Themain se...

Page 13: ...INTERLACE YUV S VIDEO S VIDEO TV SYSTEM VIDEO TV TYPE PASSWORD RATING DEFAULT SYSTEM SETUP TV SYSTEM VIDEO TV TYPE PASSWORD RATING DEFAULT 4 3PS 4 3LB 16 9 4 3PS 4 3LB 16 9 SYSTEM SETUP Note When you...

Page 14: ...IO LANG SUBTITLE LANG MENU LANG OSD LANGUAGE AUDIO LANG SUBTITLE LANG MENU LANG LANGUAGE SETUP LANGUAGE SETUP SUBTITLE LANGUAGE OSD LANGUAGE AUDIO LANG SUBTITLE LANG MENU LANG LANGUAGE SETUP OSD LANGU...

Page 15: ...ust the audio frequency sampling rate to output the best audio effect 3 SPDIP OFF SPDIF RAW SPDIF PCM SPDIP OFF SPDIF RAW SPDIF PCM AUDIO OUT DOWN SAMPLE AUDIO SETUP 48K 96K 192K 48K 96K 192K AUDIO OU...

Page 16: ...BRIGHTNESS CONTRAST HUE SATURATION 12 10 8 6 4 2 0 VIDEO SETUP 6 DIGITAL SETUP DYNAMIC RANGE When LINE OUT is selected choose this setting to adjust the line out ratio for different effects DUAL MONO...

Page 17: ...3 Confirm that your iPod has been recharged 4 If the TV screen continues to be frozen for 80 seconds after inserting your iPod your iPod has to be reset Press and hold Menu and Center buttons of your...

Reviews: