


7
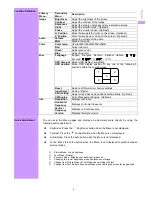
Operation
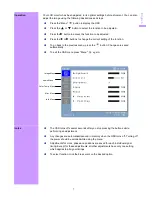
Your LCD monitor has been adjusted to its optimal settings before shipment. You can also
adjust the image using the following illustrations and steps.
Press the “Menu”
button to display the OSD.
Press the
▲
or
▼
button to select the function to be adjusted.
Press the
X
button to access the function to be adjusted.
Press the
W
or
X
buttons to change the current setting of the function.
To go back to the previous menu, press the
button
.
Changes are saved
automatically.
To exit the OSD menu press "Menu"
again.
-Position
50
Notes
The OSD turns off several seconds after you stop pressing the buttons while
performing an adjustment.
Any changes are automatically saved in memory when the OSD turns off. Turning off
the power should be avoided while using the menu.
Adjustments for clock, phase and positions are saved for each individual signal
timing. Except for these adjustments, all other adjustments have only one setting,
which applies to all signal timings.
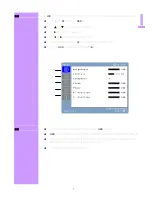
To select function, click the blue cursor on the desired option.
Misc. Menu
Image Menu
Info. Menu
Color Temp. Menu
English
Audio Menu
Summary of Contents for L-2239W
Page 1: ......
Page 14: ......
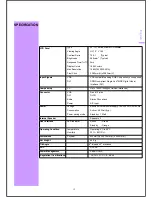
Page 15: ...2 Kensington LCD VGA VESA DPMS LCD EPA ENERGY STAR N TEK LCD VESA LCD DDC EDID...
Page 16: ...3 3 LCD LCD LCD LCD LCD LCD...
Page 17: ...4 LCD LCD LCD LCD LCD LCD LCD LCD 4 10cm LCD...
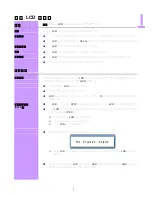
Page 19: ...6 OSD OSD On Screen Display 1 2 OSD 3 OSD OSD 4 W OSD 5 X OSD 6 OSD 7 LED...
Page 20: ...7 LCD OSD X W X OSD 50 OSD OSD...
Page 23: ...10 LCD LCD LCD LCD LCD LCD LCD LCD LCD LCD...
Page 26: ......
Page 28: ...3 LCD LCD LCD LCD LCD LCD LCD...
Page 29: ...4 LCD LCD LCD LCD LCD LCD LCD 4 10cm LCD...
Page 31: ...6 OSD OSD 1 2 Turbo OSD 3 Auto OSD OSD 4 W OSD 5 X OSD 6 OSD 7 LED...
Page 32: ...7 LCD OSD X W X OSD Position 50 OSD OSD OSD...
Page 35: ...10 LCD LCD LCD LCD LCD LCD LCD LCD LCD...
Page 86: ...202 000057...