background image

17

Chapter 5 Ports and Connectors

Chapter 5

Chapter 5 - Ports and Connectors

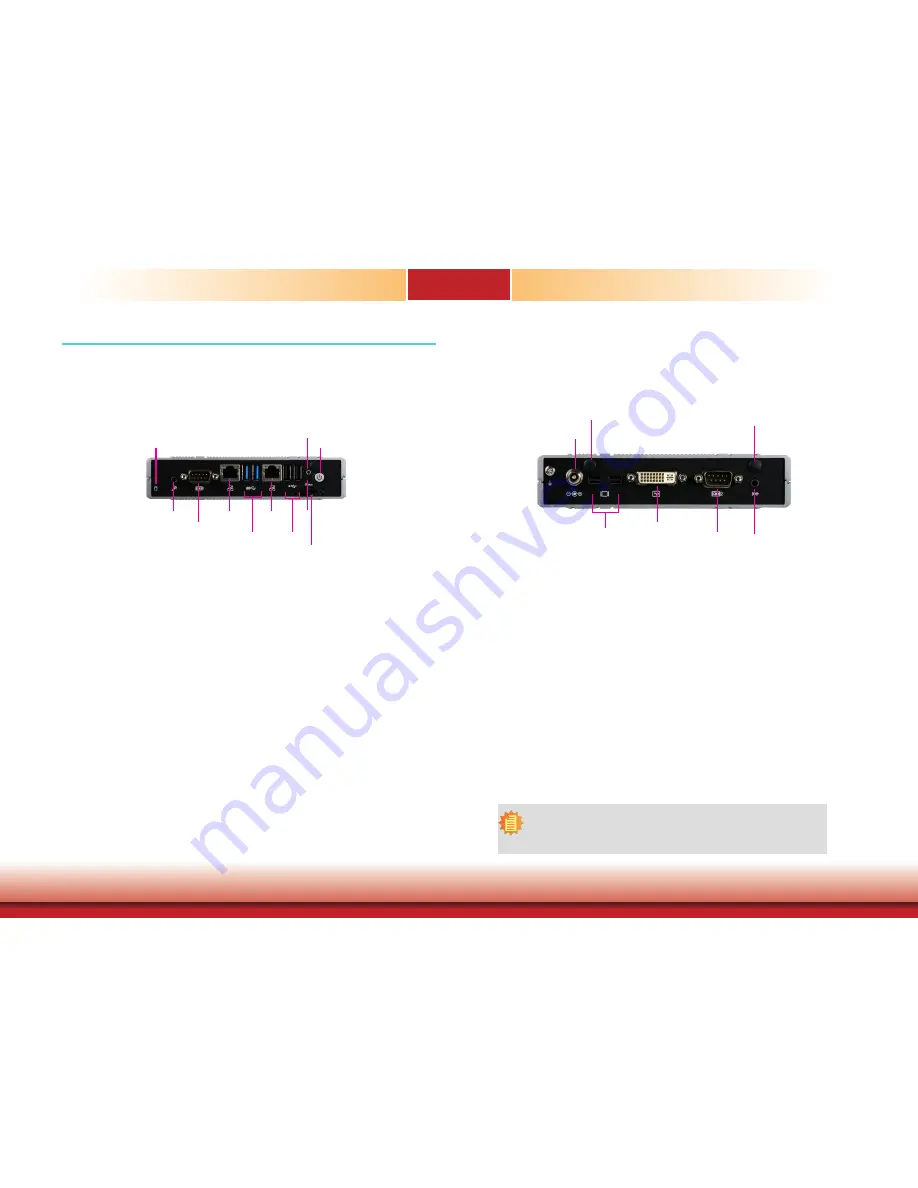
Front Panel I/O Ports

The front panel I/O consists of the following ports:

• Two RJ45 LAN ports
• COM 1
• 2 USB 3.0 ports
• 2 USB 2.0 ports
• Mic-in port
• Status LED (blue)
• HDD LED (blue)
• Reset button
• Distant power-on/off switch
• Power button with LED (green)

HDD LED 

Reset Button

Power Button 

LAN 1

Remote Power-on 

Switch

Mic-in

USB 2.0

Status LED

(blue)

LAN 2

COM 1

USB 3.0

Rear Panel I/O Ports

DC-in 

COM 2

Line-out

Mini DisplayPort

Antenna hole 

DVI-D

Antenna hole 

The rear panel I/O consists of the following ports:

• DC-in power socket
• Two Mini DisplayPorts*
• DVI-D port (DVI-I connector)*
• COM 2
• Line-out port

Note:

*  The system offers another SKU with a different combination of display 

outputs: VGA + 2 Micro HDMI.

Summary of Contents for EC800-AL

Page 1: ...1 Chapter 1 Introduction EC800 AL Fanless Embedded System User s Manual A46810817...

Page 2: ...FCC and DOC Statement on Class B This equipment has been tested and found to comply with the limits for a Class B digital device pursuant to Part 15 of the FCC rules These limits are designed to prov...

Page 3: ...Removing the Chassis Cover 11 Chapter 4 Jumper Settings 14 Clear CMOS Data bottom side 14 Chapter 5 Ports and Connectors 17 Front Panel I O Ports 17 Rear Panel I O Ports 17 USB Ports 18 Audio Ports 18...

Page 4: ...ge can damage computer components without causing any signs of physical damage You must take extra care in han dling them to ensure against electrostatic build up 1 To prevent electrostatic build up l...

Page 5: ...is before plugging the power cord Danger of explosion if battery incorrectly replaced Replace only with the same or equivalent type recommend by the manufacturer Dispose of used batteries according to...

Page 6: ...ont View Model Name EC800 AL Processor Intel Atom Processor E3900 Series Audio One line out and microphone port LAN Two LAN ports COM Two serial ports Display One DVI or VGA Two Mini DisplayPort or Mi...

Page 7: ...tion up to 1920x1200 60Hz 2 Mini DP or Micro HDMI ports Mini DP resolution up to 4096x2160 60Hz Micro HDMI resolution up to 3840x2160 30Hz Applications OpenGL 4 2 Direct X 11 1 OpenCL 1 2 OGL ES 3 0 C...

Page 8: ...i DisplayPorts Connect the Mini DP port of a display device DVI D Port DVI I connector Connects the DVI port of a display device COM 2 Port Connects RS232 RS422 RS485 devices It can also be used as an...

Page 9: ...9 Chapter 1 Introduction Mechanical Dimensions Chassis Dimension Chapter 1 35 10 108 20 161 00 Rear View Right View Top View Left View Front View...

Page 10: ...e date time and the type of hard disk drive 1 Power on the system 2 After the memory test the message Press DEL to run setup will appear on the screen Press the Delete key to enter the BIOS setup util...

Page 11: ...evices connected to it have been powered off 2 Disconnect all power cords and cables 3 The 4 mounting screws on the bottom side of the system are used to secure the cover to the chassis Remove these s...

Page 12: ...the connector 3 Place the plastic spacer on top of the screw hole push down on the other end of the M 2 card and use the provided mounting screw the longer one to secure the card on the system board...

Page 13: ...card with the key in the connector on the system board 2 Push down on the other end of the Mini PCIe card and use the provided mounting screw to secure the card on the system board Mounting screw Ins...

Page 14: ...pted b You forgot the supervisor or user password To load the default values stored in the ROM BIOS please follow the steps below 1 Power off the system and unplug the power cord 2 Set the jumper pins...

Page 15: ...ROM JP1 JP7 1 1 PCIe SATA Battery 1 Clear CMOS JP6 1 1 Mini PCIe mSATA JP2 JP3 1 JP2 JP3 Auto power on JP2 and JP3 are used to select the interface between Mini PCIe and mSATA default for the Mini PC...

Page 16: ...el WGI211AT Realtek ALC262 JP8 COM 2 DIO JP8 JP9 SMBus J19 USB 2 0 J3 1 5 6 1 Power on off J11 Standby LED 1 1 1 5 3 3 12 12 10 10 HDD LED 10 Mini DP or Micro HDMI JP8 JP9 1 2 4 5 7 8 10 11 On COM 2 d...

Page 17: ...switch Power button with LED green HDD LED Reset Button Power Button LAN 1 Remote Power on Switch Mic in USB 2 0 Status LED blue LAN 2 COM 1 USB 3 0 Rear Panel I O Ports DC in COM 2 Line out Mini Dis...

Page 18: ...Audio Ports Reset Power DDR4 LAN 1 COM 2 LINE out Mini DP or Micro HDMI Intel WGI211AT JP9 LAN 1 USB 3 0 USB 2 0 LAN 2 LAN 1 COM 1 MIC in DVI D Buzzer DDR4 DDR4 DDR4 E3900 Series Intel Atom Intel WGI...

Page 19: ...re package Reset Power DDR4 LAN 1 COM 2 LINE out Mini DP or Micro HDMI Intel WGI211AT JP9 LAN 1 USB 3 0 USB 2 0 LAN 2 LAN 1 COM 1 MIC in DVI D Buzzer DDR4 DDR4 DDR4 E3900 Series Intel Atom Intel WGI21...

Page 20: ...boot the system or cause damage to the system board The LAN ports allow the system to connect to a local area network BIOS Setting Configure the onboard LAN in the Advanced menu ACPI Configuration su...

Page 21: ...Micro HDMI The system also supports dual and triple display with these ports BIOS Setting Configure the graphics device in the Advanced menu Video Configuration submenu of the BIOS Refer to Chapter 7...

Page 22: ...tor of M 2 22x42 mm However the PCIe Gen 2 0 x2 bandwidth is capable of up to 1000MB s transfer speed whereas the SATA 3 0 can only provide up to 600MB s transfer speed To switch between PCIe and SATA...

Page 23: ...ni PCIe or M 2 slot is being ac cessed HDD LED The lithium ion battery powers the real time clock and CMOS memory It is an auxiliary source of power when the main power is shut off Safety Measures Dan...

Page 24: ...on off J11 Standby LED 1 1 1 5 3 3 12 12 10 10 HDD LED 10 Mini DP or Micro HDMI The 5 pin connector allows you to connect an additional USB 2 0 1 1 port 5 1 Reset Power DDR4 LAN 1 COM 2 LINE out Mini...

Page 25: ...screw holes to mount wall brackets 2 Align the mounting holes of the wall mount bracket with the screw holes of the system and use the provided mounting screws to secure the wall mount brackets on bot...

Page 26: ...et A to the VESA bracket B and then use the provided mounting screws to secure the system in place Mounting Screw VESA bracket A VESA bracket B 2 Attach the VESA bracket A to the back of your display...

Page 27: ...ws and put them in a safe place for later use 2 Align the mounting holes on the system and the mounting holes on the bracket and then use the screws removed in step 1 to secure the bracket in place Br...

Page 28: ...r you power up the system the BIOS message appears on the screen and the memory count begins After the memory test the message Press DEL to run setup will appear on the screen If the message disappear...

Page 29: ...tem or let you set some features according to your preference Important Setting incorrect field values may cause the system to malfunction System Time The time format is hour minute second The time is...

Page 30: ...onfiguration This section configures the CPU EIST Enable or disable the Enhanced Intel SpeedStep Technology which helps optimize the balance between system s power consumption and performance After it...

Page 31: ...aphics devices PCIe PCIe graphics devices Integrated Graphics Device Enable or disable the integrated graphics device Audio Configuration This section configures the audio settings Audio Controller Co...

Page 32: ...hese options Gen1 1 5 Gbit s Gen2 3 Gbit s or Gen 3 6 Gbit s SATA Mode Selection The mode selection determines how the SATA controller s operates AHCI Mode This option shows that the Serial ATA device...

Page 33: ...t 4 Controls the PCIe signal of LAN Port 2 PCI Express Root Port 5 Controls the PCIe signal of the Mini PCIe slot PCI Express Root Port 6 Controls the PCIe signal of the M 2 Type 2230 E key slot Press...

Page 34: ...SI Baud rate 115200 57600 38400 19200 and 9600 Data bits 8 bits or 7 bits Parity None Even or Odd Stop bits 1 bit or 2 bits Flow control None RTS CTS or XON XOFF This is the global setting for all of...

Page 35: ...port 1 and 2 WDT Enable or disable the watchdog function A counter will appear if you select to enable WDT Input any value between 1 and 255 seconds AC Power Loss Set the AC power loss to Always off o...

Page 36: ...nable Disable or No Operation No Operation No changes to the current state Disable Disable and deactivate TPM Enable Enable and activate TPM Set Supervisor Password Set the administrative password for...

Page 37: ...isabled to display the text messages Select Enabled to display the OEM logo Network Stack Enable or disable network stack It supports the operation of these functions or software Windows 8 BitLocker N...

Page 38: ...up without saving your changes Save Setting to file Select this option to save BIOS configuration settings to a USB drive The operation will fail if there aren t any USB devices detected on the system...

Page 39: ...another system board of the same model 2 The BIOS SPI ROM on this system board must be the original equipment from the factory and cannot be used to replace one which has been utilized on other syste...

Page 40: ...ies and software applications required to enhance the performance of the system board Insert the DVD into a DVD ROM drive The auto run screen will appear If the Auto run does not automatically start p...

Page 41: ...Intel chipset can be recognized and configured properly in the system To install the utility click Intel Chipset Software Installation Utility on the main menu 1 Setup is ready to install the utility...

Page 42: ...em is rebooted the screen will turn blank for 1 to 2 minutes while WinSAT is running before the Windows 7 Windows 8 1 Windows 10 desktop appears The blank screen period is the time Windows is testing...

Page 43: ...installation to take effect 1 Setup is ready to install the driver Click Next to continue Intel LAN Drivers To install the driver click Intel LAN Drivers on the main menu 1 Setup is ready to install t...

Page 44: ...the installation is complete click Finish to exit setup Adobe Acrobat Reader 9 3 To install the reader click Adobe Acrobat Reader 9 3 on the main menu 1 Click Next to install or click Change Destinat...

Page 45: ...3 Read the file information and then click Next IO Driver To install the driver click IO Driver on the main menu 1 Setup is ready to install the driver Click Next to continue 2 Read the license agree...

Page 46: ...ick Finish to exit setup Intel Trusted Execution Engine Driver To install the driver click Intel Trusted Execution Engine Driver in the main menu 1 Select I accept the terms in the License Agreement t...

Page 47: ...www dfi com 47 Chapter 8 Chapter 8 Supported Software 3 The screen displays the installation status in progress 4 Click Finish when the installation is complete...

Reviews: