background image

36

2

Hardware Installation

W

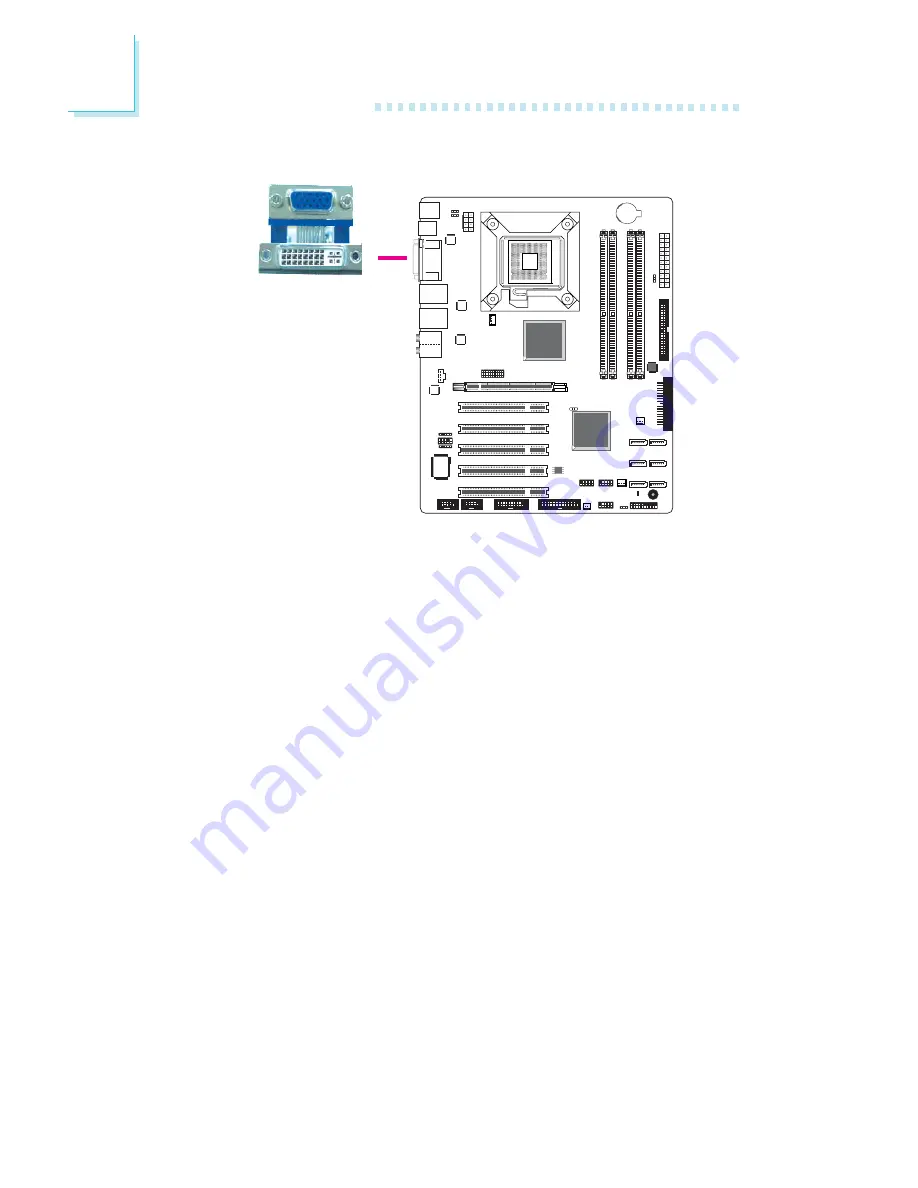
DVI-I Port

DVI-I

The DVI-I port is used to connect a digital LCD monitor or LCD
TV. This port supports DVI-D signal only.

Connect the display device’s cable connector to the DVI port on the
board. After you plug the cable connector into the DVI port, gently
tighten the cable screws to hold the connector in place.

Summary of Contents for BL600-D

Page 1: ...BL600 DR BL600 D System Board User s Manual A04560218...

Page 2: ...use of this manual and specifically disclaims any express or implied warranties of merchantability or fitness for any particular purpose The user will assume the entire risk of the use or the results...

Page 3: ...rticular installation If this equipment does cause harmful interference to radio or television reception which can be determined by turning the equipment off and on the user is encouraged to try to co...

Page 4: ...tem Board Layout System Memory CPU Jumper Settings Rear Panel I O Ports I O Connectors Chapter 3 BIOS Setup Award BIOS Setup Utility Intel RAID BIOS Updating the BIOS Chapter 4 Supported Softwares Cha...

Page 5: ...and product specifica tions 2 The warranty is void if the product has been subjected to physi cal abuse improper installation modification accidents or unau thorized repair of the product 3 Unless ot...

Page 6: ...ends Important Electrostatic discharge ESD can damage your processor disk drive and other components Perform the upgrade in struction procedures described at an ESD workstation only If such a station...

Page 7: ...r to the information listed above This may differ in accordance to the sales region or models in which it was sold For more infor mation about the standard package in your region please contact your d...

Page 8: ...SDRAM Supports maximum of 8GB system memory using 512Mbit or 1Gbit technology for x8 and x16 devices ECC DDR2 DIMMs are not supported Award BIOS 8Mbit flash memory Supports ACPI specification and OS D...

Page 9: ...llers Supports 10Mbps 100Mbps and 1Gbps data transmission IEEE 802 3 10 100Mbps and IEEE 802 3ab 1Gbps compliant Supports Serial ATA interfaces which are compliant with SATA 1 0 specification BL600 DR...

Page 10: ...and mic in jacks 1 CD in internal audio connector 1 S PDIF in out connector 1 connector for IrDA interface 6 Serial ATA connectors BL600 DR 4 Serial ATA connectors BL600 D 1 40 pin IDE connector 1 fl...

Page 11: ...which fetches 2 bits per clock cycle The graphics flexibility of the built in Intel GMA3100 delivers exceptional 3D graphics performance It supports analog CRT and DVI I interfaces DVI Digital Visual...

Page 12: ...te is 100MB s The BL600 DR board allows configuring RAID 0 RAID 1 RAID 0 1 and RAID 5 on Serial ATA drives connected to SATA ports 0 1 2 3 4 and 5 The two Realtek PCI Express Gigabit LAN con trollers...

Page 13: ...However if your system is in the Suspend mode you can power on the system only through an IRQ or DMA interrupt Important The 5V_standby power source of your power supply must sup port 720mA This func...

Page 14: ...unction enabled you can power off the system at once by pressing the power button or selecting Standby when you shut down Windows 2000 XP without having to go through the sometimes tiresome process of...

Page 15: ...1 USB 8 USB 9 LAN 2 USB 6 USB 7 1 1 1 COM 2 1 1 COM 1 Parallel 1 IDE 1 24 12 ATX power 1 13 SATA 1 SATA 0 12V power 1 Chassis open DIO 1 1 Front audio CD in 1 CPU fan 1 Line in Line out Mic in Center...

Page 16: ...ovide some ESD protec tion by wearing an antistatic wrist strap and attaching it to a metal part of the system chassis If a wrist strap is unavailable establish and maintain contact with the system ch...

Page 17: ...ls Dual channel provides better system performance because it doubles the data transfer rate DIMMs are on the same channel DIMMs in a channel can be identical or completely different However we highly...

Page 18: ...s are for reference only 1 Make sure the PC and all other peripheral devices connected to it has been powered down 2 Disconnect all power cords and cables 3 Locate the DDR2 socket on the system board...

Page 19: ...the module by its edges position the module above the socket with the notch in the module aligned with the key on the socket The keying mechanism ensures the module can be plugged into the socket in...

Page 20: ...and or contact pins are the cap is missing or the cap and or contact pins are damaged damaged damaged damaged damaged contact your dealer immediately contact your dealer immediately contact your deale...

Page 21: ...ful parti cles Remove the protec tive cap only when you are about to install the CPU Protective cap Lever Cover 5 Lift the protective cap from the location pointed below to detach the cap from the cov...

Page 22: ...CPU by its edges and avoid touch ing the pins Pin 1 of the socket Gold mark 9 Insert the CPU into the socket until it is seated in place The CPU will fit in only one orientation and can easily be in s...

Page 23: ...ually contains the fan and heat sink assembly and an installation guide If the installa tion procedure in the installation guide differs from the one in this section please follow the installation gui...

Page 24: ...st match the 4 mounting holes around the socket Position each stud so that the groove faces the heat sink then push it down firmly until it clicks into place Note You will not be able to secure the fa...

Page 25: ...with the default values stored in the ROM BIOS To load the default values stored in the ROM BIOS please follow the steps below 1 Power off the system and unplug the power cord 2 Set JP5 pins 2 and 3 t...

Page 26: ...mouse to wake up the system BIOS Setting Configure the PS 2 keyboard mouse wake up function in the Inte grated Peripherals submenu Super IO Device section of the BIOS Refer to chapter 3 for more info...

Page 27: ...OS must be set to Enabled Refer to chapter 3 for more information Important If you are using the Wake On USB Keyboard Mouse function for 2 USB ports the 5V_standby power source of your power sup ply m...

Page 28: ...e DVI port at the rear panel or to the PCI Express x16 card However you cannot use devices connected to both the DVI port and PCI Ex press x16 card at the same time Use JP8 to select between using PCI...

Page 29: ...method of powering on the system If you want the system to power on whenever AC power comes in set JP6 pins 2 and 3 to On If you want to use the power button set pins 1 and 2 to On X JP6 2 3 On Power...

Page 30: ...se port PS 2 keyboard port USB ports VGA port DVI I port DVI D signal only 2 LAN ports Center Subwoofer port Rear R L port Side R L port Line in jack Line out jack Mic in jack PS 2 K B DVI I USB 11 US...

Page 31: ...s Warning Make sure to turn off your computer prior to connecting or disconnecting a mouse or keyboard Failure to do so may dam age the system board Wake On PS 2 Keyboard Mouse The Wake On PS 2 Keyboa...

Page 32: ...tting Configure the PS 2 wake up function in the Integrated Peripherals submenu Super IO Device section of the BIOS Refer to chapter 3 for more information Important The 5V_standby power source of you...

Page 33: ...he USB ports may be mounted on a card edge bracket Install the card edge bracket to an available slot at the rear of the system chassis then insert the connectors that are attached to the USB port cab...

Page 34: ...mouse to wake up a system from the S3 STR Suspend To RAM state To use this function Jumper Setting JP2 and or JP3 must be set to 2 3 On 5V_standby Refer to USB Power Select in this chapter for more in...

Page 35: ...onnector to the VGA port Blue After you plug the monitor s cable connector into the VGA port gently tighten the cable screws to hold the connector in place BIOS Setting Configure the onboard VGA in th...

Page 36: ...to connect a digital LCD monitor or LCD TV This port supports DVI D signal only Connect the display device s cable connector to the DVI port on the board After you plug the cable connector into the DV...

Page 37: ...ct to a local area network by means of a network hub BIOS Setting Configure the onboard LAN in the Advanced Chipset Features submenu PCI Express Root Port Func section of the BIOS Refer to chapter 3 f...

Page 38: ...rs of the audio system Side Right Left Jack Gray This jack is used to connect to the side left and side right speak ers of the audio system Line in Light Blue This jack is used to connect any audio de...

Page 39: ...an external microphone Front Audio The front audio connector J26 allows you to connect to the line out and mic in jacks that are at the front panel of your system BIOS Setting Configure the onboard au...

Page 40: ...ware Installation W I O Connectors CD in Internal Audio Connector The CD in connector is used to receive audio from a CD ROM drive TV tuner or MPEG card 4 1 Left audio channel Right audio channel Grou...

Page 41: ...PDIF ports may be mounted on a card edge bracket Install the card edge bracket to an available slot at the rear of the system chassis then connect the audio cable connector to this connector Make sur...

Page 42: ...es powering on function to an external device that is connected to this connector Pins 1 3 5 7 9 11 13 15 17 19 Function GND DIO7 DIO6 DIO5 DIO4 DIO3 DIO2 DIO1 DIO0 GND Pins 2 4 6 8 10 12 14 16 18 Fun...

Page 43: ...supports SPP ECP and EPP Setting SPP Standard Parallel Port ECP Extended Capabilities Port EPP Enhanced Parallel Port Function Allows normal speed operation but in one direction only Allows parallel...

Page 44: ...acket Install the card edge bracket to an available slot at the rear of the system chassis then insert the cable to this connector Make sure the colored stripe on the ribbon cable is aligned with pin...

Page 45: ...or Connecting the Floppy Disk Drive Cable Install one end of the floppy disk drive cable into the floppy connector on the system board and the other end most connector to the floppy drive The colored...

Page 46: ...s Connecting Serial ATA Cables Connect one end of the Serial ATA cable to a Serial ATA connector and the other end to your Serial ATA device BIOS Setting Configure the onboard Serial ATA in the BIOS...

Page 47: ...tor supports 2 devices a Master and a Slave Use an IDE ribbon cable to connect the drives to the system board An IDE ribbon cable have 3 connectors on them one that plugs into an IDE connector on the...

Page 48: ...from the same manufacturer In a few cases drives from two different manufacturers will not function properly when used to gether The problem lies in the hard drives not the system board Important If...

Page 49: ...ar of the system chassis Make sure the colored stripe on the ribbon cable is aligned with pin 1 of COM 1 or COM 2 The serial port is an RS 232 asynchronous communication port with 16C550A compatible U...

Page 50: ...ned on the system board Make sure to connect the cable to the IrDA connector accord ing to their pin functions BIOS Setting Configure the onboard IrDA functions in the BIOS Refer to chapter 3 for more...

Page 51: ...cooling fans The cooling fans will provide adequate airflow throughout the chassis to prevent overheating the CPU and system board components BIOS Setting The PC Health Status submenu of the BIOS will...

Page 52: ...ing you of a chassis intrusion event Hardware Monitor for Windows Install the Hardware Doctor for Windows utility By default the chassis intrusion detection function is disabled When enabled a warning...

Page 53: ...uide Version 1 1 An ATX12V power supply unit has a standard 24 pin ATX main power connector that must be inserted onto CN9 Your power supply unit may come with an 8 pin or 4 pin 12V power connector Th...

Page 54: ...uirement To ensure that adequate power is provided we strongly recommend that you use a minimum of 400 Watt or greater power supply Important Insufficient power supplied to the system may result in in...

Page 55: ...ff the system thus prolonging the life of the power supply or system SPEAKER Speaker Connector This connects to the speaker installed in the system chassis ATX SW ATX Power Switch Depending on the set...

Page 56: ...t may indicate that the CPU or memory module was not installed properly Please make sure they are properly inserted into their corresponding socket Pin 3 5 14 16 8 10 18 20 7 9 13 15 17 19 2 4 6 HD LE...

Page 57: ...n the standby mode Warning When the Standby Power LED lit red it indicates that power is present on the PCI slots Power off the PC then unplug the power cord prior to installing any add in cards Failu...

Page 58: ...t comply to the PCI Ex press specifications into the PCI Express x16 slot To install a graph ics card into the x16 slot align the graphics card above the slot then press it down firmly until it is com...

Page 59: ...OS memory It is an auxiliary source of power when the main power is shut off Safety Measures Danger of explosion if battery incorrectly replaced Replace only with the same or equivalent type recommend...

Page 60: ...Press DEL to enter setup If the message disappears before you respond restart the system or press the Reset button You may also restart the system by press ing the Ctrl Alt and Del keys simultaneousl...

Page 61: ...d CMOS Features Use the arrow keys to highlight Standard CMOS Features then press Enter A screen similar to the one below will appear Date mm dd yy Time hh mm ss X IDE Channel 0 Master X IDE Channel 0...

Page 62: ...your operating system s manual or Help desk on which one to select The settings on the screen are for reference only Your version may not be identical to this one IDE Channel 0 Master to IDE Channel 4...

Page 63: ...ite timing Landing Zone This field displays the number of cylinders specified as the landing zone for the read write heads Sector This field displays the number sectors per track Drive A This field id...

Page 64: ...d during power up The default setting is All Errors No Errors The system boot will not stop for any errors detected All Errors The system boot will stop whenever the BIOS detects a non fatal error All...

Page 65: ...65 3 BIOS Setup Extended Memory Displays the amount of extended memory detected during boot up Total Memory Displays the total memory available in the system...

Page 66: ...PU Feature X Hard Disk Boot Priority Virus Warning CPU L3 Cache Quick Power On Self Test First Boot Device Second Boot Device Third Boot Device Boot Other Device Boot Up Floppy Seek Boot Up NumlLock S...

Page 67: ...nction Execute Disable Bit Virtualization Technology Native Mode Disabled Auto Enabled Enabled PPM Mode The options are Native Mode and SMM mode Limit CPUID MaxVal The CPUID instruction of some newer...

Page 68: ...68 3 BIOS Setup Virtualization Technology When this field is set to Enabled the VMM can utilize the additional hardware capabilities provided by Vanderpool Technology...

Page 69: ...ector table will cause the warning message to appear If you are running such a program we recommend that you first disable this field Hard Disk Boot Priority This field is used to select the boot sequ...

Page 70: ...ive in stalled is 40 or 80 tracks Note that the BIOS cannot distinguish be tween 720K 1 2M 1 44M and 2 88M drive types as they are all 80 tracks When disabled the BIOS will not search for the type of...

Page 71: ...and Typematic Delay Msec fields below Typematic Rate Chars Sec This field allows you to select the rate at which the keys are acceler ated Typematic Delay Msec This field allows you to select the dela...

Page 72: ...Select for DRAM 64MB This field allows you to access the memory that is over 64MB in OS 2 The options are Non OS2 and OS2 Report No FDD For WIN 95 The options are Yes and No Small Logo EPA Show Enabl...

Page 73: ...en this field is enabled accesses to the system BIOS ROM ad dressed at F0000H FFFFFH are cached provided that the cache controller is enabled The larger the range of the Cache RAM the higher the effic...

Page 74: ...reen are for reference only Your version may not be identical to this one Phoenix AwardBIOS CMOS Setup Utility PCI Express Root Port Func PCI Express PATA PORT PCI Express GiGa LAN1 PCI Express GiGa L...

Page 75: ...evice The options are Auto Onchip VGA and PEG Port On Chip Frame Buffer Size This field is used to select the onboard VGA s frame buffer size that is shared from the system memory DVMT Mode This field...

Page 76: ...Onboard Device X Super IO Device X USB Device Setting Press Enter Press Enter Press Enter Press Enter The settings on the screen are for reference only Your version may not be identical to this one ID...

Page 77: ...isk drive Disabled The IDE HDD uses the standard mode IDE DMA Transfer Access This field is used to enable or disable the DMA transfer function of an IDE hard drive SATA Mode IDE This option configure...

Page 78: ...it F5 Previous Values F6 Fail Safe Defaults F7 Optimized Defaults AHCI ROM Control High Definition Audio Onboard LAN Boot ROM Enabled Enabled Disabled Onboard Device Move the cursor to this field and...

Page 79: ...k drive to boot up the system and access the local area network directly If you wish to change the boot ROM s settings type the Shift and F10 keys simultaneously when prompted during boot up Take note...

Page 80: ...tem Super IO Device Move the cursor to this field and press Enter The following screen will appear The settings on the screen are for reference only Your version may not be identical to this one Phoen...

Page 81: ...he onboard serial port 1 and serial port 2 3F8 IRQ4 2F8 IRQ3 3E8 IRQ4 2E8 IRQ3 Allows you to manually select an I O address for the onboard se rial port 1 and serial port 2 Disabled Disables the onboa...

Page 82: ...to a standard specification and will depend on the type and speed of your device Refer to your peripheral s manual for the best option SPP Allows normal speed operation but in one direction only ECP E...

Page 83: ...ailure the system will return to the state where you left off be fore power failure occurs If the system s power is off when AC power failure occurs it will remain off when power returns If the system...

Page 84: ...s If a PS 2 keyboard is not available and you need to use a USB keyboard to install Windows installation is performed in DOS mode or run any program under DOS set this field to Enabled The settings on...

Page 85: ...be able to support more advanced features as well as provide compatibility to a wide variety of peripheral devices If a PS 2 mouse is not available and you need to use a USB mouse to install Windows...

Page 86: ...s disabled the system resume time is shortened but system will need an AGP driver to initialize the VGA card Therefore if the AGP driver of the card does not support the initialization feature the dis...

Page 87: ...and PwrOn Suspend MODEM Use IRQ This field is used to set an IRQ channel for the modem installed in your system Soft Off by PWR BTTN This field allows you to select the method of powering off your sys...

Page 88: ...e On Ring Connector in chapter 2 for more information USB KB Wake Up From S3 This field when enabled allows you to use a USB keyboard or USB mouse to wake up a system that is in the S3 STR Suspend To...

Page 89: ...o power on The system will power on on the set date and time set in the Time hh mm ss Alarm field Time hh mm ss Alarm This is used to set the time you would like the system to power on If you want the...

Page 90: ...ata ESCD once automatically It will then recre ate a new set of configuration data Disabled The BIOS will not reset the configuration data The settings on the screen are for reference only Your versio...

Page 91: ...ical to this one Phoenix AwardBIOS CMOS Setup Utility IRQ Resources Item Help Menu Level XX Move Enter Select F1 General Help PU PD Value F10 Save ESC Exit F5 Previous Values F6 Fail Safe Defaults F7...

Page 92: ...to select the length of time each PCI device will control the bus before another takes over The larger the value the longer the PCI device can retain control of the bus Since each ac cess to the bus c...

Page 93: ...Menu Level X Move Enter Select F1 General Help PU PD Value F10 Save ESC Exit F5 Previous Values F6 Fail Safe Defaults F7 Optimized Defaults Case Open Detection Current System Temp Current CPU Tempera...

Page 94: ...vary within the range of the tolerance value selected in the field below CPU Fan Tolerance Value This field is used to select the tolerance value of the CPU s tempera ture The options are 1 2 3 4 and...

Page 95: ...um Leave this field in its default setting Do not alter this setting unless advised by an engineer or technician Phoenix AwardBIOS CMOS Setup Utility Frequency Voltage Control Item Help Menu Level X M...

Page 96: ...ter If you want to proceed type Y and press Enter The default settings will be loaded Phoenix AwardBIOS CMOS Setup Utility Esc Quit F10 Save Exit Setup Select Item Load Fail Safe Defaults X Standard C...

Page 97: ...default values Phoenix AwardBIOS CMOS Setup Utility Esc Quit F10 Save Exit Setup Select Item Load Optimized Defaults X Standard CMOS Features X Advanced BIOS Features X Advanced Chipset Features X In...

Page 98: ...irm Password You are asked to verify the password Type in exactly the same password If you type in a wrong password you will be prompted to enter the correct password again To delete or disable the pa...

Page 99: ...n done the message below will appear Confirm Password You are asked to verify the password Type in exactly the same password If you type in a wrong password you will be prompted to enter the correct p...

Page 100: ...to the setup press Ctrl Alt Esc simultaneously or Del after memory testing is done Phoenix AwardBIOS CMOS Setup Utility Esc Quit F10 Save Exit Setup Select Item Save Data to CMOS X Standard CMOS Featu...

Page 101: ...Alt Esc simulta neously or Del after memory testing is done Phoenix AwardBIOS CMOS Setup Utility Esc Quit F10 Save Exit Setup Select Item Abandon All Data X Standard CMOS Features X Advanced BIOS Feat...

Page 102: ...RAID BIOS status message screen will appear Press the Ctrl and I keys simultaneously to enter the utility The utility allows you to build a RAID system on Serial ATA drives Refer to chapter 5 for step...

Page 103: ...enter the Award BIOS Setup Utility to set the first boot drive to Floppy 3 Save the setting and reboot the system 4 After the system booted from the floppy disk execute the flash utility by typing AW...

Page 104: ...OS in your system We recommend that you save the current BIOS and its flash utility just in case you need to reinstall the BIOS To save the current BIOS press Y then enter the file name of the current...

Page 105: ...performance of the system board Insert the CD into a CD ROM drive The autorun screen Mainboard Utility CD will appear If after inserting the CD Autorun did not automatically start which is the Mainbo...

Page 106: ...ility is used for updating Windows INF files so that the Intel chipset can be recognized and configured properly in the system To install the utility click Intel Chipset Software Installation Utility...

Page 107: ...107 4 Supported Software 4 After all setup operations are done click Next 3 Go through the readme document for more installa tion tips then click Next 5 Click Finish to exit setup...

Page 108: ...C Driver for Windows XP To install click Microsoft DirectX 9 0C Driver on the main menu 1 Click I accept the agree ment then click Next 3 Click Finish Reboot the system for DirectX to take effect 2 Yo...

Page 109: ...atically run WinSAT and enable the Windows Aero desktop theme is enabled With this enabled after installing the graphics driver and the system rebooted the screen will turn blank for 1 to 2 minutes wh...

Page 110: ...ed Software 4 Setup is now installing the driver Click Next to con tinue 3 Go through the readme document for system re quirements and installation tips then click Next 2 Read the license agreement th...

Page 111: ...111 4 Supported Software 5 Click Yes I want to restart this computer now then click Finish Restarting the system will allow the new software in stallation to take effect...

Page 112: ...oftware Intel Graphics Drivers for Windows XP To install the driver click Intel Graphics Drivers on the main menu 1 Setup is ready to install the graphics driver Click Next 2 Read the license agreemen...

Page 113: ...installa tion tips then click Next 4 Setup is currently installing the driver After installation has completed click Next 5 Click Yes I want to restart this computer now then click Finish Restarting t...

Page 114: ...tall the driver click Audio Drivers on the main menu 2 Click Yes I want to restart my computer now then click Finish Restarting the system will allow the new software in stallation to take effect 1 Se...

Page 115: ...Software LAN Drivers To install the driver click LAN Drivers on the main menu 2 Click Install to begin the installation 3 After completing installa tion click Finish 1 Setup is ready to install the dr...

Page 116: ...settings values are over or under the set range a warning message will pop up The utility can also be configured so that a beeping alarm will sound whenever an error occurs We recommend that you use t...

Page 117: ...rted Software 4 After completing instal lation click Finish to exit setup 3 Click Next to add the pro gram icon to the Program Folder 5 Click Yes if you want to create a Hardware Doctor shortcut at yo...

Page 118: ...118 4 Supported Software 6 Click Yes I want to restart my computer now then click Finish Restarting the system will allow the utility to take ef fect...

Page 119: ...un the utility which is usually done by double clicking the Hard ware Doctor shortcut an error message will appear 2 To solve this problem right click the Hardware Doctor shortcut then select Prop ert...

Page 120: ...120 4 Supported Software 4 You can now access the utility...

Page 121: ...settings values are over or under the set range a warning message will pop up The utility can also be configured so that a beeping alarm will sound whenever an error occurs We recommend that you use t...

Page 122: ...122 4 Supported Software 3 Click Install to begin the installation 4 After completing installa tion click Finish...

Page 123: ...allow you to install the operating system onto a hard drive when in AHCI mode 1 Insert a blank floppy diskette 2 Locate for the drivers in the CD then copy them to the floppy diskette The CD includes...

Page 124: ...eader 9 3 To install the reader click Adobe Acrobat Reader 9 3 on the main menu 1 Click Next to install or click Change Destination Folder to select another folder 2 Click Install to begin instal lati...

Page 125: ...of the data from one drive to the other drive If a drive fails to function the disk array management software directs all applications to the other drive since it contains a complete copy of the driv...

Page 126: ...lly while creating RAID A damaged cable will ruin the entire installation process and operat ing system The system will not boot and you will lost all data in the hard drives Please give special atten...

Page 127: ...message 3 Press S to Specify Additional Device 4 At this point you will be prompted to insert a floppy disk containing the RAID driver Insert the RAID driver diskette 5 Locate for the drive where you...

Page 128: ...operating system It will also display useful SATA device and RAID volume in formation The user interface tray icon service and monitor service allow you to monitor the current status of the RAID volu...

Page 129: ...Read the license agree ment then click Yes 6 Go through the readme document to view system requirements and installa tion information then click Next 7 Click Yes I want to restart my computer now then...

Page 130: ...ion Logical Device 8 register CRF5 CRF6 CRF7 WDT count mode count value control mode MOV DX 4EH MOV AL 07H Ready to Program Logical Device OUT DX AL MOV DX 4FH MOV AL 08H Select Logical Device 8 OUT D...

Page 131: ...et CRF6 value 02 Watch Dog Timer 2 unit Min OUT DX AL MOV DX 4EH MOV AL F7H Select CRF7 OUT DX AL MOV DX 4FH MOV AL 02H Set CRF7 Bit 7 6 11 WDT reset by mouse key board interrupt OUT DX AL 3 Exit exte...

Page 132: ...plosion if battery incorrectly replaced Replace only with the same or equivalent type recommended by the manu facturer Dispose of used batteries according to the battery manufacturer s instructions CM...

Page 133: ...locked Keyboard controller is pulled low Keyboard error or no keyboard present Cannot initialize the keyboard Make sure the keyboard is attached correctly and no keys are being pressed during the boot...

Page 134: ...the outlet by plugging in a lamp or other electrical device 4 The monitor is turned on 5 The display s brightness and contrast controls are adjusted prop erly 6 All add in boards in the expansion slo...

Page 135: ...ing happens 1 Check that one end of the AC power cord is plugged into a live outlet and the other end properly plugged into the back of the system 2 Make sure that the voltage selection switch on the...

Page 136: ...nter doesn t respond when you try to print 1 Make sure that your printer is turned on and that the printer is on line 2 Make sure your software is configured for the right type of printer attached 3 V...

Page 137: ...there are no objects resting on the keyboard and that no keys are pressed during the booting process System Board 1 Make sure the add in card is seated securely in the expansion slot If the add in car...

Page 138: ...stalla tion procedures may slightly vary if you re using another version of the program 1 Download the program from nLite s offical website http www nliteos com download html 2 Install nLite Important...

Page 139: ...c into an optical drive 5 Launch nLite The Welcome screen will appear Click Next 6 Click Next to temporarily save the Windows installa tion files to the designated default folder If you want to save t...

Page 140: ...140 E NLITE and AHCI Installation Guide 7 Click Next 8 In the Task Selection dia log box click Drivers and Bootable ISO Click Next...

Page 141: ...driver folder to select the drivers you will integrate Click Next 10 Select only the drivers appropriate for the Win dows version that you are using and then click OK Integrating 64 bit driv ers into...

Page 142: ...142 E NLITE and AHCI Installation Guide 11 If you are uncertain of the southbridge chip used on your motherboard select all RAID AHCI con trollers and then click OK 12 Click Next...

Page 143: ...143 E NLITE and AHCI Installation Guide 13 The program is currently integrating the drivers and applying changes to the installation 14 When the program is fin ished applying the chang es click Next...

Page 144: ...se lect the Create Image mode under the General section and then click Next 16 Or you can choose to burn it directly to a disc by selecting the Direct Burn mode under the General section Select the o...

Page 145: ...E and AHCI Installation Guide 17 You have finished cus tomizing the Windows XP installation disc Click Finish Enter the BIOS utility to configure the SATA con troller to RAID AHCI You can now install...

Page 146: ...er to IDE mode 2 Install Windows XP but do not press F6 3 Download relevant RAID AHCI driver files supported by the motherboard chipset from Intel s website Transfer the downloaded driver files to C A...

Page 147: ...5 In the Hardware Update Wizard dialog box select No not this time then click Next 6 Select Install from a list or specific location Ad vanced and then click Next 7 Select Don t search I will choose t...

Page 148: ...148 E NLITE and AHCI Installation Guide 8 Click Have Disk 9 Select C AHCI iaAHCI inf and then click Open 10 Select the appropriate AHCI Controller of your hardware device and then click Next...

Page 149: ...re device Ignore the warning and click Yes to proceed 12 Click Finish 13 The system s settings have been changed Win dows XP requires that you restart the computer Click Yes 14 Enter the BIOS utility...

Reviews: