background image

NOTE: The radio is resistant to water and rain splashes only when the battery 

cover, headset accessory and micro-USB ports are sealed. Open the battery 

compartment door or headset port/USB charge cover only when the radio is 

dry. Use of a headset accessory should be in dry environments only. The 

micro-USB cable and plug is not waterproof. Do not expose the charger to rain 

or snow. Charge the radios only in a dry location. The battery door must be 

tightly closed with the screw to maintain the weatherproof seal of the radio. 

Operation

Using Your Radio

For charging radios in an OPTIONAL desktop charger:
1.

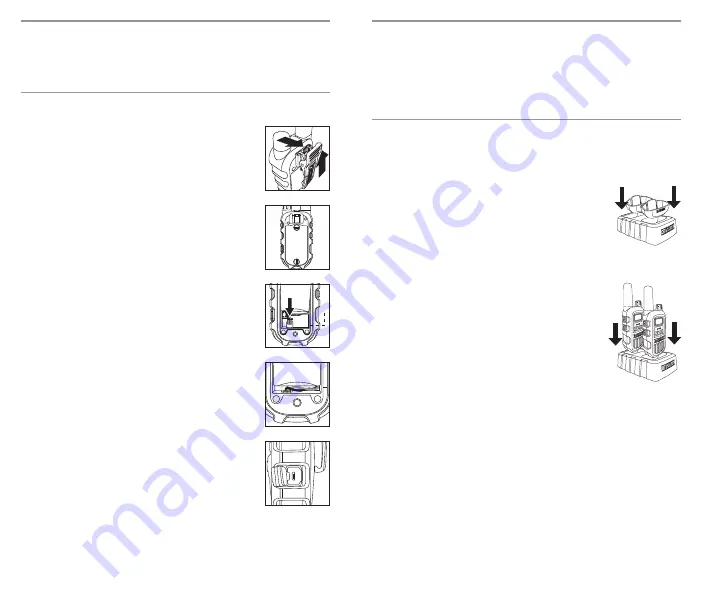
 Insert the provided adaptor into charger compartment 

(Fig. 8). 

2.

 Insert radio(s) into desktop charger as shown (Fig. 9). 

3.

 Insert the micro-USB cable into jack on back of charger.

4.

 Plug the cable into USB-compatible power port. For 

pluggable equipment, the socket-outlet shall be installed 

near the equipment and shall be easily accessible.

If charging light is not 

on

, check position of radio. Radio 

should be upright. The charge indicator light on desktop 

charger will stay 

on

 (Red) as long as the radio is in the 

charging well, and the light will go 

off

 when the 

charging is complete.

Note: 

To charge a single radio, you can bypass the desktop 

charger and simply insert the micro-USB’s connector 

directly into the charge jack located at the right of the radio.
The radio will have Red LED indicator ON while charging.
D

E

WALT recommends your radio be turned off while charging.

Note

: If the charging LED still is OFF when the radio inserted completely. 

1. 

Check if there is output from power source first and check if the radio has 

battery that is inserted correctly.

2.

 Check for contact contamination or corrosion:

 •  Remove the radio from the charger.
  •  Inspect the charging contacts on radio for contamination or corrosion. 

Clean the charging contacts using a dry cloth.

  •  Inspect the charging contacts in the charger pocket for contamination or 

corrosion. If contamination or corrosion are found, 

remove power

 from 

the charger and clean the charging contacts using a dry cloth.

3. 

Try replacing the battery. If the fault no longer exists, then take the faulted 

battery out of service.

2

3

ENGLISH

Caring for Your Radio  

Your radio will give you years of trouble-free service if cared for properly. 
Handle the radio gently. Keep the radio away from dust. Never put the radio in 
water or in a damp place. Avoid exposure to extreme temperatures. 

Installing Batteries  (Battery already pre-installed)

To install or replace batteries:
1. 

Remove Belt clip by releasing the belt clip latch 

and slide the Belt clip upward (Fig. 3). 

2. 

Using a flat head screw driver or edge of a coin 

(a quarter may be used), remove the 2 screws 

securing the back battery panel (Fig. 4). 

3.

 Open the battery compartment cover, connect 

the connector of the battery to the socket of the 

radio inside the battery compartment in proper 

polarity (Fig. 5). 

4.

 Place the battery inside battery compartment and 

align the wires as shown. (Note: Wires are 

required to be tucked into the battery 

compartment completely and carefully. If any 

object interfere the O-ring, its sealing 

performance will be affected.) (Fig. 6)

5. 

Place the battery compartment cover, screw 

down the screws mildly. (Screw nuts may be 

damaged if overtighten)

6.

 Re-attach the Belt clip.

To charge batteries in radio:
1.

 Check to see that the batteries have been 

inserted properly. 

2.

 Insert the cable into the charge jack located at 

the right side of the radio (Fig. 7).  

3.

 Plug the cable into USB-compatible power port.

 
Only use the supplied rechargeable batteries and desktop charger for 
recharging your D

E

WALT radio.

Please charge new batteries for 6 hours for first time of use.
D

E

WALT recommends your radio is turned off while being charged.

1

2

Fig. 3

Fig. 4

Fig. 5

Fig. 7

Fig. 6

Fig. 8

Fig. 9

O-ring

Summary of Contents for DXFRS265

Page 1: ...Printed in China Part No AL ML English DXFRS265 Owner s Manual TWO WAY RADIO MODEL DXFRS265 IF YOU HAVE QUESTIONS OR COMMENTS CONTACT US 1 866 208 1654 Owner s Manual ...

Page 2: ...of personal injury or property damage DANGER Indicates an imminently hazardous situation which if not avoided will result in death or serious injury WARNING Indicates a potentially hazardous situation which if not avoided could result in death or serious injury CAUTION Indicates a potentially hazardous situation which if not avoided may result in minor or moderate injury Used without word Indicate...

Page 3: ...to service the radio yourself Removing the cover will void the warranty Changes or modifications not expressly approved by DEWALT may void the user s authority granted by the FCC to operate this device and should not be made 4 Do not plug the wall adaptor into the power outlet if the outlet is wet 5 Do not use any portable radio that has a damaged antenna If a damaged antenna comes into contact wi...

Page 4: ...s chargers not included in this package may impair transceiver performance and invalidate the warranty Changes or modifications not expressly approved by DEWALT may void the user s authority granted by the FCC IC to operate this radio and should not be made To comply with FCC IC requirements transmitter adjustments should be made only by or under the supervision of a person certified as technicall...

Page 5: ... 1 l appareil ne doit pas produire de brouillage et 2 l utilisateur de l appareil doit accepter tout brouillage radioélectrique subi même si le brouillage est susceptible d en compromettre le fonctionnement ISEDC Radiation Exposure Statement For body worn operation this model device has been tested and meets the FCC ISED RF exposure guidelines when used with an accessory designated for this produc...

Page 6: ...tamination or corrosion Clean the charging contacts using a dry cloth Inspect the charging contacts in the charger pocket for contamination or corrosion If contamination or corrosion are found remove power from the charger and clean the charging contacts using a dry cloth 3 Try replacing the battery If the fault no longer exists then take the faulted battery out of service 2 3 ENGLISH Caring for Y...

Page 7: ...s used only to establish voice communications Quick Start 1 Turn On Off VOL Knob Fig 10 clockwise to turn the radio on and counter clockwise to turn the radio off 2 Select a desired channel Note Both radios must be tuned to the same channel privacy code to communicate 3 Press and hold the Talk button while speaking into the microphone 4 When finished talking release the Talk button and listen for ...

Page 8: ... and foliage in the path of the signal can reduce the range of the radio Fig 18 Dense foliage and hilly terrain will further reduce the range of the radio Fig 19 On Channels 8 through 14 your radio automatically switches to low power which will limit the range the radio can communicate Auto Squelch Your radio will automatically shut off weak transmissions and unwanted noise due to terrain conditio...

Page 9: ...ge 11 for resetting all the channels and privacy code setting to factory default ENGLISH Fig 21 Fig 22 Privacy Codes Your radio incorporates two advanced coded squelch systems that can help to reduce interference from other users on any given channel CTCSS Continuous Tone Coded Squelch System provides 38 privacy codes and DCS Digitally Coded Squelch provides privacy codes for factory default chann...

Page 10: ...t be tuned to the same channel and to the same privacy code number CTCSS or DCS Each channel will remember the last privacy code system and number you select Note The privacy code OFF is not a privacy code but allows all signals to be heard on a channel that is set to 0 on both the CTCSS and DCS systems Note See Page 11 for resetting all the channels and privacy code setting to factory default Res...

Page 11: ...ounding an audible call tone or an audible tone with Vibra Alert To turn Vibration Alert feature on 1 During Standby mode press and hold the Vibra Alert button Fig 31 until there is a long vibration for 2 seconds 2 Once the Vibration Alert feature is ON you may check if there are 2 successive vibrations feedback when press and release the Vibra Alert button in Standby mode To turn Vibration Alert ...

Page 12: ...TY AND FITNESS FOR A PARTICULAR PURPOSE DEWALT EXPRESSLY DISCLAIMS ALL WARRANTIES NOT STATED IN THIS LIMITED WARRANTY ANY IMPLIED WARRANTIES THAT MAY BE IMPOSED BY LAW ARE LIMITED TO THE TERMS OF THIS EXPRESSED WARRANTY LIMITATION OF REMEDIES AND DAMAGES REPAIR OR REPLACEMENT AS PROVIDED UNDER THIS WARRANTY IS THE EXCLUSIVE REMEDY OF THE CONSUMER DEWALT SHALL NOT BE LIABLE FOR ANY INCIDENTAL OR CO...

Reviews: