background image

13

English

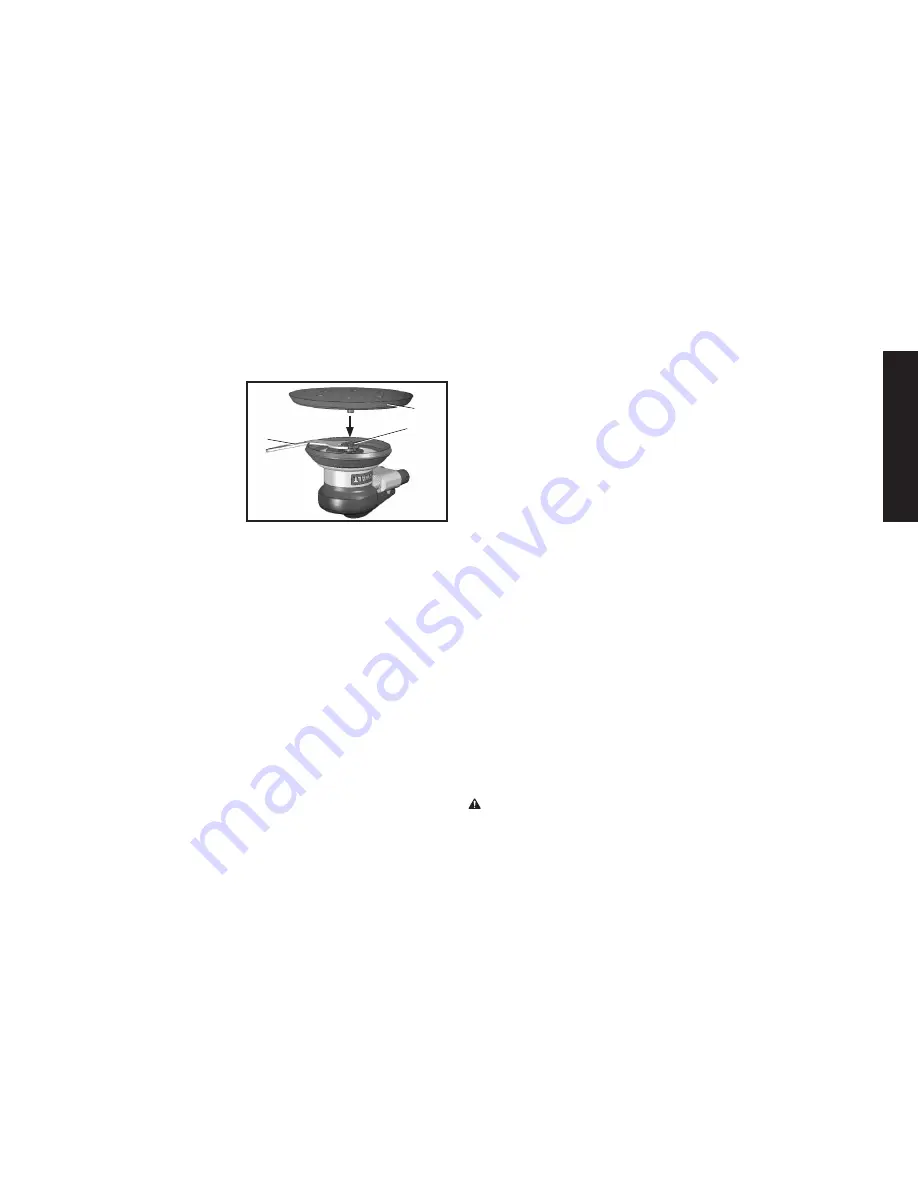
SANDER PAD ASSEMBLY CONTINUED

• To assemble the 

sanding


  pad  (B), place the supplied 

  wrench onto the 

balance  


shaft nut (H)

• Hold the wrench firmly and 

  insert the threaded post on  

  the 

sander pad (B) into the 


balance shaft nut (H).  

  Tighten by turning the  


sander pad (B) clockwise.

OPERATING PROCEDURES

START-UP (FIG. 1, PG. 2)

• Turn on the air compressor and allow the air tank to be filled.

• Set the air compressor regulator to 90 PSI. This air 

  tool operates at a maximum of 90 PSI air pressure.

• Depress the trigger to start operating the tool.

 SHUT-DOWN (FIG. 1, PG. 2)

 • Release the trigger to stop the tool.

• Always disconnect air supply when changing sandpaper pads.

• When job is completed, turn off the air compressor and store

  the air tool after lubrication.

Tips

• Begin sanding with an abrasive grit sandpaper coarse 

  enough to remove the high spots. Progress to a finer grit 

  sandpaper until the desired finish is obtained.

• Never change from coarse grit sandpaper to a very fine grit 

  sandpaper, always progress gradually to the finer grit.

OPERATING INSTRUCTIONS

• Select a suitable abrasive disc and make sure that it is fixed

  securely to the tool. 

• Connect to suitable air supply as recommended.

• Apply the sander lightly to the work and allow the abrasive 

  disc to cut. Take great care when sanding around sharp 

  edges and surfaces to avoid the disc snagging i.e. the disc 

  may be brought to an abrupt stop or considerably slowed, 

  causing the tool to kick in the hands.

NOTE: Use of safety glasses and a breathing mask is 

recommended. Sanding certain materials may create 

hazardous dust which may require special breathing 

equipment. Check before using the tool. Although the tool has 

a low noise level, the actual sanding process may cause a 

noise level such that ear protectors will be required. Safety 

gloves are recommended.

Do not continue to use abrasive discs that are worn or clogged.

Do not use undersized or oversized sanding discs. The disc 

should be no more than 1/4” larger in diameter than the pad, 

and not smaller than the pad.

MAINTENANCE

Lubrication

Air tools require lubrication throughout the lifetime of the tools. 

The air motor and bearing uses compressed air to power the tool. 

The compressed air contains moisture that will rust the air motor 

and other parts in side of the tools, therefore lubrication is required 

daily.  Failure to lubricate the air tool properly will dramatically 

shorten the life of the tool and will void the warranty

CAUTION: This air tool requires lubrication BEFORE initial use, 

also before and after each additional use.

WRENCH

B

H

Summary of Contents for DWMT70781L

Page 1: ... DE INSTRUCCIONES INSTRUCTIVO DE OPERACIÓN CENTROS DE SERVICIO Y PÓLIZA DE GARANTÍA ADVERTENCIA LÉASE ESTE INSTRUCTIVO ANTES DE USAR EL PRODUCTO If you have questions or comments contact us Pour toute question ou tout commentaire nous contacter Si tiene dudas o comentarios contáctenos 1 800 4 DeWALT www dewalt com ...

Page 2: ...23 8MM PAD TYPE Stick On PAD DIAMETER 6 150MM SPINDLE DIAMATER 5 16 7 94MM AVERAGE AIR CONSUMPTION AT LOAD 15 5 SCFM 7 3 L s 2 2 CFM 1 0 L s NET WEIGHT 2 LBS 0 9Kg AIR INTLET SIZE 1 4 NPT F RECOMMENDED HOSE SIZE 3 8 10MM MAX AIR PRESSURE 90 PSI DWMT70781L PALM SANDER E Exhaust F Trigger FIG 1 A B C D E F For replacement sanding pads purchase DWMT72171L 6 Adhesive Backed Disc ...

Page 3: ...ucts Arsenic and chromium from chemically treated lumber Your risk from these exposures varies depending on how often you do this type of work To reduce your exposure to these chemicals work in a well ventilated area and work with approved safety equipment al ways wear OSHA MSHA NIOSH approved properly fit ting face mask or res pi ra tor when us ing such tools When using air tools basic safety pre...

Page 4: ...with this product carefully Be thoroughly familiar with the controls and the proper use of the equipment Only persons well acquainted with these rules of safe operation should be allowed to use the air tool Do not exceed any pressure rating of any component in the system Disconnect the air tool from air supply before changing tools or attachments and during non operation Always wear safety glasses...

Page 5: ...sion resulting in serious injury Use compressed air regulated to a maximum pressure at or below the rated pressure of any attachments WARNING RISK TO BREATHING ASPHYXIATION WHAT CAN HAPPEN HOW TO PREVENT IT Abrasive tools such as grinders sanders and cut off tools generate dust and abrasive materials which can be harmful to human lungs and respiratory system Always wear MSHA NIOSH approved properl...

Page 6: ...a key that is left attached to a rotating part of the tool increases the risk of personal injury Remove adjusting keys and wrench before turning the tool on WHAT CAN HAPPEN HOW TO PREVENT IT Using inflator nozzles for duster applications can cause serious injury DO NOT use inflator nozzles for duster applications Air tools can cause the work piece to move upon contact leading to injury Use clamps ...

Page 7: ...f electric shock if your body is grounded Thoroughly investigate the workpiece for possible hidden wring before performing work WARNING RISK FROM FLYING OBJECTS WHAT CAN HAPPEN HOW TO PREVENT IT Air powered equipment and power tools are capable of propelling materials such as metal chips saw dust and other debris at high speed which could result in serious eye injury Always wear ANSI Z87 1 CAN CSA...

Page 8: ...the tool Keep hands away from moving parts Tie up or cover long hair Always wear proper fitting clothing and other safety equipment when using this tool WARNING AIR SUPPLY AND CONNECTIONS Do not use oxygen combustible gases or bottled gases as a power source for this tool as the tool may explode possibly causing injury Do not use supply sources which can potentially exceed 200 PSI 13 8 bar as tool...

Page 9: ...ol lever C allows the user to adjust the RPM speed Turning the lever clockwise increases the speed and turning the lever counterclockwise decreases the speed AIR INLET The tool s air inlet D located at the bottom of the handle is used for connecting an air supply has a standard 1 4 NPT American thread EXHAUST The exhaust E is located at the base of the handle and allows the exhaust to be directed ...

Page 10: ...ir line lubricators and air line filters is recommended to prevent water in the line that can damage the tool Drain the air tank daily Clean the air inlet filter screen on at least a weekly schedule to remove accumulated dirt or other matter that can restrict air flow The tool s air inlet used for connecting an air supply has standard 1 4 NPT American thread Safety Rules For Pneumatic Tools 1 Insp...

Page 11: ...at the tool is connected to the air supply as shown in figure A on page 11 Do not connect the tool to the air line system without incorporating an easy to reach and operate air shut off valve The air supply should be lubricated It is strongly recommended that an air filter regula tor lubricator FRL is used as shown in figure A on page 11 as this will supply clean lubricated air at the correct pres...

Page 12: ...10 Use only genuine Dewalt spare parts or parts which perform equivalently Do not make temporary or permanent repairs with unauthorized parts 11 Do not lock tape wire etc the on off trigger in the run position The trigger must always be free to return to the off position when it is released 12 Always shut off the air supply to the tool and depress the trigger to release air from the feed hose befo...

Page 13: ...ded Apply the sander lightly to the work and allow the abrasive disc to cut Take great care when sanding around sharp edges and surfaces to avoid the disc snagging i e the disc may be brought to an abrupt stop or considerably slowed causing the tool to kick in the hands NOTE Use of safety glasses and a breathing mask is recommended Sanding certain materials may create hazardous dust which may requ...

Page 14: ...ep 4 SERVICE INFORMATION Please have the following information available for all service calls Model Number ________________________________________ Date and Place of Purchase ______________________________ FULL THREE YEARS WARRANTY DeWALT heavy duty industrial tools are warranted for 3 years from date of purchase We will repair without charge any defects due to faulty materials or workmanship For...

Page 15: ...OMPRIMÉPOURLARESPIRATION RÉGLEZ LAPRESSIONÀZÉROAVANTDERETIRERLEBOYAU RISQUEDECHOCÉLECTRIQUE VOLTAGEDANGEREUX DEBRANCHEZLAMACHINEAVANTD ENLEVERBOITIER N EXPOSEZPASLECOMPRESSEUR ÀLAPLUIE REMISEZ LEÀL INTÉRIEUR LISEZLEMANUELDEL UTILISATEURPOURDESINSTRUCTIONSCOMPLÈTESCONCERNANTLASÉCURITÉ L UTILISATIONETLESRÉPARATIONS INCORRECT USE CAN CAUSE HAZARDS FOLLOW THESE INSTRUCTIONS RISK OF BURSTING MAKE SURE ...

Reviews: