background image

6

E

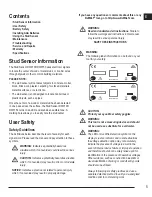
WARNING:

Always turn off AC power when working near wiring.
WARNING:

Shielded wires or wires in metal conduits, casings, 

metalized walls, or thick, dense walls may not be 

detected. 

CAUTION:

Use personal protective equipment. Always wear 

eye protection. Depending on the work conditions, 

wearing protective equipment such as a dust 

mask, non-skid safety shoes, hard hat, and hearing 

protection will reduce the risk of personal injury.

IMPORTANT SAFETY NOTICE

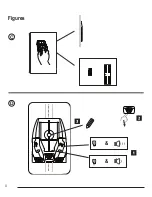
Ensure proper detection of live wires. Always hold the Stud 

Sensor DW0100/DW0150 in the handle area only. Grasp 

between fingers and thumb while making contact with your palm 

(Figure 

C

).

NOTE: Static electrical charges that can develop on drywall 

and other surfaces will spread the voltage detection area many 

inches on each side of the actual electrical wire. To aid in 

locating the wire position, scan holding the unit ½” (13mm) away 

from the wall surface or place your other hand on the surface 

approximately 12” (305mm) from the sensor.

Battery Safety

WARNING: 

Batteries can explode, or leak, and can cause 

injury or fire. To reduce this risk:

•  Carefully follow all instructions and warnings on the battery 

label and package.

•   Always insert batteries correctly with regard to polarity (+ and 

–), as marked on the battery and the equipment.

•  Do not short battery terminals.
•  Do not charge disposable batteries.
•  Do not mix old and new batteries. Replace all batteries at the 

same time with new batteries of the same brand and type.

•  Remove dead batteries immediately and dispose of per 

local codes.

•  Do not dispose of batteries in fire.
•  Keep batteries out of reach of children.

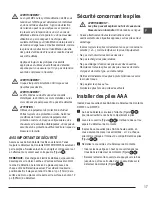
Installing AAA Batteries

Load two new AAA batteries in the DW0100/DW0150 stud 

sensor.

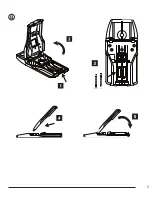
1.


On the bottom of the laser, lift up the latch (Figure 

B


1

to unlock the battery compartment cover.

2.


Move the cover upward (Figure 

B


2

) and remove it 

once it separates from the stud sensor.

3.


Insert two new, high-quality AAA batteries, making sure to 

position the - and + ends of each battery as noted inside 

the battery compartment (Figure 

B


3

).

4.


Place the cover back on the stud sensor.

•  Insert the two pins at the top of the cover into the holes 

in the stud sensor (Figure 

B


4

).

•  Slowly lower the cover and press down until the latch 

locks securely on the stud sensor (Figure 

B


5

).

5.


Press   to test the stud sensor.

•  All the LEDs except the green Power   LED should 

illuminate for a second and then turn off.

•  Whenever you press  , the green Power   LED 

should illuminate to indicate that the batteries are good. 

If this LED blinks or does not illuminate, change the 

batteries.

Using the Stud Sensor

The stud sensor will help you find wood or metal studs, and AC 

voltage behind drywall.
•  DW0100 will work on up to 3/4” (19mm) thick drywall.
•  DW0150 will work on up to 1.5” (38mm) thick drywall.
•  DW0100 and DW0150 will detect AC voltage through up to 2” 

(50.8mm) thick drywall.

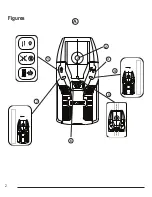
•  When AC voltage is found, the stud sensor will sound a 

few short (alternating) beeps and light the AC LED (Figure 

A


3

).

•  When the center of a stud is found, the stud sensor will 

sound one longer (constant) beep and light the center LED 

(Figure 

A


5

).

•  When live AC and the center of a stud are both found, the 

stud sensor will sound both the long beep and the short 

beeps, and light the center and AC LEDs.

Summary of Contents for DW0100

Page 1: ...DW0100 DW0150 StudSensor E PT ES F Please read these instructions before operating the product www DEWALT com ...

Page 2: ...A 1 3 2 4 5 7 6 Figures 2 ...

Page 3: ...B 3 ...

Page 4: ...C D Figures 4 ...

Page 5: ... situation which if not avoided may result in minor or moderate injury NOTICE Indicates a practice not related to personal injury which if not avoided may result in property damage If you have any questions or comments about this or any DEWALT tool go to http www DEWALT com WARNING Read and understand all instructions Failure to follow the warnings and instructions in this manual may result in ser...

Page 6: ...er local codes Do not dispose of batteries in fire Keep batteries out of reach of children Installing AAA Batteries Load two new AAA batteries in the DW0100 DW0150 stud sensor 1 On the bottom of the laser lift up the latch Figure B 1 to unlock the battery compartment cover 2 Move the cover upward Figure B 2 and remove it once it separates from the stud sensor 3 Insert two new high quality AAA batt...

Page 7: ...ly place the stud sensor flat against the wall and parallel to a door or window on the same wall which give you an indication of how the studs are positioned behind the wall 3 Without moving the stud sensor press and hold until all the LEDs except the green Power LED turn off 1 sec 4 While still pressing SLOWLY move the stud sensor to the left or the right on the wall 5 As you move the stud sensor...

Page 8: ... void all warranties on the product To assure product SAFETY and RELIABILITY repairs maintenance and adjustment should be performed by authorized service centers Service or maintenance performed by unqualified personnel may result in a risk of injury To locate your nearest DEWALT service center go to http www DEWALT com Three Year Limited Warranty DEWALT will repair without charge any defects due ...

Page 9: ...4 12 7mm 19mm thick drywall 1 4 6 4mm under 1 2 1 5 12 7mm 38mm thick drywall Accuracy Center of Metal stud 1 4 6 4mm under 1 2 3 4 12 7mm 19mm thick drywall 1 4 6 4mm under 1 2 1 5 12 7mm 38mm thick drywall Power Source 2 AAA 1 5V size batteries 3V DC Battery Life 20 hrs of continual use at 2 4V 0 3V Power LED will flash to indicate low battery Automatic Calibration Yes Automatic Shutoff when rel...

Page 10: ...ilmente el centro del poste Seguridad del usuario Guías de Seguridad Las siguientes definiciones describen el nivel de severidad para cada palabra de señal Por favor lea el manual y ponga atención a estos símbolos ADVERTENCIA Indica una situación potencialmente peligrosa que si no se evita podría resultar en lesiones serias PRECAUCIÓN Indica una situación potencialmente peligrosa que si no se evit...

Page 11: ...ltaje varias pulgadas a cada lado del cable eléctrico real Para ayudar a ubicar la posición del cable escanee sosteniendo la unidad a 13 mm de distancia de la superficie de la pared o coloque la otra mano sobre la superficie a aproximadamente a 12 305 mm del sensor Seguridad de la batería ADVERTENCIA Las baterías pueden explotar o tener fugas y pueden causar lesiones personales o incendios Para re...

Page 12: ...á una indicación de cómo los postes están ubicados detrás de la pared 3 Sin mover el sensor de postes use el dedo índice para mantener presionado hasta que todos los LED excepto el LED verde de encendido se apaguen 1 segundo 4 Mientras sigue presionando mueva LENTAMENTE el sensor de postes hacia la izquierda o hacia la derecha en la pared 5 A medida que mueve el sensor de postes mire los LED del s...

Page 13: ...ostes en un lugar limpio a una temperatura entre 67 F 55 C y 158 F 70 C Solución de problemas El LED parpadea La energía de la batería es baja Verifique las baterías AAA para asegurarse que Cada batería esté instalada correctamente de acuerdo con y enumerados dentro del compartimento de la batería Los contactos de la batería están limpios y libres de óxido o corrosión Las baterías son baterías nue...

Page 14: ...ados por reparaciones realizadas o intentadas por terceros Esta garantía le otorga derechos legales específicos además de los cuales puede tener otros dependiendo del estado o la provincia en que se encuentre Además de la garantía las herramientas DEWALT están cubiertas por nuestro 1 AÑO DE SERVICIO GRATUITO DEWALT realizará el mantenimiento de la herramienta y reemplazará las piezas gastadas por ...

Page 15: ...e 1 2 3 4 12 7mm 19mm de espesor 1 4 6 4mm bajo panel de yeso de 1 2 1 5 12 7mm 38mm de espesor Precisión Centro de Poste de metal 1 4 6 4mm bajo panel de yeso de 1 2 3 4 12 7mm 19mm de espesor 1 4 6 4mm debajo de panel de yeso de 1 2 1 5 12 7mm 38mm de espesor Fuente de energía 2 baterías tamaño AAA 1 5V 3V CD Vida de batería 20 hrs de uso continuo en 2 4V 0 3V el LED de Energía parpadeará para i...

Page 16: ...indiquer facilement le centre du montant Sécurité de l utilisateur Directives sur la sécurité Les définitions suivantes décrivent le niveau de sévérité pour chaque mot indicateur Veuillez lire le manuel et porter attention à ces symboles AVERTISSEMENT Indique une situation potentiellement dangereuse qui si elle ne peut être évitée pourrait entraîner des blessures graves ATTENTION Indique une situa...

Page 17: ...ent se développer sur la cloison sèche et d autres surfaces étendront la zone de détection de la tension de plusieurs pouces de chaque côté du fil électrique actuel Pour aider à localiser la position des fils balayez en tenant l unité à po 13mm de la surface du mur ou placez votre autre sur la surface à environ 12 po 305mm du détecteur Sécurité concernant les piles AVERTISSEMENT Les piles peuvent ...

Page 18: ...être sur le même mur ce qui vous donne une idée de la façon dont les montants sont placés derrière le mur 3 Sans déplacer le détecteur de montants utilisez votre index pour appuyer et maintenir jusqu à ce que tous les voyants DEL sauf le voyant d alimentation vert DEL s éteignent 1 sec 4 Pendant que vous appuyez encore déplacez LENTEMENT le détecteur de montants vers la gauche ou la droite sur le ...

Page 19: ...ur de montants Entreposez le détecteur de montants dans un endroit propre à une température entre 55 C 67 F et 70 C 158 F Dépannage Le voyant DEL clignote La pile est faible Vérifiez les piles AAA pour vous assurer que Chaque pile est installée correctement selon et indiqués à l intérieur du compartiment des piles Les contacts des piles sont propres et sans rouille ou corrosion Ce sont de nouvelle...

Page 20: ...éfectueux causé par un défaut de matériel ou de fabrication durant une période de trois ans à compter de la date d achat Cette garantie ne couvre pas les défaillances de pièces dues à une usure normale ou à une mauvaise utilisation de l outil Pour plus de détails relatifs à la couverture de la garantie et aux réparations sous garantie visitez le site Web www DEWALT com ou composez le 1 800 4 DEWAL...

Page 21: ...ne cloison sèche d une épaisseur de 1 2 à 3 4 po 12 7 à 19 mm 1 4 po 6 4 mm sous une cloison sèche d une épaisseur de 1 2 à 1 5 po 12 7 à 38 mm Précision Centre du montant en métal 1 4 po 6 4 mm sous une cloison sèche d une épaisseur de 1 2 à 3 4 po 12 7 à 19 mm 1 4 po 6 4 mm sous une cloison sèche d une épaisseur de 1 2 à 1 5 po 12 7 à 38 mm Source de l alimentation 2 piles AAA 1 5 V 3 V CC Durée...

Page 22: ...ite notar facilmente o centro do pino Segurança do Usuário Guia de segurança As definições abaixo descrevem o nível de gravidade representado para cada palavra de sinal Por favor leia o manual e preste atenção nestes símbolos AVISO Indica uma situação potencialmente perigosa que se não for evitada poderá resultar em ferimentos graves CUIDADO Indica uma situação potencialmente perigosa que se não f...

Page 23: ...detecção de voltagem em muitas polegadas para todos os lados do fio elétrico em questão Para ajudar a localizar a posição do fio faça uma varredura segurando a unidade 13 mm da superfície da parede ou coloque a outra mão na sua superfície aproximadamente 12 305 mm do sensor Segurança da Bateria AVISO As baterias podem explodir ou vazar substâncias e causar ferimentos graves ou incêndio Para reduzi...

Page 24: ...e dará uma indicação de como os metais estão posicionados atrás da parede 3 Sem mover o detector use o dedo indicador para pressionar e segurar até que todos os LEDs exceto o LED verde de energia se desliguem 1 seg 4 Enquanto estiver pressionando LENTAMENTE mova o detector para a esquerda ou para a direita na parede 5 Ao mover detector observe com atenção os LEDs Se a luz acender Figura A 7 mova o...

Page 25: ...e 67 F 55 C e 158 F 70 C Solução de problemas O LED está piscando A bateria está acabando Verifique as baterias AAA para garantir que Cada bateria esteja instalada corretamente de acordo com e dentro do compartimento da bateria Os contatos da bateria estejam limpos sem ferrugem ou corrosão As baterias sejam novas e de alta qualidade para reduzir as chances de vazamento da bateria Certifique se de ...

Page 26: ...ês anos A DEWALT efetuará reparos sem cobrança de taxa de todos os defeitos provocados por falha do material ou de fabricação por três anos contados a partir da data da compra Esta garantia não cobre falhas da peça provocadas pelo desgaste natural ou por uso incorreto da ferramenta Para obter mais informações sobre a cobertura da garantia e sobre os reparos abrangidos acesse www DEWALT com ou ligu...

Page 27: ... 12 7 mm 19 mm de espessura parede de 1 4 6 4 mm menor que 1 2 1 5 12 7 mm 38 mm de espessura Exatidão Centro do pino de metal parede de 1 4 6 4 mm menor que 1 2 3 4 12 7 mm 19 mm de espessura parede de 1 4 6 4 mm menor que 1 2 1 5 12 7 mm 38 mm de espessura Fonte de potência 2 AAA 1 5V baterias de tamanho 3V DC Vida da bateria 20 horas de uso contínuo a 2 4 V 0 3 V energia de LED piscará para ind...

Page 28: ... 2018 DEWALT Industrial Tool Co 701 East Joppa Road Towson MD 21286 Made in China N596253 June 2018 ...

Reviews: