background image

9

English

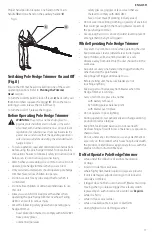
Joining Trimmer Head Assembly to 

Handle Assembly (Fig. A, B)

Combining the handle assembly 

 15 

 to the trimmer head 

assembly 

 16 

 creates a pole trimmer that is approximately 

7' (2.1 m) long. 

1.  Align the groove on the outside of the coupling end of 

the handle assembly 

 15 

 with the tongue on the inside 

of the coupling end of the trimmer head assembly 

 16 

.

2.  Slide the threaded sleeve 

 8 

 on the trimmer head 

assembly down as far as possible and rotate the 
sleeve clockwise until it stops and completely covers 
the threads.


WARNING:

 Always check to make sure that the sleeve 

is completely threaded on and that the threads are no 
longer visible. Not threading the sleeve completely on 
could result in the assemblies becoming disconnected 
creating a hazardous condition. Periodically check the 
connections to ensure that no threads are visible.

ASSEMBLY AND ADJUSTMENTS


WARNING: To reduce the risk of serious personal 

injury, turn unit off and remove the battery pack 

before making any adjustments or removing/

installing attachments or accessories.

 An 

accidental start-up can cause injury.

Intended Use

This pole hedge trimmer is designed for professional 
landscaping applications.

DO nOT

 use under wet conditions or in presence of 

flammable liquids or gases.

DO nOT

 let children come into contact with the tool. 

Supervision is required when inexperienced operators use 
this tool.

when the battery pack is below +40 °F (+4.5 °C), or 

above +104 °F (+40 °C). This is important and will 

prevent serious damage to the battery pack.

2.  The charger and battery pack may become warm to the 

touch while charging. This is a normal condition, and 

does not indicate a problem. To facilitate the cooling of 

the battery pack after use, avoid placing the charger or 

battery pack in a warm environment such as in a metal 

shed or an uninsulated trailer.

3.  If the battery pack does not charge properly:

a.  Check operation of receptacle by plugging in a lamp 

or other appliance;

b.  Check to see if receptacle is connected to a light 

switch which turns power off when you turn out  

the lights;

c.  Move the charger and battery pack to a location 

where the surrounding air temperature is 

approximately 65 °F – 75 °F (18 °C – 24 °C);

d.  If charging problems persist, take the tool, battery 

pack and charger to your local service center.

4.  The battery pack should be recharged when it fails to 

produce sufficient power on jobs which were easily 

done previously. DO NOT CONTINUE to use under these 

conditions. Follow the charging procedure. You may also 

charge a partially used pack whenever you desire with 

no adverse effect on the battery pack.

5.  Foreign materials of a conductive nature such as, but 

not limited to, grinding dust, metal chips, steel wool, 

aluminum foil, or any buildup of metallic particles 

should be kept away from charger cavities. Always 

unplug the charger from the power supply when there 

is no battery pack in the cavity. Unplug the charger 

before attempting to clean.

6.  Do not freeze or immerse the charger in water or any 

other liquid.

Charger Cleaning Instructions


WARNING: 

Shock hazard. Disconnect the charger 

from the AC outlet before cleaning. Dirt and grease 
may be removed from the exterior of the charger using 
a cloth or soft non-metallic brush. Do not use water or 
any cleaning solutions.

Wall Mounting

DCB107, DCB112, DCB113, DCB115, DCB118, DCB132

These chargers are designed to be wall mountable or to 
sit upright on a table or work surface.  If wall mounting, 
locate the charger within reach of an electrical outlet, 
and away from a corner or other obstructions which may 
impede air flow. Use the back of the charger as a template 
for the location of the mounting screws on the wall. Mount 
the charger securely using drywall screws (purchased 
separately) at least 1” (25.4  mm) long, with a screw head 
diameter of 0.28–0.35” (7–9 mm), screwed into wood to an 
optimal depth leaving approximately 7/32” (5.5 mm) of the 
screw exposed. Align the slots on the back of the charger 
with the exposed screws and fully engage them in the slots.

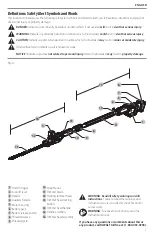
Fig. B

16

8

15

Summary of Contents for DCPH820

Page 1: ...stion ou tout commentaire nous contacter Si tiene dudas o comentarios contáctenos 1 800 4 DeWALT DCPH820 20V Max Pole Hedge Trimmer Taille haie télescopique 20 V max Cortasetos de altura de 20 V Máx Instruction Manual Guide D utilisation Manual de instrucciones ...

Page 2: ...English original instructions 1 Français traduction de la notice d instructions originale 15 Español traducido de las instrucciones originales 31 ...

Page 3: ...without word Indicates a safety related message NOTICE Indicates a practice not related to personal injury which if not avoided may result in property damage WARNING Read all safety warnings and all instructions Failure to follow the warnings and instructions may result in electric shock fire and or serious injury WARNING To reduce the risk of injury read the instruction manual If you have any que...

Page 4: ...of children and do not allow persons unfamiliar with the power tool or these instructions to operate the power tool Power tools are dangerous in the hands of untrained users e Maintain power tools and accessories Check for misalignment or binding of moving parts breakage of parts and any other condition GENERAL POWER TOOL SAFETY WARNINGS WARNING Read all safety warnings instructions illustrations ...

Page 5: ...aused by poorly maintained power tools f Keep cutting tools sharp and clean Properly maintained cutting tools with sharp cutting edges are less likely to bind and are easier to control g Use the power tool accessories and tool bits etc in accordance with these instructions taking into account the working conditions and the work to be performed Use of the power tool for operations different from th...

Page 6: ... to reduce fatigue Keep firm footing and balance Do not overreach Overreaching can result in loss of balance or exposure to sharp surfaces Do not under any circumstance use any attachment or accessory on this product which was not provided with the product or identified as appropriate for use with this product in this Instruction Manual Do Not Operate Pole Hedge Trimmer While under the influence o...

Page 7: ...ized parts or failure to follow Maintenance Instructions may create a risk of electric shock or injury Specific Safety Rules Hold tool by insulated gripping surfaces when performing an operation where the cutting tool may contact hidden wiring Contact with a live wire will make exposed metal parts of the tool live and shock the operator READ ALL INSTRUCTIONS Important Safety Instructions for All B...

Page 8: ...losive atmospheres such as in the presence of flammable liquids gases or dust Inserting or removing the battery pack from the charger may ignite the dust or fumes When battery pack is not in use keep it away from other metal objects like paper clips coins keys nails screws or other small metal objects that can make a connection from one terminal to another Shorting the battery terminals together m...

Page 9: ... trademark of Call 2 Recycle Inc from short circuits So when transporting individual battery packs make sure that the battery terminals are protected and well insulated from materials that could contact them and cause a short circuit NOTE Li ion batteries should not be put in checked baggage Important Safety Instructions for All Battery Chargers WARNING Read all safety warnings instructions and ca...

Page 10: ...power cord is damaged it must be replaced by the manufacturer or its representative or by an equally qualified person to avoid danger Do not place any object on top of the charger or place the charger on a soft surface that might block the ventilation slots and result in excessive internal heat Place the charger in a position away from any heat source The charger is ventilated through slots in the...

Page 11: ... plugging in a lamp or other appliance b Check to see if receptacle is connected to a light switch which turns power off when you turn out the lights c Move the charger and battery pack to a location where the surrounding air temperature is approximately 65 F 75 F 18 C 24 C d If charging problems persist take the tool battery pack and charger to your local service center 4 The battery pack should ...

Page 12: ...utton 13 and rotate the trimmer head handle 14 to pivot the trimmer head as shown in Figure E 2 Lock the trimmer head into one of the seven operating positions To lock the trimmer head into place release your grip on the trimmer head handle Check to make sure that trimmer head is locked into position by trying to move the motor housing If it is not locked rotate it to the nearest lock position Fig...

Page 13: ...e marked to comply with ANSI Z87 1 face or dust mask if working in dusty areas Do not wear loose fitting clothing or jewelry of any kind that could get caught in the moving blades or parts of the pole hedge trimmer Secure long hair so it is above shoulder level to prevent entanglement in any moving parts While Operating Pole Hedge Trimmer Stay alert Use common sense while operating the unit Keep w...

Page 14: ... L DANGER Keep hands away from blade WARNING To guard against injury observe the following Read instruction manual before using Save instruction manual Check the hedge for foreign objects such as wires or fences before each use Keep hands on handles Don t overreach Do not use under wet conditions CAUTION Blade may coast after turn off Working Position Fig H I Maintain proper footing and balance an...

Page 15: ...damp cloth to clean the unit Never let any liquid get inside the unit never immerse any part of the unit into a liquid Prevent the blades from rusting by applying a film of light machine oil after cleaning Sharpening Blade Fig N Keep blade sharp for best performance A dull blade does not cut cleanly When sharpening blade ensure that battery is removed Replace bent or damaged blade immediately It i...

Page 16: ...arranty repair information visit www dewalt com or call 1 800 4 DeWALT 1 800 433 9258 This warranty does not apply to accessories or damage caused where repairs have been made or attempted by others THIS LIMITED WARRANTY IS GIVEN IN LIEU OF ALL OTHERS INCLUDING THE IMPLIED WARRANTY OF MERCHANTABILITY AND FITNESS FOR A PARTICULAR PURPOSE AND EXCLUDES ALL INCIDENTAL OR CONSEQUENTIAL DAMAGES Some sta...

Page 17: ... qui par contre si rien n est fait pour l éviter pourrait poser des risques de dommages matériels AVERTISSEMENT lire tous les avertissements de sécurité et toutes les directives Le non respect des avertissements et des directives pourrait se solder par un choc électrique un incendie et ou une blessure grave AVERTISSEMENT afin de réduire le risque de blessures lire le mode d emploi de l outil Pour ...

Page 18: ...s par les poussières h Ne pas laisser votre connaissance acquise suite l utilisation fréquente des outils vous permettre de baisser la garde et ignorer les principes de sécurité de l outil Un acte irréfléchi peut causer une blessure grave en une fraction de seconde AVERTISSEMENTS GÉNÉRAUX SUR LA SÉCURITÉ DES OUTILS AVERTISSEMENT lisez tous les avertissements de sécurité toutes les instructions les...

Page 19: ...tre effectuée par le fabricant ou les fournisseurs de service autorisé 4 Utilisation et entretien d un outil électrique a Ne pas forcer un outil électrique Utiliser l outil électrique approprié à l application L outil électrique approprié effectuera un meilleur travail de façon plus sûre et à la vitesse pour laquelle il a été conçu b Ne pas utiliser un outil électrique dont l interrupteur est défe...

Page 20: ...la pluie Pour votre sécurité lire et comprendre toute instruction avant toute utilisation du taille haie télescopique Suivre toutes les directives de sécurité Tout manquement aux directives de sécurité suivantes pose des risques de dommages corporels graves Travailler prudemment Faire preuve de bon sens Ne pas utiliser le taille haie télescopique en cas de fatigue Le taille haie télescopique ne do...

Page 21: ...che NE PAS RETIRER un matériau découpé ou le tenir à la main pendant la coupe alors que l organe de coupe est en mouvement Retirer le bloc piles avant de retirer des matériaux coincés dans l organe de coupe Ne pas attraper ou tenir le taille haie télescopique par ses organes de coupe exposés ou ses bords de coupe ATTENTION l organe de coupe continue de tourner après l arrêt de l outil NE PAS FORCE...

Page 22: ...ine Avant d utiliser le bloc piles et le chargeur lire les consignes de sécurité ci après puis suivre la procédure de chargement indiquée Pour commander un bloc piles de rechange s assurer d en inclure le numéro de catalogue et la tension L étiquette apposée sur votre outil peut inclure les symboles suivants Les symboles et leur définition sont indiqués ci après V volts Hz hertz min minutes ou DC ...

Page 23: ...ut pas laisser de piles au li ion dans les bagages enregistrés l incinération des blocs piles au lithium ion des vapeurs et matières toxiques sont dégagées En cas de contact du liquide de la pile avec la peau rincer immédiatement au savon doux et à l eau En cas de contact oculaire rincer l œil ouvert à l eau claire une quinzaine de minutes ou jusqu à ce que l irritation cesse Si des soins médicaux...

Page 24: ...orte des risques d incendie de chocs électriques ou d électrocution Protéger le chargeur de la pluie ou de la neige Tirer sur la fiche plutôt que sur le cordon pour débrancher le chargeur Cela permet de réduire les risques d endommager la fiche ou le cordon d alimentation S assurer que le cordon est protégé de manière à ce que personne ne marche ni ne trébuche dessus ou à ce qu il ne soit ni endom...

Page 25: ...les rechargeables DeWALT out autre type de piles pourrait exploser et causer des dommages corporels et matériels ATTENTION sous certaines conditions lorsque le chargeur est connecté au bloc d alimentation des matériaux étrangers pourraient court circuiter le chargeur Les corps étrangers conducteurs tels que mais pas limité à poussières de rectification débris métalliques laine d acier feuilles d a...

Page 26: ...température ambiante est élevée comme dans un hangar métallique ou une remorque non isolée 3 Si le bloc piles ne se recharge pas correctement a Vérifier le bon fonctionnement de la prise en y branchant une lampe ou tout autre appareil électrique b Vérifier que la prise n est pas contrôlée par un interrupteur qui coupe le courant lorsqu on éteint les lumières c Déplacer le chargeur et le bloc piles...

Page 27: ...ne courroie d épaule ajustable 1 Enclenchez le verrou de la courroie d épaule 17 sur le support de la courroie 10 situé sur l outil juste à l avant de la gâchette comme illustré dans la Fig C Ajustez la courroie afin qu elle adapte à votre épaule Faire pivoter la tête du taille haie Fig A D E G La tête du taille haie pivote à 180 et peut être verrouillée dans 7 positions différentes dans cette pla...

Page 28: ... haie à manche lorsque vous êtes fatigué Seulement des adultes bien formés doivent utiliser le taille haie à manche Ne jamais autoriser les enfants à l utiliser Ne pas utiliser cet outil pour toute tâche autre que celles pour lesquelles il est conçu Ne pas autoriser les enfants ou des personnes non formées à utiliser cet outil Utilisez taille haie à manche un casque protecteur approuvé ANSI CSA lo...

Page 29: ...si vous travaillez dans une zone poussiéreuse Ne pas porter de vêtements amples ou de bijoux quelconques qui pourraient se coincer dans les lames ou les pièces du taille haie à manche Attachez les cheveux longs afin qu ils soient au dessus des épaules afin de prévenir l emmêlement dans les pièces en mouvements Pendant que vous utilisez le taille haie à manche Demeurez vigilant Faites preuve de bon...

Page 30: ...ion Fig A Lames 1 Après l utilisation nettoyez soigneusement la lame 11 avec un solvant de résine 2 Après avoir nettoyé appliquez une couche légère de lubrification sur la lame exposée 3 Tournez le taille haie à la verticale avec les lames vers le sol et faites le fonctionner pendant quelques secondes afin de répartir entièrement la lubrification Fig I Fig L Fig K Fig J Tailler les nouvelles pouss...

Page 31: ... lame est arrêtée et que la pile a été retirée avant d aiguiser la lame 3 Portez une protection oculaire et des gants appropriés et faites attention de ne pas vous couper 4 Limez soigneusement les bords coupants de la lame avec une lime à dents fines Limez vers le bord coupant 20 à l angle de coupe original 38 de l horizontal Limez seulement les bords coupants droits 20 des lames Ne pas limer l en...

Page 32: ...B203 DCB204 DCB204BT DCB205 DCB205BT DCB206 DCB230 DCB606 DCB609 DCB612 Registre en ligne Merci pour votre achat Enregistrez dès maintenant votre produi RÉPARATIONS SOUS GARANTIE cette carte remplie vous permettra de vous prévaloir du service de réparations sous garantie de façon plus efficace dans le cas d un probléme avec le produit CONFIRMATION DE PROPRIÉTÉ en cas de perte provoquée par un ince...

Page 33: ... lesiones corporales que de no evitarse puede resultar en daños a la propiedad ADVERTENCIA Lea todas las advertencias de seguridad e instrucciones El incumplimiento de las advertencias e instrucciones puede provocar descargas eléctricas incendios o lesiones graves ADVERTENCIA Para reducir el riesgo de lesiones lea el manual de instrucciones Si tiene alguna duda o algún comentario sobre ésta u otra...

Page 34: ...s con fines de recolección y extracción de polvo asegúrese de que estén conectados y que se utilicen correctamente El uso de dispositivos de recolección de polvo puede reducir los peligros relacionados con el polvo ADVERTENCIAS GENERALES DE SEGURIDAD PARA HERRAMIENTAS ELÉCTRICAS ADVERTENCIA Lea todas las advertencias de seguridad instrucciones ilustraciones y especificaciones incluidas con esta he...

Page 35: ... descuidado e ignorar los principios de seguridad de la herramienta Una acción descuidada puede causar lesiones severas en una fracción de segundo 4 Uso y Mantenimiento de la Herramienta Eléctrica a No fuerce la herramienta eléctrica Utilice la herramienta eléctrica correcta para el trabajo que realizará Si se la utiliza a la velocidad para la que fue diseñada la herramienta eléctrica correcta per...

Page 36: ... manos lejos de la cuchilla El contacto con la cuchilla resultará en lesiones serias ADVERTENCIA Use protección para los ojos ADVERTENCIA No lo exponga a la lluvia Normas de Seguridad Importantes ADVERTENCIA Lea y comprenda todas las instrucciones El incumplimiento de las instrucciones que se indican a continuación podría provocar una descarga eléctrica un incendio y o lesiones corporales graves G...

Page 37: ...r esto podría resultar en una lesión corporal grave Mantenga los mangos secos limpios y libres de aceite Asegúrese de que las hojas de corte se hayan detenido antes de soltar la unidad PELIGRO PELIGRO DE CORTE Mantenga las manos alejadas de las hojas Mantenga ambas manos en los mangos cuando el cortasetos de altura esté encendido NO INTENTE sacar el material cortado ni sujete el material que va a ...

Page 38: ...Utilice además una cubrebocas o mascarilla antipolvo si la operación de corte genera demasiado polvo SIEMPRE LLEVE EQUIPO DE SEGURIDAD CERTIFICADO protección ocular ANSI Z87 1 CAN CSA Z94 3 protección auditiva ANSI S12 6 S3 19 protección respiratoria NIOSH OSHA MSHA ADVERTENCIA Algún polvo contiene químicos conocidos por el Estado de California que causan cáncer defectos de nacimiento u otros daño...

Page 39: ... batería para que entre en el cargador NO modifique la unidad de batería en ninguna forma para que entre en un cargador no compatible pues puede producir una ruptura en la unidad de batería y causar lesiones corporales graves Consulte la tabla al final de este manual para ver la compatibilidad entre baterías y cargadores Cargue las unidades de batería sólo en los cargadores designados por DeWALT N...

Page 40: ... y otros usuarios de baterías han establecido programas en los Estados Unidos y Canadá para facilitar la recolección de baterías de níquel cadmio níquel e hidruro metálico o de iones de litio gastadas Al llevar sus baterías de níquel cadmio níquel e hidruro metálico y de iones de litio gastadas a un centro de servicio autorizado por DeWALT o al minorista local para que sean recicladas ayuda a prot...

Page 41: ...as eléctricas El retirar el paquete de baterías no reducirá este riesgo NUNCA intente conectar 2 cargadores entre sí El cargador está diseñado para operar con una corriente eléctrica estándar residencial de 120 V No intente usarlo con ningún otro voltaje Esto no aplica al cargador vehicular ADVERTENCIA Peligro de descarga eléctrica No permita que ningún líquido se introduzca en el cargador Puede p...

Page 42: ...iento de la unidad de batería después del uso evite colocar el cargador o la unidad de batería en un lugar cálido como un cobertizo metálico o un remolque sin aislamiento térmico 3 Si la unidad de batería no se carga correctamente a Verifique el funcionamiento de la toma enchufando una lámpara u otro aparato b Revise que la toma de corriente no esté conectada a un interruptor de luz que corte la c...

Page 43: ...amables Este cortasetos de altura es una herramienta eléctrica profesional NO permita que los niños toquen la herramienta Si el operador no tiene experiencia operando esta herramienta su uso deberá ser supervisado Fig B 16 8 15 Conexión y ajuste de correa de hombro Fig C La podadora de setos de poste incluye una correa de hombro Fig C 17 10 Giro de cabeza de podadora Fig A D E G La cabeza de podad...

Page 44: ...la unidad de batería quede firmemente insertada en la herramienta verifique que ésta no se salga sola Para retirar la unidad de batería de la herramienta presione el botón de liberación 7 y tire firmemente de la de batería para sacarla del mango de la herramienta Insértela en el cargador tal como se describe en la sección del cargador de este manual OPERACIÓN ADVERTENCIA Para reducir el riesgo de ...

Page 45: ...tiga Mantenga una posición de los pies y equilibrio firmes No se estire Estirarse demasiado puede provocar la pérdida de equilibrio o la exposición a superficies afiladas No utilice bajo ninguna circunstancia ninguna conexión o accesorio en este producto que no se haya provisto con el mismo o identificado como apropiado para uso con este producto en este Manual de instrucciones No opere el cortase...

Page 46: ...metales No guarde la unidad en o junto a fertilizantes o productos químicos Fig I Poda lateral de setos Fig L Oriente la podadora como se muestra y comience en la parte inferior y barra hacia arriba Fig L Fig K Poda de retoños Fig J Usar un movimiento amplio y de barrido y pasar los dientes de la cuchilla a través de las ramas es más efectivo Una ligera inclinación hacia abajo de la hoja en la dir...

Page 47: ...ntro de la cuchilla 5 Voltee la podadora para afilar la cuchilla inferior 6 Repita los pasos para afilar el lado opuesto de cada cuchilla Fig N 18 19 20 Limpieza ADVERTENCIA Sople la suciedad y el polvo de todos los conductos de ventilación con aire seco al menos una vez por semana Para reducir el riesgo de lesiones utilice siempre protección para los ojos aprobada ANSI Z87 1 al realizar esta tare...

Page 48: ...IDENTIFICACIÓN DEL PRODUCTO Sello o firma del Distribuidor Nombre del producto ___________________________ Mod Cat ____________________________________ Marca ______________________________________ Núm de serie _________________________________ Datos para ser llenados por el distribuidor Fecha de compra y o entrega del producto ___________________________________________ Nombre y domicilio del dist...

Page 49: ...n cobro en cualquier momento durante un año a contar de la fecha de compra 2 AÑOS DE SERVICIO GRATUITO PARA UNIDADES DE ALIMENTACIÓN DeWALT DC9071 DC9091 DC9096 DC9182 DC9280 DC9360 DCB120 DCB122 DCB124 DCB127 DCB201 DCB203BT DCB207 DCB361 3 AÑOS DE SERVICIO GRATUITO PARA UNIDADES DE ALIMENTACIÓN DeWALT DCB200 DCB203 DCB204 DCB204BT DCB205 DCB205BT DCB206 DCB230 DCB606 DCB609 DCB612 NOTA La garant...

Page 50: ......

Page 51: ......

Page 52: ...ale est de 10 8 18 54 ou 108 120 V max se base sur l utilisation combinée de 2 blocs piles au lithium ion DeWALT de 60 V max El máximo voltaje inicial de la batería medido sin carga de trabajo es 12 20 o 60 voltios El voltaje nominal es de 10 8 18 54 o 108 V 120 V Máx se basan en el uso de 2 baterías de iones de litio DeWALT de 60 V Máx combinadas BT Bluetooth NOTE The Bluetooth word mark and logo...

Reviews: