DeWalt DCD791B Instruction Manual Download Page 12

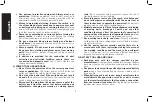
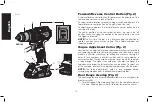
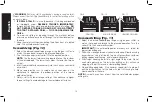
 3. Insert the accessory about 3/4" (19 mm) into the chuck and 

tighten securely by rotating the chuck sleeve clockwise with one 

hand while holding the tool with the other. Your tool is equipped 

with an automatic spindle lock mechanism. This allows you to 

open and close the chuck with one hand.

FIG. 5

FIG. 6

F

FIG. 4

Be sure to tighten chuck with one hand on the chuck sleeve and one 

hand holding the tool for maximum tightness.

To release the accessory, repeat steps 1 and 2 above.

Belt Hook and Bit Clip 

(Optional Accessory) (Fig. 2)

 WARNING:  To reduce the risk of serious  personal injury, 

turn tool off and remove the battery pack before making any 

adjustments or removing/installing attachments or accessories. 

An accidental start-up can cause injury.

WARNING:  To reduce the risk of serious personal injury, 

ONLY use the tool's belt hook to hang the tool from a work 

belt. DO NOT

 use the belt hook for tethering or securing the tool to 

a person or object during use. DO NOT suspend tool overhead or 

suspend objects from the belt hook.

WARNING: To reduce the risk of serious personal injury, 

ensure the screw holding the belt hook is secure.

 CAUTION:


To reduce the risk of personal injury or damage, 

DO NOT use the belt hook to hang the drill while using as a 

spotlight.

IMPORTANT: 

When attaching or replacing the belt hook or bit clip, 

use only the screw (H) that is provided. Be sure to securely tighten 

the screw.

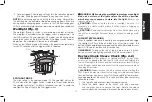
The belt hook (G) and bit clip (I) can be attached to either side of the 

tool using only the screw (H) provided, to accommodate left- or right- 

handed users. If the hook or bit clip is not desired at all, it can be 

removed from the tool. 

To move belt hook or bit clip, remove the screw (H) that holds it in 

place then reassemble on the opposite side. Be sure to securely 

tighten the screw.

OPERATION

 WARNING:  To reduce the risk of serious  personal injury, 

turn tool off and remove the battery pack before making any 

adjustments or removing/installing attachments or accessories. 

An accidental start-up can cause injury.

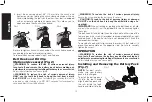
Installing and Removing the Battery Pack 

(Fig. 7) 

NOTE:

 For best results,

K

J

FIG. 7


make sure your battery 

pack is fully charged. 

To install the battery pack 

(K) into the tool handle, 

align the battery pack with 

the rails inside the tool’s 

handle and slide it into the 

English

12

Summary of Contents for DCD791B

Page 1: ...es or dust Power tools create sparks which may ignite the dust or fumes c Keep children and bystanders away while operating a power tool Distractions can cause you to lose control 2 ELECTRICAL SAFETY a Power tool plugs must match the outlet Never modify the plug in any way Do not use any adapter plugs with earthed grounded power tools Unmodified plugs and matching outlets will reduce risk of elect...

Page 2: ... plug from the power source and or the battery pack from the power tool before making any adjustments changing accessories or storing power tools Such preventive safety measures reduce the risk of starting the power tool accidentally d Store idle power tools out of the reach of children and do not allow persons unfamiliar with the power tool or these instructions to operate the power tool Power to...

Page 3: ...ing operation Wear gloves when handling them if performing heat producing applications such as hammerdrilling and drilling metals Do not operate this tool for long periods of time Vibration caused by hammer action may be harmful to your hands and arms Use gloves to provide extra cushion and limit exposure by taking frequent rest periods Air vents often cover moving parts and should be avoided Loos...

Page 4: ...alog number and voltage Consult the chart at the end of this manual for compatibility of chargers and battery packs The battery pack is not fully charged out of the carton Before using the battery pack and charger read the safety instructions below and then follow charging procedures outlined READ ALL INSTRUCTIONS Do not charge or use the battery pack in explosive atmospheres such as in the presen...

Page 5: ...itation Provide fresh air If symptoms persist seek medical attention WARNING Burn hazard Battery liquid may be flammable if exposed to spark or flame The RBRC Seal The RBRC Rechargeable Battery Recycling Corp oration Seal on the nickel cadmium nickel metal hydride or lithium ion batteries or battery packs indicates that the costs to recycle these batteries or battery packs at the end of their usef...

Page 6: ...an extension cord suitable for outdoor use Use of a cord suitable for outdoor use reduces the risk of electric shock An extension cord must have adequate wire size AWG or American Wire Gauge for safety The smaller the gauge number of the wire the greater the capacity of the cable that is 16 gauge has more capacity than 18 gauge An undersized cord will cause a drop in line voltage resulting in loss...

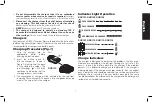
Page 7: ...s shown in Figure 1 making sure the pack is fully seated in charger The red charging light will blink continuously indicating that the charging process has started 3 The completion of charge will be indicated by the red light remaining ON continuously The pack is fully charged and may be used at this time or left in the charger Indicator Light Operation DCB101 DCB102 DCB103 PACK CHARGING PACK CHAR...

Page 8: ...oblem with a charger DCB107 DCB112 DCB113 DCB115 These chargers will not charge a faulty battery pack The charger will indicate faulty battery pack by refusing to light NOTE This could also mean a problem with a charger Wall Mounting DCB107 DCB112 DCB113 DCB115 These chargers are designed to be wall mountable or to sit upright on a table or work surface If wall mounting locate the charger within r...

Page 9: ...rvice center for recycling Storage Recommendations 1 The best storage place is one that is cool and dry away from direct sunlight and excess heat or cold 2 For long storage it is recommended to store a fully charged battery pack in a cool dry place out of the charger for optimal results NOTE Battery packs should not be stored completely depleted of charge The battery pack will need to be recharged...

Page 10: ...s an adjustable torque screwdriver mechanism for driving and removing a wide array of fastener shapes and sizes and in some models a hammer mechanism for drilling into masonry Circling the collar C are numbers a drill bit symbol and in some models a hammer symbol These numbers are used to set the clutch to deliver a torque range The higher the number on the collar the higher the torque and the lar...

Page 11: ... could result CAUTION When using the tool as a spotlight be sure it is secured on a stable surface where it will not cause a tripping or falling hazard CAUTION Remove all accessories from the chuck before using the drill as a spotlight Personal injury or property damage could result LOW BATTERY WARNING When in spotlight mode and the battery is nearing complete discharge the spotlight will flash tw...

Page 12: ...educe the risk of serious personal injury ensure the screw holding the belt hook is secure CAUTION To reduce the risk of personal injury or damage DO NOT use the belt hook to hang the drill while using as a spotlight IMPORTANT When attaching or replacing the belt hook or bit clip use only the screw H that is provided Be sure to securely tighten the screw The belt hook G and bit clip I can be attac...

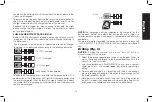
Page 13: ...e battery is below the usable limit the fuel gauge will not illuminate and the battery will need to be recharged P FIG 8 NOTE The fuel gauge is only an indication of the charge left on the battery pack It does not indicate tool functionality and is subject to variation based on product components temperature and end user application For more information regarding fuel gauge battery packs please ca...

Page 14: ...e chuck as you would any drill bit 4 Make some practice runs in scrap or on unseen areas of the workpiece to determine the proper position of the torque adjustment collar 5 Always start with lower torque settings then advance to higher torque settings to avoid damage to the workpiece or fastener FIG 9 HAMMERDRILLING FIG 11 SCREWDRIVING FIG 10 DRILLING C C Hammerdrilling Fig 11 1 Select the desired...

Page 15: ...he risk of injury only DeWALT recommended accessories should be used with this product Recommended accessories for use with your tool are available at extra cost from your local dealer or authorized service center If you need assistance in locating any accessory please contact DeWALT Industrial Tool Co 701 East Joppa Road Towson MD 21286 call 1 800 4 DeWALT 1 800 433 9258 or visit our website www ...

Page 16: ...al use for free any time during the first year after purchase 2 YEARS FREE SERVICE ON DeWALT BATTERY PACKS DC9071 DC9091 DC9096 DC9280 DC9360 DC9180 DCB120 DCB127 DCB201 DCB203 DCB203BT DCB207 3 YEARS FREE SERVICE ON DeWALT BATTERY PACKS DCB200 DCB204 DCB204BT DCB205 DeWALT BATTERY PACKS Product warranty voided if the battery pack is tampered with in any way DeWALT is not responsible for any injur...

Reviews: