background image

Assembly from crates:

11

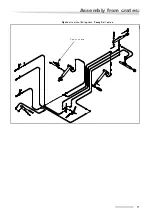
Hydraulic circuit diagram, 3-way ball valve

Clamping piece

Summary of Contents for SwatMaster 7131

Page 1: ...SwatMaster 7131 SwatMaster 7131 Evo Assembly instructions Edition 9 2008 Date printed 9 2008 Language EN Machine number 5801 1001 Type 6962 Evo 6962 Document Number VF16645615 EN ...

Page 2: ...f this manual without the explicit permission of Kverneland is not permitted All rights reserved The contents of these assembly instructions are subject to change without notice The right to technical revision is reserved Kverneland Group Gottmadingen N V Filiale Gottmadingen Industriepark 312 78244 Gottmadingen Germany Tel 49 7731 788 0 ...

Page 3: ...ur safety 5 Screw tightening torques 7 Direction and direction of rotation 7 Assembly from crates 8 Prerequisites 8 Fit rear swath 8 Mount cross beam 9 Mount front rotary swaths 10 Mount tine arms 12 Fitting the rear guard stay 13 Front guard 14 Swath cloth 14 Fit PTO shaft 15 Check list 16 Checking of the assembled machine 16 Trial run 16 ...

Page 4: ...ed to assemble the machinery Meaning of the symbols In order to make this manual clear and easy to read we have used various symbols They are explained below A dot accompanies each item in a list A triangle indicates operating functions which must be performed We have also used pictograms to help you find instructions more quickly NOTE Note indicates tips and notes for the operation The warning tr...

Page 5: ...igence It invalidates any liability of the manufacturer for resultant damage Non compliance is solely at the risk of the operator This machine must only be assembled by trained technicians in ac cordance with thecurrent revision of theassembly instructions Before the machine is coupled to a tractor transported or commissioned the operating manual and its safety instructions have to be thoroughly r...

Page 6: ...ting clothes when operating the machine Wear stur dy footwear and regulation protective equipment Chock and secure the machine carefully during assembly Particularcarehastobetakenindealingwithenergy accumulators such as springs and hydraulic or compressed air aggregates Dispose of oils grease and filters in accordance with regulations Protective equipment has to be properly fitted and swivelled in...

Page 7: ...o the left anti cockwise Rotation around a vertical axis seen from top to bottom Rotation around a horizontal axis at right angles to the direction of travel seen from left to right The rotation of screws bolts and similar is always described from the working side 8 8 10 9 12 9 M 6 9 9 Nm 7 3 ft lbs 14 Nm 10 3 ft lbs 17 Nm 12 5 ft lbs M 8 24 Nm 17 7 ft lbs 34 Nm 25 ft lbs 41 Nm 30 3 ft lbs M10 48 ...

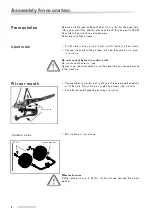
Page 8: ...ls boxes and clear the space around larger components Do not connect hydraulic control units Do not connect hydraulic lines Hydraulic cylinders activated during the assembly can cause damage to the machine Fit rear swath Remove fastenings wires lashing straps and take rear swath assembly out of the crate Stop points are indicated by arrows on the illustration Place the rear swath assembly securely...

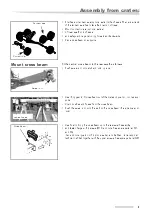
Page 9: ...joint onto stub and lock in place Use lifting gearto liftcrossbeamoutofthe crateandpositionit on twosup ports Unwind cables and hoses from the cross beam Push the swivel joint onto the stub on the cross beam this side does not lock Use hoist to bring the cross beam up to the rear swath assembly and fasten flange with 4 srews M16 and nuts See spare parts list F03 and F04 If an additional guard clot...

Page 10: ...e rear chas sis Attach front swath with bolts ø 35 to the cross beam and secure with clamping pin Second bolt ø 25 and secure with washer and split pin Run hydraulic tubes and cables underneath the cover Fasten cover with screws Pass hydraulic tubes and cables through the stay bar Connect the tubes to their appropriately marked connections see hydrau lic schematics Fasten clamping piece in vertica...

Page 11: ...Assembly from crates 11 Hydraulic circuit diagram 3 way ball valve Clamping piece ...

Page 12: ...arms using the contents of bag A Push the washer onto the stub shaft Fix tine arm to the stub shaft Be aware of the position of the connecting plate Fasten tine arm with two shims and setscrews Tighten setscrews to 110 Nm Clamping piece drive direction Shackle Torque 110 Nm Shims Washer ...

Page 13: ...rmation consult spare parts list page 77 to 79 Fasten bracket with 2 screws Attach cross beam with warning plates Insert the guard stay on the left and right and secure it at the front with a nut and bolt Connect existing cables for lighting equipment See spare parts list Support arm Cross beam with warn ing plates Guard stay ...

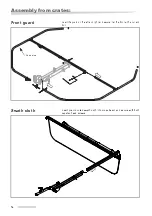
Page 14: ...m crates Front guard Insert the guard on the left and right and secure it at the front with a nut and bolt Swath cloth Insert pre mounted swath cloth into cross beam and secure with both capstan head screws Guard stay ...

Page 15: ...one a and tube b until the noses of slide ring d are lo cated above the recesses of the guard cone arrows Push back guard cone and protecting tube Push pivot e onto the stub shaft Ensure that it is safely engaged f Reverse the above instructions to fasten PTO drive shaft guard Torque limiting clutch Mount the PTO shaft with torque limiting clutch as illustrated Guard stay ...

Page 16: ...n of all cables PTO drive shaft connections engaged Check lights Check air pressure 1 5 bar Trial run To fill the hydraulic system with oil requires about 3 litres of hydraulic oil SAE 90 API GL4 Keep slewing range clear Nobody must be withintheslewing rangeofthemachine Movingparts can cause injuries Operate all hydraulic functions of the machine ten times to the limit stops in order to remove any...

Reviews: