background image

7.4

SPECIAL VENTING
REQUIREMENTS FOR
INSTALLATION IN CANADA

In Canada, S636 certified primers and cements must be used
and be of the same manufacturer of the S636 venting system.
Do not mix primers and cements from one manufacturer with
a vent system from a different manufacturer.

Follow the

manufacturer’s instructions for the use of primer and cement
and never use primer or cement beyond its expiration date.

All fire stop and roof flashing used with this system must be UL
listed material.

Acceptability under Canadian standard CAN/CSA B149
requires full compliance with all installation instructions.

The authority having jurisdiction (gas inspection authority,
municipal building department, fire department, etc.) should
be consulted before installation to determine the need to obtain
a permit.

7.5

MATERIAL

USA:

Combustion air and vent pipe, fittings, primers, and solvents
must conform to American National Standards Institute (ANSI)
standards and American Society for Testing and Materials
(ASTM) standards. See Table 10 Approved combustion air and
vent pipe, fitting and cement materials (U.S.A. Installation) - for
approved materials for use in the U.S.A.

CANADA:

Vent pipe installations in Canada must conform to the
requirements of CAN/CSA B149 code. PVC and CPVC vent
systems must be composed of pipe, fittings, cements, and
primers listed to ULC S636. Combustion air pipe can use ABS
material meeting the ASTM standard D2661 / CSA B181.1.

All vent piping and combustion air piping MUST conform to local
and national codes.

7.6

SIZE THE VENT AND
COMBUSTION AIR PIPES

Furnace combustion air and vent pipe connections are sized
for 2” pipe. Any pipe diameter change should be made outside
furnace casing in a vertical section of the pipe. Any change in
diameter to the pipe must be made as close to the furnace as
reasonably possible.

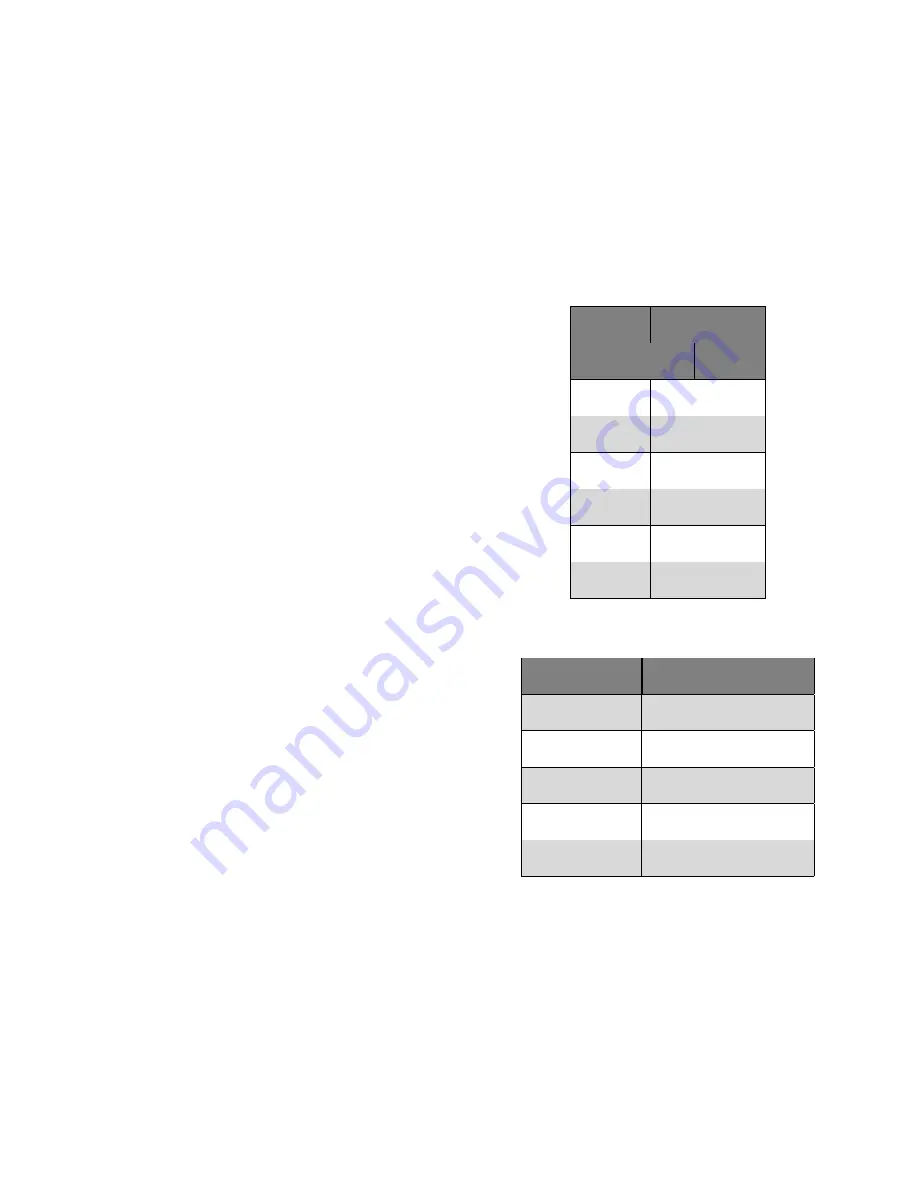
The maximum allowable vent length for the vent and
combustion air pipe (when used) is listed in table and depends
on the furnace input. The maximum length must include straight
pipe and any fitting and termination.

Equivalent length of

various fitting is list in table 9.

A minimum linear length of 5 ft must be respected.

To properly measure the Equivalent Vent Length :

1. Measure the linear pipe distance from the furnace to the

termination for each pipe.

2. Count the number of elbows for each pipe.

3. For each pipe, multiply the number of elbows by the

equivalent length for the type of elbow used (see table

9). Record the equivalent length of all the elbows for each
pipe.

4. Record the equivalent length of the termination used (see

table ).

5. Add the equivalent length of the elbows and termination

to the linear distance measured for each pipe.

6. If the calculated vent length is greater than the maximum

allowed vent length (for either vent pipe or combustion air
pipe), consider modifying the termination location or use
a greater pipe diameter.

Table 8 – Maximum equivalent vent length (ft) for 2-
stage unit and altitude up to 4500 ft

Unit size

Vent pipe dia.

BTU/hr

2"

3"

30,000

100

N/A

45,000

70

90

60,000

70

90

75,000

70

90

105,000

15

80

120,000

10

40

Table 9 – Deduction for fittings

Type of elbow

Equivalent Length (ft)

45° standard

5

45° long sweap

2.5

90° standard

10

90° long sweap

5

Tee

1.5

7.7

EXHAUST PIPE CONNECTION
TO FURNACE

Never common vent with any other appliance. Do not install in
the same chase or chimney as a metal or high temperature
plastic pipe from another gas or fuel-burning appliance
unless the required minimum clearances to combustibles are
maintained between the approved PVC pipe and the other
pipes. Clean and deburr all pipe cuts.

In the included parts bag, an exhaust venting gasket is supplied
and needs to be installed on the exhaust of the top panel. (See
figure 28)

19

Summary of Contents for C105-2-V

Page 1: ...n in this manual for the installation servicing of the furnace and keep the document near the unit for future reference HOMEOWNER Please keep this manual near the furnace for future reference Manufactured by Dettson Industries Inc Sherbrooke Qc Canada www dettson com Gas furnace manufactured on or after May 1 2017 are not permitted to be used in Canada for heating of buildings or structures under ...

Page 2: ...scal treatment 14 5 GAS SUPPLY AND PIPING 15 5 1 GENERAL 15 5 2 PROPANE CONVERSION 15 5 3 GAS PIPE GROMMET 15 5 4 SETTING GAS OUTLET PRESSURE 15 6 ELECTRICAL CONNECTIONS 17 6 1 120V WIRING 17 6 2 24V THERMOSTAT WIRING 17 6 3 FUSE 17 6 4 THERMOSTATS 17 6 4 1 Single Stage thermostat 17 6 4 2 Multi Stage thermostat 17 6 5 ELECTRIC DIAGRAM 17 6 6 ALTERNATE POWER SUPPLY 17 7 VENTING AND COMBUSTION AIR ...

Page 3: ...2 Figure 28 Venting gasket 22 Figure 29 Direct vent clearance 23 Figure 30 Other than Direct vent clearance 24 Figure 31 Dimensions 31 Figure 32 Two Stage ECM Wiring diagram 32 Figure 33 Exploded view Cxx 2 V part 1 35 Figure 34 Exploded view Cxx 2 V part 2 36 List of tables Table 1 Codes and Standards 7 Table 2 Minimum clearance 8 Table 3 Suggested Return size 14 Table 4 Inlet Gas Pressure 16 Tab...

Page 4: ...n in half 1 2 inch in size gas vent directly below Keep clear of all obstruction INSPECTION the state of local gas inspector of the side wall horizontally vented gas fuelled equipment shall not approve the installation unless upon inspection the inspector observes carbon monoxide detectors and signage installed in accordance with the provisions of 248 CMR 5 08 2 a 1 through 4 EXEMPTION the followi...

Page 5: ...nace to show and explain to you the following items The main disconnect switch or circuit breaker The gas shut off valve The air filter and how to change it at least twice a year 7 Before calling for service be sure to have the information of section 11 of your manual close by in order to be able to provide the contractor with the required information such as the model and serial numbers of the fu...

Page 6: ...ion of air 8 Gas furnace manufactured on or after May 1 2017 are not permitted to be used in Canada for heating of buildings or structures under construction 9 A gas fired furnace for installation in a residential garage must be installed as specified in the WARNING box below WARNING FIRE INJURY OR DEATH HAZARD Failure to follow this warning could result in personal injury death and or property da...

Page 7: ...ith the National Fuel Gas Code ANSI Z223 1 NFPA 54 and or Natural Gas and Propane Installation code CSA B149 1 9 After it has been determined that each appliance connected to the venting system properly vents when tested as outlined above return doors windows exhaust fans fireplace dampers and any other gas fired burning appliance to their previous conditions of use 1 4 DETECTION SYSTEMS It is rec...

Page 8: ...Systems ANSI NFPA 90B National Standard of Canada Natural Gas and Propane Installation Code NSCNGPIC CAN CSA B149 1 General installation NFGC and the NFPA 90B For copies contact the National Fire Protection Association Inc Battery march Park Quincy MA 02269 or for only the NFGC contact the American Gas Association 400 N Capitol N W Washington DC 20001 NSCNGPIC For a copy contact Standard Sales CSA...

Page 9: ... from water Not be installed directly on any combustible material other than wood flooring Be located close to the chimney or vent and attached to an air distribution system Refer to section 7 Place the unit so that proper venting can be achieved with a minimum number of elbows in accordance with the instructions in this manual The furnace should be located as close to the chimney vertical venting...

Page 10: ... figure 1 and read the following instructions 1 Remove the oblong knock out from the right side of the casing 2 Place the drain trap gasket on drain trap 3 Install the drain trap on the right side See figure 1 4 Screw in place the drain trap with two head tapping screws on the right side of the furnace 5 Connect the three stubs to the condensate tubings already in place in the furnace 6 Connect th...

Page 11: ...properly Plan your installation to have at least 1 0 ft of clearance under the installed furnace to put the exhaust pipe drainage and drain trap Figure 3 Downflow position 3 2 1 Downflow condensate drain trap connection 1 Remove all condensate tubing from the inducer blower condensate box and vent collector Block the openings with the provided 5 8 and 1 2 black caps In the downflow position the on...

Page 12: ...zontal right position make sure the furnace is tilted foward to make it drain properly Refer to figure 7 Plan your installation and make sure you have sufficient space for the drain trap and exhaust pipe drainage Drain trap will add approximately 6 50 to the furnace width Refer to figure 6 3 3 1 Horizontal right condensate drain trap connection REFER TO FIGURE 6 FOR INSTALLATION DETAILS 1 Remove a...

Page 13: ...osition The pressure switch must also be electrically connected in series with the low fire pressure switch top using the brown jumper provided in the parts bag Refer to figure8 Horizontal right pressure switch connection for more details 3 4 HORIZONTAL LEFT Figure 10 Horizontal left position 3 4 1 Horizontal left condensate drain trap connection REFER TO FIGURE 10 FOR INSTALLATION DETAILS 1 Remov...

Page 14: ...pplied black squared PVC tubing to connect the pressure switch 0 2 in w c to this stub see figure 10 The pressure switch must also be electrically connected in series with the low fire pressure switch top using the brown jumper furnished in the parts bag Refer to figure 12 for more details 3 5 MULTIPOSITION VENTING DRAINAGE All furnaces with horizontal exhaust vent piping must have drain tee assem...

Page 15: ...tatic pressure exceeds the maximum listed on the furnace rating plate check for closed dampers register unproperly size duct work or incorrect dipswitch settings Make sure the temperature rise is coherent with the furnace rating plate 4 3 SMART DUCT SYSTEM Dettson Industries also offers the Smart Duct System Please refer to the Smart Duct Manual X40240 for proper installation of this system Please...

Page 16: ... cover screws 4 Remove both Natural Gas regulator springs from regulator sleeves 5 Insert the L P regulator springs provided in the conversion kit into the regulator sleeves 6 Place the High regulator adjustment screw and adjust approximately 4 turns to the bottom stop 7 Place the Low regulator adjustment screw and adjust approximately 6 turns to the bottom stop 8 Start the furnace and adjust both...

Page 17: ...ement Table 4 Inlet Gas Pressure Gas Pressure in w c psig Minimum Maximum Natural Gas 4 5 10 5 Propane 11 0 13 0 Table 5 Outlet gas pressure Gas Pressure in w c Input Natural Gas Propane High fire 100 3 0 8 6 Low fire 70 1 55 5 0 Table 6 Maximum capacity of pipe Ft hr for pipe length ft m Nominal Iron pipe size in mm Internal dia in mm 10 3 0 20 6 0 30 9 1 40 12 1 50 15 2 1 2 13 0 622 158 175 120 ...

Page 18: ...at may be used with the furnace Consult the thermostat installation instructions for specific information about configuring the thermostat 6 4 1 Single Stage thermostat Use the DIP switches S7 1 and S7 2 see table 7 to configure for a single stage thermostat Options include a 10 minute delay on second stage 20 minute delay on second stage or an auto setting allowing the module to calculate the tim...

Page 19: ...als must be UL S636 listed This requirement does not apply to the combustion air pipe Below are important information that needs to be considered when installing the venting system The vent pipe and combustion air pipe must of be the same diameter Slope horizontal vent piping upward a minimum of 1 4 per foot of run so that condensate drains toward the furnace Support horizontal vent piping at leas...

Page 20: ... pipe must be made as close to the furnace as reasonably possible The maximum allowable vent length for the vent and combustion air pipe when used is listed in table 8 and depends on the furnace input The maximum length must include straight pipe and any fitting and termination Equivalent length of various fitting is list in table 9 A minimum linear length of 5 ft must be respected To properly mea...

Page 21: ... every 5 ft using perforated metal hanging strap or commercially available hangars designed to support plastic pipe 15 Prevent condensate from accumulating in the pipes by sloping the combustion air piping and vent piping downward toward furnace a minimum of 1 4 per linear ft with no sags between hangers 16 Complete the vent installation by installing the required termination See figures 23 to 27 ...

Page 22: ...f ice build up For multiple concentric installation spacing of minimum 12 between each concentric is required Figures 21 and 22 show the required clearance for concentric installation For installation through the roof or side wall cut one 4 102 mm diameter hole for 2 51 mm kit or one 5 127 mm diameter hole for 3 76 mm kit in the desired location Loosely assemble concentric vent combustion air term...

Page 23: ...igure 24 Standard horizontal termination Figure 25 Alternate horizontal termination A Figure 26 Alternate horizontal termination B Figure 27 Alternate horizontal termination C Figure 28 Venting gasket 22 ...

Page 24: ...Figure 29 Direct vent clearance 23 ...

Page 25: ...Figure 30 Other than Direct vent clearance 24 ...

Page 26: ...41 PVC PIPE SDR 21 SDR 26 D2466 PVC Fittings Schedule 40 D2468 ABS Fittings Schedule 40 D2564 For ABS Solvent Cement For PVC D2661 ABS PIPE Fittings DWV at Schedule 40 IPS Sizes D2665 PVC PIPE Fittings DWV at Schedule 40 IPS Sizes F438 CPVC Fittings Schedule 40 F441 CPVC PIPE Schedule 40 F442 CPVC PIPE SDR F493 For CPVC Solvent Cement For CPVC F628 ABS PIPE Cellulare Core DWV at Schedule 40 IPS si...

Page 27: ...room thermostat to the desired temperature These furnaces are equipped with a manual reset limit switch in the burner assembly This switch opens and shuts off the power to the gas valve if an overheat condition flame rollout occurs Correct inadequate combustion air supply or improper venting conditions before resetting the switch DO NOT jumper this switch Before operating the furnace check the fla...

Page 28: ...3 2 ON S3 1 ON D 1 0 635 800 400 S3 2 ON Table 18 CFM C75 2 V 0381210C Dipswitch Max ESP 1st stage 2nd stage Temp Settings w c heating heating rise F S4 3 OFF A 1 0 820 1180 56 S4 4 OFF S4 3 ON B 1 0 834 1200 55 S4 4 OFF S4 3 OFF C 1 0 840 1210 55 S4 4 ON S4 3 ON D 1 0 810 1160 57 S4 4 ON Dipswitch Max ESP 1st stage 2nd stage FAN ON Settings w c cooling cooling G S3 1 OFF A 1 0 1120 1400 435 S3 2 ...

Page 29: ...h ECM motors 8 9 ERROR CODES The control continuously monitors its own operation and the operation of the system If a failure occurs the diagnotic indicator LED will flash a red failure code Please see table 25 for error code details If a failure is internal to the control the red indicator will stay on continuously In this case the entire control should be replaced as the contol is not field repa...

Page 30: ...dic physical inspections of your appliance paying special attention to the gas burner and the flue outlet from the furnace These components are located on the front of the unit A flashlight will be useful for these inspections Make one inspection prior to the beginning of the heating season and another during the middle Should you observe unusual amounts of any of the following conditions it is im...

Page 31: ...ITCH The blower compartment door on your high efficiency gas furnace is equipped with a safety interlock switch that will automatically shut off your complete system including blower once the door is removed This is for your personal safety Be sure to check your furnace for proper operation once the door or panel has been replaced If the system does not operate once the panel has been replaced try...

Page 32: ...Figure 31 Dimensions 31 ...

Page 33: ...Figure 32 Two Stage ECM Wiring diagram 32 ...

Page 34: ...as pressure high fire 100 Outlet gas pressure low fire 70 Static pressure in return Static pressure in supply Temperature rise Is drain trap filled with water Is drain trap outlet vented with a Tee Are condensate tubing properly slopped towards drain trap Furnace leveled or slopped Venting pipe diameter Venting length Venting termination 33 ...

Page 35: ...ke sure flame rod is clean and properly wired 9 Improper grounding or polarity 120V hot and neutral reversed 120V should be read between Hot and ground 0V should be read between Neutral and ground 10 Gas valve current detected with no call for heat Verify if any electrical short could send voltage current to the gas valve If not replace control board 11 Open limit switch for more than 5 minutes Re...

Page 36: ...Figure 33 Exploded view Cxx 2 V part 1 35 ...

Page 37: ...Figure 34 Exploded view Cxx 2 V part 2 36 ...

Page 38: ...2 R02N022 R02N022 R02N022 33 Burner box B40908 01 B40908 02 B40908 03 B40908 04 B40908 05 B40908 07 B40908 08 34 Control board support B40559 B40559 B40559 B40559 B40559 B40559 B40559 35 Transformer 120V 24V L01F009 L01F009 L01F009 L01F009 L01F009 L01F009 L01F009 36 Control board R99G016K R99G016K R99G016K R99G016K R99G016K R99G016K R99G016K 37 Ignitor electric harness B40592 01 B40592 01 B40592 0...

Reviews: