

2
HCCB6020 man
ENGLISH
INSTALLATION AND CARGO LOADING INSTRUCTIONS
DANGER
To Prevent Serious Injury or Death:
z
INSPECT
for signs of wear and damage BEFORE each use. DO
NOT use if worn or damaged.
z
DO NOT EXCEED your cargo hitch mount carrier’s rated capacity.
Consult the owner’s manual for your vehicle.
z
DO NOT use your Cargo Bag to transport people, animals, or
flammable liquids.
Check local and state laws governing projection of objects beyond the perimeter of
a vehicle.
ALWAYS obey all posted speed limits and be aware of traffic conditions. Adapt your
speed to the conditions of the road and the load being carried.
Make sure your cargo bag is secure before every trip. Check at each stop to ensure
your rainproof cargo bag is secure.
Your rainproof cargo bag will not prevent property damage that may result from
improper loading, securing, or driving.
LOADING
1. Check the vehicle’s cargo carrier. Make sure it is properly attached to the vehicle.Make sure that
all hardware is tight and that the structure of the cargo carrier is in good condition.
2.
Unzip the carrier and load cargo into the carrier. Place heavy, large objects in first. This may
require a partner to help you. Continue loading lighter items on the top, creating a compact load.
NOTE: CONSIDER PLACING ITEMS IN PLASTIC BAGS BEFORE LOADING
FOR EXTRA PROTECTION FROM WATER CONDENSATION.
3.
Close the zipper and fold the flap to completely cover the entire zipper and secure using hook
and loop fasteners to hold the flap in place.
ATTACHING THE 8 STRAPS TO THE BUCKLES ON TOP PANEL
OF THE CARGO CARRIER BAG.
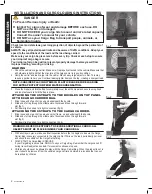
1. Bring loose end of each strap up and underneath the buckle.
2. Slide end of strap through the middle slot of buckle and then through forward
slot (fig.1).
3.
Pull down tight on strap for a tight connection (fig.2).
ATTACHING THE 8 STRAPS TO THE CARGO CARRIER.
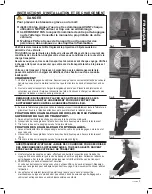
1. Bring loose end of each strap around carrier frame, up and underneath the buckle.
2. Slide end of strap through the middle slot of buckle and then through forward
slot (fig.3).
3.
Pull down tight on strap for a tight connection (fig.4).
WARNING: NEVER USE STRAPS TO SECURE ADDITIONAL CARGO. ALL
OBJECTS MUST BE PLACED INSIDE YOUR CARGO BAG.
4. With all straps in place, make one final inspection before the trip begins to be sure the Cargo
Carrier Bag is securely connected to the cargo carrier. While on the road, periodically pull over
and check the condition of the Cargo Carrier Bag.
5.
CHECK That The Cargo Bag IS SECURE.
If your Cargo Bag is not secure, DO NOT use your Cargo Bag. Remember the cargo can shift
during travel. Readjust as needed. If movement continues, stop use.
6. Children should never be allowed to play with the Cargo Carrier Bag. When the product is not in
use, it should be removed from the vehicle’s cargo carrier and stored in a location that can not
be reached by children.
fig.1
fig.2
fig.3
fig.4


