Desoutter 6159326900 Configuration Manual Download Page 17

6159924940 - 07/2020

- 17 -

Select 

Pset 1

 in the list.

Tap this icon to save.

WARNING Risk Of Injury

As the reaction force increases in proportion to the tightening torque, there is a risk of severe bodily injury of the
operator as a result of unexpected behavior of the tool.

Make sure that the tool is in perfect working order and the system is programmed correctly.

Apply the tool to the joint to tighten.

Press the tool trigger to run Pset 1.

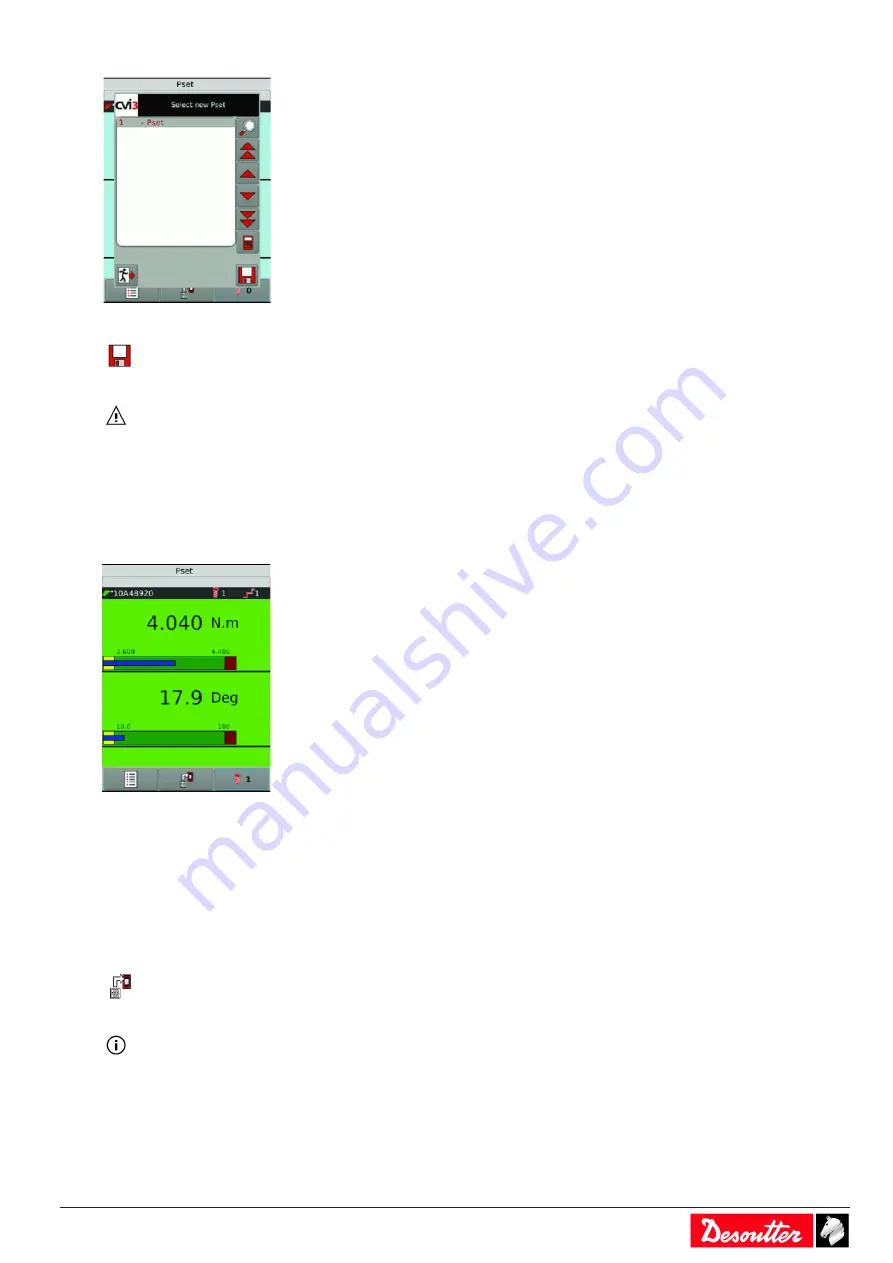
The simple view is displayed by default.

The following values are displayed:

• Min. and max. torque

• Min. and max. angle

• In the 

yellow

 zone (low), torque/angle is 

below

 the min. torque/min. angle.

• In the 

green

 zone (OK), torque/angle is 

within

 the acceptance window.

• The 

blue

 zone (result) shows the 

measured

 values.

• In the 

red

 zone (high zone), torque/angle is 

above

 the min. torque/min. angle.

Tap this icon to see the other possible views.

The view you will select now will be the one by default for the next tightenings.

Detailed view

Summary of Contents for 6159326900

Page 1: ...00 CVI3 Function eSTOP 6159326930 CVI3 Vision 6159326910 CVI3 Vision eSTOP 6159326940 TWINCVI3 6159326970 TWINCVI3 eSTOP 6159326980 WARNING Read all safety warnings and instructions Failure to follow...

Page 2: ...ted 11 Liability 11 How to run a Pset with CVI3 Essential CVI3 Function 11 Selecting a Pset 11 Viewing the last result 11 Viewing other results 13 Getting results full screen 13 How to run a Pset with...

Page 3: ...th CVIMONITOR 35 How to view user logs with CVIMONITOR 36 Using CVILOGIX 36 CVI3 Essential CVI3 Function 36 CVI3 Vision TWINCVI3 37 Selecting which source will start the Pset 38 References 39 List of...

Page 4: ...f CVI CONFIG printed matter 6159939221 available at https www desouttertools com resource centre There are two types of tightening operations Pset and Assembly Process The tightening strategy will be...

Page 5: ...t result to select the next Assembly Process and or Pset to display the results to display the user infos to save the results configurations and logs to a USB key to upgrade the firmware to backup res...

Page 6: ...tool and the tightening processes Pset and Assembly Process to set up the I O manage the memory calibrate the screen to display the tool characteristics to manage the ePOD to display the log of user...

Page 7: ...views to display the results 0 to view the selected Pset 0 to view the selected Assembly Process to view why the tool is locked to quit and display the start screen to cancel the last action and retur...

Page 8: ...to CVI CONFIG the controller date and time will be updated during the data transfer from the software to the controller None CVI CONFIG CVINET WEB Fieldbus Ethernet protocol Server NTP enter the serv...

Page 9: ...ange the subnet mask if needed Enter a name for each net work Tap Save to validate How to quickly select a network interface CVI3 controller Go to the tree view Select the product Go the tool bar on t...

Page 10: ...159924940 07 2020 To change to synchronous mode select the second tightening unit and tap this icon To return to the asynchronous mode tap this icon to add the second tightening unit Tap this icon to...

Page 11: ...after initial installation maintenance or repair of the equipment Occur at least once per shift or at another suitable frequency How to run a Pset with CVI3 Essential CVI3 Function Use CVI CONFIG to...

Page 12: ...mber Stop source Press the Left or Right key to get the message in full Description of symbols The last step has been done The Pset has been stopped before the last step OK The tightening operation is...

Page 13: ...t result Use the Up and Down keys to change the display Use Left or Right keys to select another result Keep pressing the key to display the results by 10 This screen indicates that a run reverse oper...

Page 14: ...Press this button to validate Tap this icon to save Selecting which source will start the Pset Go to the start screen Tap this icon to go to the main menu Tap Configuration Tightening unit Press this...

Page 15: ...6159924940 07 2020 15 Select the tightening unit which manages the tool Tap this icon to create a Pset Keep the tool connected Tick Simple mode Tap this icon Tap the box Target torque...

Page 16: ...16 6159924940 07 2020 Tap C to clear the text Type your target torque Tap this icon to validate Tap this icon Tap this icon to save Running the Pset Tap this icon 0 Tap this icon...

Page 17: ...l to the joint to tighten Press the tool trigger to run Pset 1 The simple view is displayed by default The following values are displayed Min and max torque Min and max angle In the yellow zone low to...

Page 18: ...is icon to point to the first value Keep pressing the icon to follow the curve Use this icon to point to the last value The markers show remarkable samples The white cross shows the current sample Use...

Page 19: ...e Tap this icon to save How to run an Assembly Process with CVI3 Vision or TWINCVI3 Setting the running mode to Assembly Process Go to the start screen Tap this icon to go to the main menu Tap Configu...

Page 20: ...urce and select Front panel Press this button to validate Tap this icon to save Creating an Assembly Process Go to Main menu Configuration Assembly Process If you have more than 1 tool select the tigh...

Reviews: