
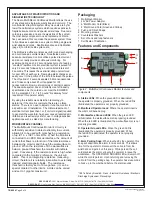


F. 24 VAC Power Jack:
Connect the power adapter here.
G. Mat Connection:
Monitors worksurface mat. NOTE: To
disable worksurface monitoring, shunt this terminal to the
neighboring GND terminal with bus wire.
H. Mat Ground:
Grounds worksurface mat.
Installation
Remove the monitor from its packaging and inspect for
any shipping damage. Confirm that the work surface is 1
x 10E7 ohms or less and has a conductive layer such as
Dual Layer Rubber, Dissipative 3-Layer Vinyl, or Micastat®
Dissipative Laminate with conductive buried layers.
1. A convenient 120VAC outlet should be located and
tested for proper wiring and grounding. We recommend
Desco Item
AC Outlet Analyzer to verify proper
wiring and ground.
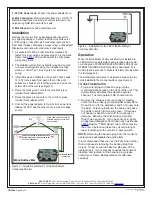
2. The Multi-Mount Continuous Monitor may be mounted
to a convenient location using the included mounting
screws or Velcro
®
set. See Figure 3 for installation
set-up.
3. Install Screws and Washers or Push and Clinch snaps
12 to 72 inches apart from each other on the work
surface mat. Make sure that they pierce and clinch the
bottom side of the mat (see Figure 3).
4. Route the black ground cord to the monitor’s green
terminal block labeled MAT.
5. Route the green ground cord to the monitor’s green
terminal block labeled GND.
6. Connect the power adapter to the monitor’s power jack
labeled “24VAC” and the other end to a proper voltage
source.
TB-3054
Page 3 of 4
Operation
When the Multi-Mount Continuous Monitor is installed to
an ESD protective worksurface and grounded via a power
cord, the green WORKSURFACE GROUND LED and red
OPERATOR GROUND LED should be illuminated. The
monitor takes 6 seconds to activate its alarm circuitry when
it is first plugged in.
The worksurface resistance is measured between the two
cords installed to the mat worksurface (see Figure 3).
TO USE THE MONITOR
1. Plug a wrist strap cord banana plug into the
monitored banana jack on the front of the unit. This
automatically activates the selected operator
channel. The red operator LED should turn on.
2. Remove the charges from your body by making
contact with a properly grounded ESD worksurface.
Snap the cord to the wristband, and fit it snugly onto
the wrist. This should silence the audio and cause
the LEDs to switch from red to green. If this does
not happen, check the coil cord for continuity or
damage. Examine the wrist strap and confirm
that it has a secure fit. If you have dry skin, apply
an approved dissipative hand lotion such as Menda
Reztore™ ESD Hand Lotion. When leaving
the area, a person can take the coil cord along or
leave it attached to the monitor in park position.
NOTE:
Removing the banana plug from the monitor’s
operator jack will disable the audio alarm.
It is recommended that you use the Park Snap rather
than continuously removing the banana plug from
its jack. Doing so will increase the life span of the
operator jack. If your process requires the constant
insertion and removal of the banana plug, please
contact your Desco Representative for alternate
solutions.
© 2011 DESCO INDUSTRIES INC.
Employee Owned
DESCO WEST
- 3651 Walnut Avenue, Chino, CA 91710 • (909) 627-8178 • Fax (909) 627-7449
DESCO EAST
- One Colgate Way, Canton, MA 02021-1407 • (781) 821-8370 • Fax (781) 575-0172 • Web Site:
Figure 3. Installation method #1 of the Multi-Mount
Continuous Monitor
Screw allows ground cord to be
bolted to mat; keeps cord from
disconnecting.
or
10mm snaps need to pierce and clinch
bottom side of mat. Snaps need to be
12 to 72 inches apart
Work Surface Mat
Power Adapter
Connection
Figure 4. Installation method #2 of the Multi-Mount
Continuous Monitor


