background image


12 

4.1  Range and Exchange of Clutch Spring  

The torque range of the DEPRAG Screwdriver is adjustable. Please see a 
listing for the torque ranges of the color-coded springs below. 
 

Torque Range of the individual clutch spring: 


Type 344-340-31 und 344-440-31 

P

ART 

N

O

.  

WIRE

-

Æ


COLOR


T

ORQUE 

"

MIN

." 

T

ORQUE 

"

MAX

." 

353796 


4,0 mm


Black


appx. 3,5 Nm


appx. 10,0 Nm


Type 344-740-31 und 344-840-31 

P

ART 

N

O

.  

WIRE

-

Æ


COLOR


T

ORQUE 

"

MIN

." 

T

ORQUE 

"

MAX

." 

353796 


4,0 mm


Black


appx. 16,0 Nm


appx. 45,0 Nm


All torque values are based on 90-PSI (6,3 bar) air pressure. Torque values 
are estimated data which may differ – depending on the type of screw joint.  
 

Exchange of clutch spring 

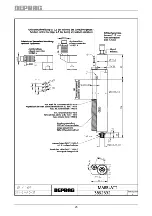
(see picture) 


To avoid loosing individual small parts, it is recommended to 
only disassemble the machine on top of a flat work surface. 


1.  Disconnect screwdriver from air supply.  
2.  Unscrew clutch bearing 389852 C resp. gearing 389852 A (left-hand 

thread). 

3. 

For screwdriver version with gearing 389852 A:

 Disassemble lock 

ring 800304 and remove intermediate pinion 379110 together with groo-
ve ball bearing 802035 (bore thread M4 in intermediate pinion). 

4.  Remove clutch 389748 A complete. 
5.  Insert hand screwdriver into the half-round bore of the lock ring and turn 

hand screwdriver in clockwise direction, until the adjustment nut comes 
off. 

6.  Remove lock ring. 
7.  Remove clutch spring, replace with required clutch spring and reassem-

ble in reverse order. 

8.  Place clutch into clutch bearing resp. gearing and tighten it to the 

DEPRAG Screwdriver (left-hand thread). 

9.  The clutch can be adjusted again externally (see chapter 

Torque Ad-

justment

). 

Summary of Contents for 344-340-31

Page 1: ...012554EN Operating Instruction Booklet Stationary Screwdriver Spindle 344 340 31 389730 A 344 440 31 389730 B 344 740 31 389730 C 344 840 31 389730 D MINIMAT ...

Page 2: ...neral Safety Tips for Pneumatic Stationary Screwdriver Spindles 4 1 3 Owner Obligation 4 1 4 Operator Obligation 5 1 5 Warranty and Liability 5 1 6 Symbol Description 6 1 7 Observe Environmental Regulations 8 2 DESIGNATED EQUIPMENT USE 8 3 INSTALLATION 9 4 OPERATION 11 4 1 Range and Exchange of Clutch Spring 12 4 2 Torque Adjustment 13 4 3 Change of bits 14 4 4 Connection Possibilities of the Func...

Page 3: ...is clearly described in chapter Designated Equipment Use and those requirements have to be observed as well Prerequisite for the safe conduct and the uninterrupted operation of the equipment is the knowledge of the basic safety tips and the safety regulations Additionally all current regulations for a safe operational area for accident prevention guidelines of electrical and mechanical installatio...

Page 4: ...r pressure A pressure regulator has to be installed which regulates pressure before reaching the tool After turning off the tool the bit will continue to rotate inertia 1 3 Owner Obligation The owner is obliged to only let persons operate the equipment who are familiar with basic work environment safety rules and accident preventing regulations Also those persons must have been instructed in the c...

Page 5: ...f the following causes apply Use of the equipment in a non designated application Improper installation operation service or maintenance of the machine Operation of the machine with either defective or removed safety and protection devices Non observance of the requirements stated in the operating instruction booklet in regards to transportation storage mounting installation operation maintenance ...

Page 6: ... damaging grease cooling agents or detergents RECOMMENDATIONS Important or additional information on the equipment or in the documentation Use eye protection or wear safety goggles Wear hearing protection Warning against hand injuries Attention Keep away your hands from areas which are marked with this symbol Hands may be crushed seized or otherwise injured ESD protected area Equipment may be dama...

Page 7: ...er repair and maintenance check the following items make sure all detached and re attached connections are solid confirm that removed covers screens or filters were re installed During disconnecting or reconnecting of an air operated equipment injury may occur due to a whipping air hose After conclusion of maintenance or repair and prior to start of operation make sure to remove all materials tool...

Page 8: ...ing cleaning agents must not leak into the ground or into the sewage system Such materials must be stored transported contained and recycled in suitable containers 2 Designated Equipment Use Screwdriver Spindles are constructed for the stationary use in Lever Operated Single Spindle Screwdriving Stations Construction Units Multi Spindle Screwdriving Stations Robot End Of Arm Tooling X Y Z Screw As...

Page 9: ...consisting of Filter with condensation reservoir Regulator and Oiler When choosing a maintenance unit observe air consumption rate for the tool see Technical Data Air Consumption Thread Size Part No 0 05 0 5 m min 820454 A 0 15 1 5 m min 820455 A 0 8 6 0 m min 821608 A b for the use with minimal lubrication connect to a filter regulator consisting of Filter with condensation reservoir and pressure...

Page 10: ... be adjusted to an airflow between 5 0 71 PSI and 6 3 bar 90 PSI A higher pressure leads to increased wear and tear A lower pressure may lead to clutch not being able to correctly shut off the motor In regards to air quality according to ISO8573 1 we recommend CLASS RESIDUE OF OIL RESIDUE OF DUST RESIDUE OF WATER Content mg m Particle Size mm Concentration max mg m Dew Point o C Pressure Concentra...

Page 11: ...hould not drop below 5 bar 71 PSI The installation and connection of the Screwdriver Spindle requires the following steps 1 Adjust clutch to required torque setting see paragraph Torque Adjustment 2 Install Screwdriver spindle according to picture Installation Tips for screwdriver spindle 3 Connect main air hose 4 Connect pneumatic function control hose This function control is under pressure of 2...

Page 12: ...ll parts it is recommended to only disassemble the machine on top of a flat work surface 1 Disconnect screwdriver from air supply 2 Unscrew clutch bearing 389852 C resp gearing 389852 A left hand thread 3 For screwdriver version with gearing 389852 A Disassemble lock ring 800304 and remove intermediate pinion 379110 together with groo ve ball bearing 802035 bore thread M4 in intermediate pinion 4 ...

Page 13: ...ment The required torque for the driver can be adjusted externally as follows 1 Disconnect Screwdriver from air supply 2 Insert hand screwdriver through one of the three openings of the housing into the half round bore of the lock ring If necessary turn clutch using bit 3 By turning the hand screwdriver clockwise the torque is reduced and by turning it counter clockwise the torque is increased Pic...

Page 14: ... turn off the Screwdriver The pressure in the function control line will drop The Screwdriver can now be lifted off the assembled screw Use as air pressure inlet If 6 3 bar 90 PSI air pressure is given to the function control port the driver starts rotating at about 15 of its speed This will simplify the enga gement of bit socket to fastener for example when driving hex screws nuts etc If the func...

Page 15: ...eed in the sequence described below 1 Disconnect screwdriver from air supply 2 Unscrew clutch bearing resp gearing complete with the attached com ponents see chapter Range and Exchange of Clutch Spring 3 Remove clutch complete 4 Disassemble guide bolt by removing hex nut 800679 AF 17 5 Chuck screwdriver spindle on its flange into vice and unscrew nipple 384207 AF 17 and then exhaust connection 351...

Page 16: ...two bearing covers c Press the shaft side bearing cover with the ball bearing on the rotor d Insert the new vanes into the rotor e Put the rotor cylinder over the rotor After assembly the bearing covers shouldn t have any axial gap The rotor must turn freely f Press air connecting side bearing cover with the ball bearing on the rotor For remaining assembly proceed logically in reverse order with r...

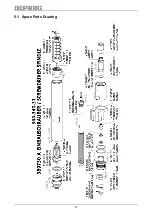
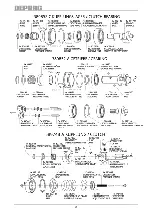
Page 17: ...17 5 1 Spare Parts Drawing ...

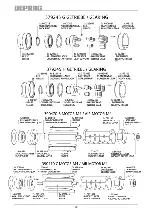
Page 18: ...18 ...

Page 19: ...19 ...

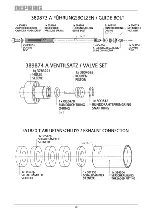
Page 20: ...20 ...

Page 21: ...21 ...

Page 22: ...22 ...

Page 23: ...23 ...

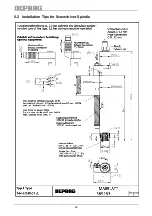
Page 24: ...24 5 2 Installation Tips for Screwdriver Spindle ...

Page 25: ...25 ...

Page 26: ...cient oil is in the lubricator if lubrication is used and that the adjustment is correct We recommend for your lubricator DEPRAGOL part 790081 E After cleaning the gearing parts have to be greased prior to re assembly preferably with Grease part 807293 After assembly fill 2 3 drops of DEPRAGOL into the air inlet nipple If tool are being used with lubrication we recommend to have tools tested and c...

Page 27: ... Air pressure too low Minimum air pressure should be 90 PSI for maximum performance Restriction in air hose Remove bends or other restrictions Hose I D is too small Use required hose I D Valve Pin too short Check required length of valve pin according to picture Actual Size of Valve Pin If needed exchange valve pin Insufficient Power Vanes are worn Exchange vanes Screen Support or si lencer clogge...

Page 28: ... of the valve pin make sure N O T to hold the screwdriver directed towards yourself or any other person Verify the actual size only with compressed air connected 8 Delivery Capacity Please check the delivery capacity in regards to its completeness QUANTITY NAME PART NO 1 Operating Instruction Booklet 012554EN 1 Stationary Screwdriver Spindle 389730 A B C D 1 Hand screwdriver 326240 ...

Page 29: ...crewdriver spindle on its housing by means of chucking jaws into a vice 3 Unscrew slide connector 828002 AF 21 4 Unscrew nipple 384207 AF 17 right hand thread 5 Unscrew exhaust connection 351820 T complete AF 36 right hand thread 6 Mount exhaust connection 351820 R U as needed and tighten exhaust connection with nipple 384207 AF 17 right hand thread 7 Assemble slide connector 828002 AF 21 see also...

Page 30: ...30 INFORMATION You will find suitable inserting tools in our brochure D 3320 E or on the internet as follows www deprag com Screwdriving Technology Selection program Inserting tools ...

Page 31: ...89730 B 389730 C 389730 D Drive hex female DIN 3126 F6 3 1 4 F11 2 7 16 Weight kg lbs 2 6 5 72 2 8 6 16 Air pressure bar PSI 6 3 90 Hose for function control O D I D mm 4 2 5 Hose for air supply O D I D mm 12 8 Torque min Nm in lbs 4 0 35 4 4 0 35 4 16 0 142 16 0 142 Torque max Nm in lbs 8 0 71 10 0 88 34 0 300 45 0 398 Speed unloaded rpm 2800 2100 640 450 Noise level dB A 78 Air consumption m min...

Page 32: ... stored in a dry locked area Disassemble the machine for the required disposal complete Observe local and environmental regulations for the separation and recycling of materials Recycle waste oil to avoid environmental contamination Waste Oil ...

Page 33: ...tion of the stationary screwdriver spindle 344 340 31 344 440 31 344 740 31 344 840 31 its design this tool is meant for integration with another machine Operation of this tool is not permitted unless the complete unit of mounted machines conforms with the national Protection of Labour Regulations especially in application of the Provision and Use of Work Equipment Regulations Directive used stand...

Page 34: ... Fax 358 0 10 7781 401 Internet http www pneumacon fi e mail info pneumacon fi e mail harri lindroos pneumacon fi TALLINN office PK 2841 Kose PK EE 12001 Tallinn Tel 372 0 6 41 94 91 Fax 371 0 6 41 94 92 e mail rauno kolga pneumacon fi FINLAND Pneumacon OY Kankurinkatu 4 6 FI 05800 Hyvinkää Tel 358 0 10 7781 400 Fax 358 0 10 7781 401 Internet http www pneumacon fi e mail info pneumacon fi e mail h...

Page 35: ...Eskilstuna Universal Import Tel 47 0 2 2681 530 Fax 47 0 2 2199 127 POLAND INTEGRATOR RHC ul Wielki Rów 40 B 87 100 Torun Tel 48 56 66 93 841 Fax 48 56 66 93 805 Internet www integrator rhc pl e mail leszek wojtowicz rhc com pl e mail marek sobocinski rhc PORTUGAL IberoAir Unipessoal Lda Mourisca do Vouga Apartado 30 3754 907 Trofa AGD Tel 351 0 234 690 080 Fax 351 0 218 647 214 e mail iberoair ib...

Page 36: ...stfach 1352 D 92203 Amberg Kurfürstenring 12 18 D 92224 Amberg 09621 371 0 Fax 09621 371 120 Internet http www deprag com e mail info deprag de Apr 08 Änderungen und Irrtümer vorbehalten Technical alterations and errors reserved ...

Reviews: