background image

OSD Menu

14

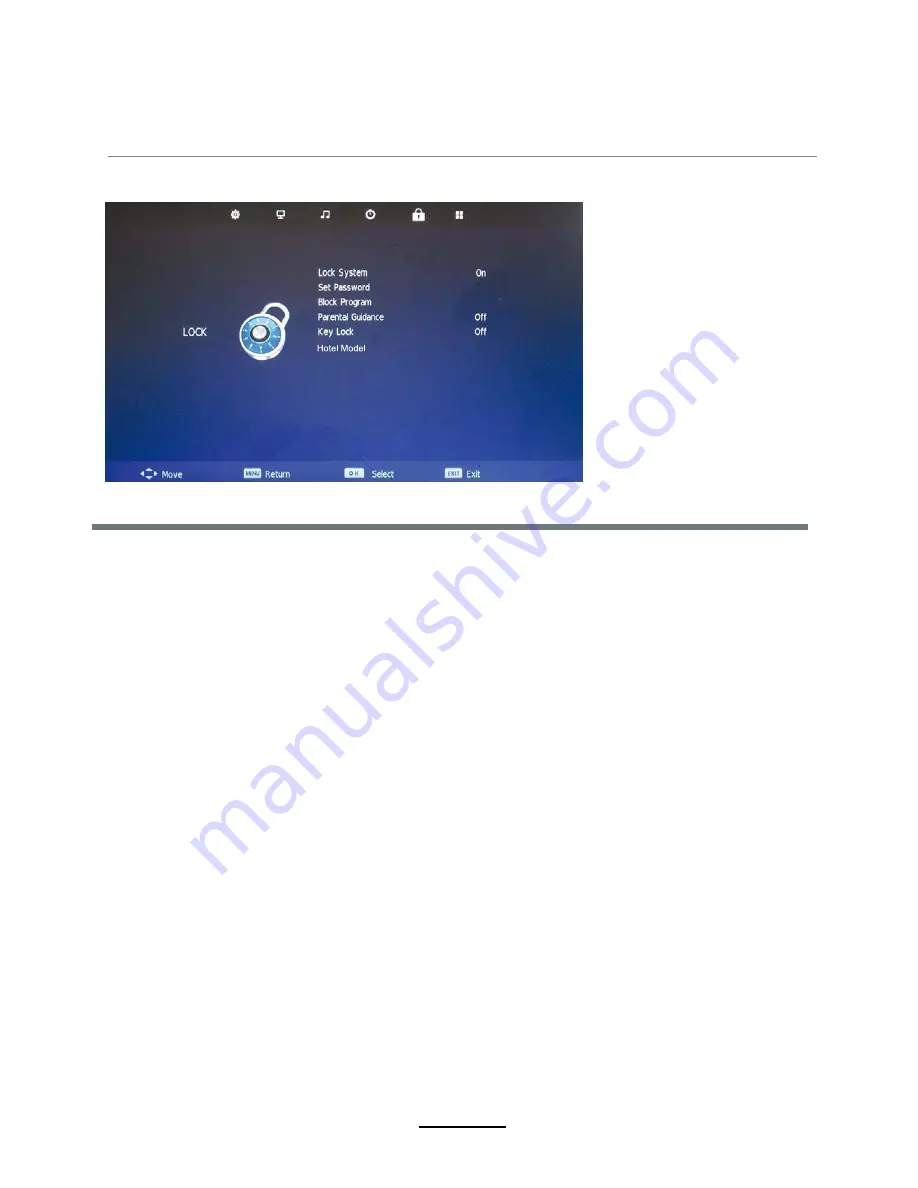
5. LOCK menu

Description

Lock System: 

Turn on/off the Lock System function.

Note: You should enter the code to operate the menu.(original code is 0000)

Set Password: 

Set pin code. If the Pin code has been changed you must enter the present 

code.

    New : Enter the new password.

    Confirm: Enter the new password.

Summary of Contents for LDD-2254MC

Page 1: ...Instruction Manual 22 full hd led tv with atv and mpeg 4 dvb t c c i built in dvd player usb input pvr function Model NO LDD 2254MC...

Page 2: ...ew OSD Menu 1 Channel menu 2 Picture menu 3 Sound menu 4 Time menu 6 Setup menu DVD Operation 1 2 3 3 4 5 4 9 17 9 10 11 12 13 17 24 31 Connections 6 7 Remote Control 8 Basic Operation Multimedia Oper...

Page 3: ...the USA there are separate collection systems for used electrical and electronic products Please help us to conserve the environment we live in 1 The exclamation point within an equilateral triangle...

Page 4: ...TV or mains adaptor Do NOT use in wet or moist areas such as Bathrooms steamy kitchens or near swimming pools the mains plug or cable is damaged liquid is spilt onto the set or if it is accidentally...

Page 5: ...istance Control angle Batteries PAL BG DK I SECAM BG DK L L 22 inch diagonal 1920x1080 0 infrared 5m 30 horizontal 2 x 1 5V size AAA Converter cable AV Cable for YPbPr Audio output power Power Consump...

Page 6: ...L POWER The effective receiving range for the signal is 5 8 metres from the front of the remote control window and 300 to the left or right side and 200 above or below the remote control window off Nu...

Page 7: ...with the converter cable POWER Connect to the mains adaptor USB USB jack for update media and PVR HDMI1 2 Connect it to the HDMI of DVD or other equipment VGA For PC display Connect it to the D Sub 1...

Page 8: ...SUBTITLE Turn on off the subtitle display in DTV mode and DVD mode EPG To show the Electronic Program Guide during no menu state only in DTV mode REP Repeat playing the title or chapter Load eject DV...

Page 9: ...d end of it GOTO Play your favorite title chapter track SLOW Play DVD programs at slow speed CH Scan through channels VOL Adjust the volume PICTURE Select the picture mode NICAM A2 TV Nicam A2 select...

Page 10: ...te control to enter Note Before you select the input source make sure the connections are prepared Basic OSD Menu operation Press MENU button to display the OSD menu as below Use button to select the...

Page 11: ...the CADTV DTV Manual Tuning menu and press OK button to start searching Press button to manual search ATV Manual Tuning Press OK button to enter the ATV Manual Tuning menu Current CH Select a Channel...

Page 12: ...you can use and buttons to change the position of the program press YELLOW again to confirm the change Press menu to exit and it will automatically save the current set Skip Select a channel and press...

Page 13: ...ntrast Controls the difference between the brightest and darkest regions of the picture Brightness Controls the overall brightness of the picture Colour Control the colour Sharpness Increase this sett...

Page 14: ...ted when the sound mode is set to Personal Controls the relative intensity of lower pitched sounds Balance To adjust the balance of the left and right sound track or turn off the volume of the left an...

Page 15: ...to setup the sleep timer among 10min 20min 30min 60min 90min 120min 180min 240min and off Auto Standby According to the latest ERP regulation this unit will switch off itself automatically if no chan...

Page 16: ...on off the Lock System function Note You should enter the code to operate the menu original code is 0000 Set Password Set pin code If the Pin code has been changed you must enter the present code New...

Page 17: ...ls that have been locked Use and buttons to select the channel and press the GREEN button on the remote control to lock the channel Parental Guidance Allows you to select the Parental Guidance mode Ke...

Page 18: ...OSD Menu 16 Source Lock L L V A V MAX V Y r DVD...

Page 19: ...e Hearing Impaired function PVR File System Setup the PVR file system Note The options PVR File System are described on pages Aspect Ratio Choose from 4 3 16 9 Zoom1 Zoom2 Blue Screen Turn on off the...

Page 20: ...ile to delete the file Basic Operation 2 Select the file type mains menu you want to view and insert USB device you will find the name of the device display on the screen 3 Press button to select the...

Page 21: ...on to cancel the list displaying Info Display the information of the file Rotate Rotate the photo clockwise counterclockwise Zoom Out In Zoom out in the photo Move View Move the photo in Zoom in mode...

Page 22: ...mation of the movie Slow Forward Play the movies at slow speed press button to cancel Step Forward Step quickly through the movie by using this option Goto Time Program the movie form the time you set...

Page 23: ...720 576 Max Data Rate 40 Mbps mp3 MP3 wma WMA Sample Rate 8K 48KHz Bit Rate 32K 320Kbps Channel Mono Stereo Music m4a aac AAC Sample Rate 16K 48KHz Bit Rate 32K 442Kbps Channel Mono Stereo Progressive...

Page 24: ...ecorded programme by pressing the RED button on the list Note You can display the information of the recorded programme by pressing the GREEN button on the list Select Disk Select the device for the R...

Page 25: ...TOP button to exit the recording mode c Press PLAY button to play the programme you are recording from the beginning Note a Press STOP button to exit the Timeshift mode b Press PLAY button to play the...

Page 26: ...Do not touch the playing surface Hold the disc around the outside with your fingers and place the disc into the slot The player will automatically draw the disc into the player To Eject the disc press...

Page 27: ...25 DVD Operation...

Page 28: ...26 DVD Operation...

Page 29: ...27 DVD Operation Spdif Setup...

Page 30: ...28 DVD Operation or NO disc...

Page 31: ...29 DVD Operation...

Page 32: ...30 DVD Operation...

Page 33: ...31 DVD Operation...

Page 34: ...ty Check the aerial connections Check that the channel is tuned in properly Adjust the picture settings brightness colour sharpness contrast hue Make sure that the TV is not located close to electrica...

Page 35: ...ENERG Y IE IA IJA ENERGIA E W E RGY E RGI E RGIE E RGIJA DENVER LDD 2254MC 44 30 22 55 kWh annum 2010 1062 2011 cm inch inch B...

Page 36: ...sposed of with other household waste but should be disposed of separately As the end user it is important that you submit your used batteries to the approriate and designated facility In this manner y...

Reviews: