background image

1.

In the Standby mode, press 

 on the top panel or MODE on the remote

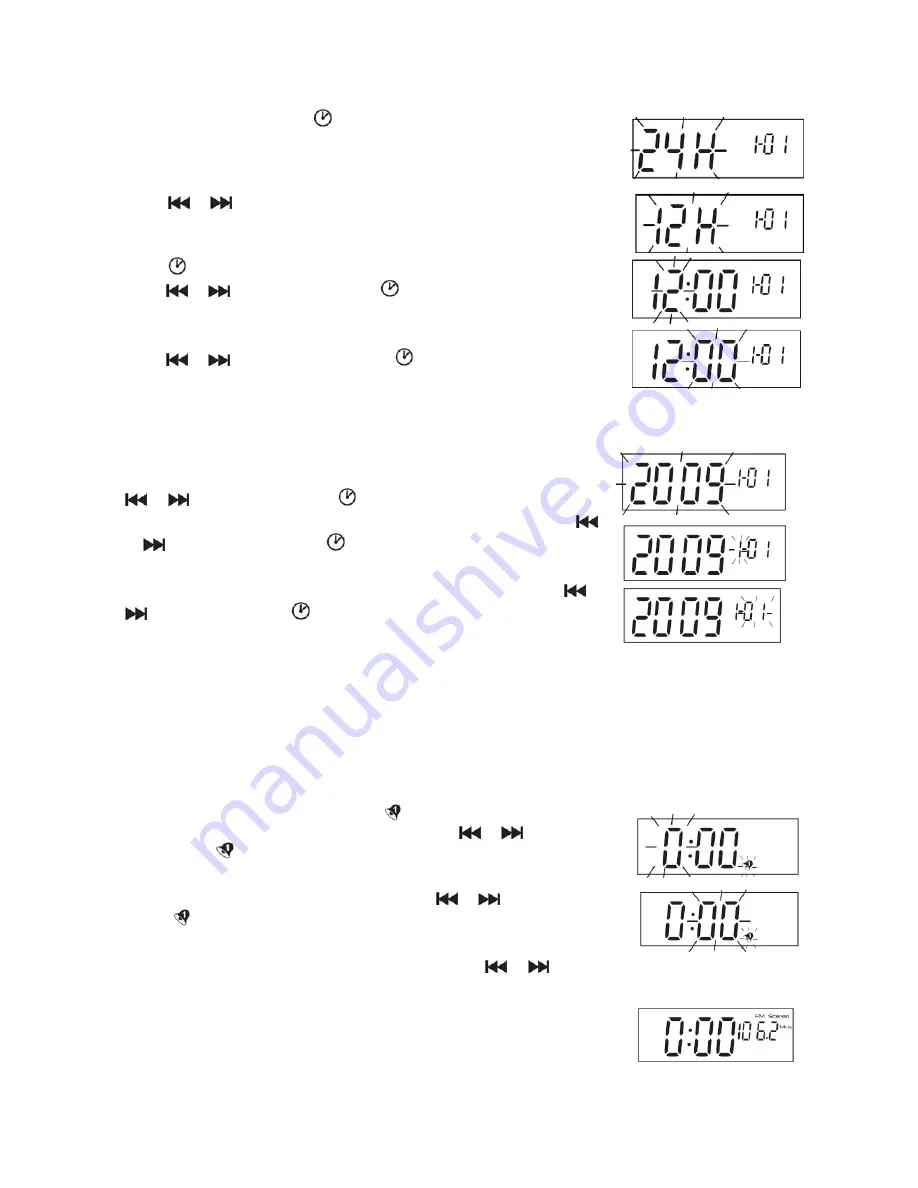
until the unit enters the clock set mode. ‘24H’ will flash on the display
indicating that the clock is set for 24-hour cycle.

2.

Press 

 or 

 on the top panel or the remote once to change the clock

format to 12-hour cycle. The display will change from ‘24H’ to ‘12H’.

3.

Press 

 or MODE to confirm. The hour digits ‘12’ will flash. Repeatedly

press 

 or 

 to set the hour. Press 

 or MODE to confirm. 

4.

When the hour is confirmed, the minute digits ‘00’ will flash. Repeatedly

press 

 or 

 to set the minute. Press 

 or MODE to confirm.

5.

When the clock time is set, the year digits will flash. Repeatedly press

 or 

 to set the year. Press 

 or MODE to confirm. 

6.

‘1’ in the Date box will flash for the month setting. Repeatedly press 

or 

 to set the month. Press 

 or MODE to confirm. 

7.

01’ in the Date box will flash for the day setting. Repeatedly press 

 or

 to set the day. Press 

 or MODE to confirm. 

SETTING THE ALARM 1 AND 2

You can only set your Alarm mode in the Standby mode.

Setting Alarm 1

1.

In the Standby mode, press and hold 

 on the top panel until the hour

digit ‘0’ flashes on the display. Repeatedly press 

 or 

 to set the

hour. Press 

 to confirm. 

2.

Minute digits ‘00’ will flash. Repeatedly press 

 or 

 to set the minute.

Press

 to confirm.

3.

The wake up mode display will flash, and then press 

 or 

 repeatedly to select the desired wake

up mode.


Wake up to ‘FM Broadcasting’ - You have to pre-tune your desired

radio channel in FM radio mode before setting the wake up function. 

8

Summary of Contents for IFM-90

Page 1: ...Alarm Clock Radio for iPod iPhone Model No IFM 90 INSTRUCTION MANUAL 1 ...

Page 2: ...basic safety precautions when using electrical products especially when children are present The lightning flash with arrowhead symbol within an equilateral triangle is intended to alert the user to the presence of insulated dangerous voltage within the product s enclosure that may be of sufficient magnitude to constitute a risk of electric shock to persons WARNING TO REDUCE THE RISK OF ELECTRIC S...

Page 3: ...ystem on a flat hard and stable surface Do not expose to temperatures above 35 C Allow at least 10 cm clearance from the rear and the top of the unit and 5 cm from each side 15 Press the player s buttons gently Pressing them too hard can damage the player 16 Dispose of used batteries in an environmental responsible manner 17 Always ensure that the product is unplugged from the electrical outlet be...

Page 4: ...at may be attached to the front panel of the main unit Do not remove any labels or stickers on the back panels of the main unit Place all the components in the desired location This system is designed to be used on level stable flat surface such as a table desk shelf or stand out of direct sunlight and away from sources of excess heat dust moisture or vibration LOCATION OF CONTROLS AND INDICATORS ...

Page 5: ...ton 8 ALARM 1 Button 9 ALARM 2 Button 10 SLEEP Button 11 SNOOZE Button 12 iPod iPhone socket 13 VOLUME Button 14 VOLUME Button 15 LCD Display 16 AUX Input 17 DC Input 18 Battery Compartment 19 FM Antenna 20 PM Indication For 12H set 21 Time Display 22 iPod AUX FM Frequency Date Mode Display 23 Wake Up Mode Indication 24 Alarm Function Indication 5 ...

Page 6: ...UME Button Remote Control INSTALLING THE BATTERIES Remote Control Battery The remote control requires one CR2025 type 3 volt lithium battery included To extend the life of the original battery we have inserted a small clear plastic spacer tab between the lithium battery and the battery terminal You must remove this battery spacer tab before you can use the remote control To remove the tab pull the...

Page 7: ...t stations insert two AAA size batteries not supplied observing the polarity marking in the battery compartment on the rear of the unit The back up battery will NOT backup iPod settings Caution Danger of explosion if battery is incorrectly replaced Replace only with the same or equivalent type Caution Risk of explosion if battery is replaced by an incorrect type Dispose of batteries according to t...

Page 8: ... or to set the year Press or MODE to confirm 6 1 in the Date box will flash for the month setting Repeatedly press or to set the month Press or MODE to confirm 7 01 in the Date box will flash for the day setting Repeatedly press or to set the day Press or MODE to confirm SETTING THE ALARM 1 AND 2 You can only set your Alarm mode in the Standby mode Setting Alarm 1 1 In the Standby mode press and h...

Page 9: ...n the display when snooze function is enabled Sleep Function 1 In the Power on mode press on the top panel or the remote 120 and Sleep will show on the display 2 Press repeatedly to select from 120 90 60 30 20 10 or 5 minutes 3 The unit will turn off automatically after the selected time 4 To cancel sleep press and hold on the top panel or on the remote or repeatedly press SLEEP until Sleep disapp...

Page 10: ...ill show on the display For example 106 2 MHz 2 Press MODE P will flash on the display 3 Press MEMORY to select the preset program 4 Press MODE to confirm 5 Repeat step 2 to 4 until you have memorised up to 10 stations Press MEMORY to listen to the preset FM channel CH01 CH10 at FM mode Note The saved preset stations will be lost if the AC Power is interrupted and the backup batteries are not inse...

Page 11: ...d right of the iPod dock or VOLUME on the remote to adjust the sound level as desired Note The volume control on your iPod will not function whilst docked Control iPod Menu by Remote Control Only Press MODE on the remote control the iPod will go to the previous menu Press or on the remote control to select the next previous iPod menu item then press ENTER to enter the selected menu Settings are ch...

Page 12: ...he time in a darkened room In the Power on mode press SNOOZE to dim or brighten the display RESETTING If the system does not function correctly you may have experienced an electrostatic discharge or a power surge that caused the internal computer to lock up crash If this occurs simply disconnect the main power at the wall socket and reconnect the main power again after one minute Note Although dis...

Page 13: ... again Make sure the iPod is switched on Vibration can cause the iPod to come loose from the docking station RADIO Poor FM reception Make sure the FM antenna is extended Move the unit away from other operating electrical equipment such as motorised appliances transformers televisions and microwave ovens Please be aware the structure of some buildings blocks radio waves REMOTE No function or short ...

Page 14: ...2 2GB 4GB 8GB Dust Cover Dust cover should be installed in the docking station if no iPod will be docked for an extended period of time Electric and electronic equipment and included batteries contains materials components and substances that can be hazardous to your health and the environment if the waste material discarded electric and electronic equipment and batteries is not handled correctly ...

Page 15: ...n either be submitted free of charge at recycling stations and other collection sites or be collected from the households Additional information is available at the technical department of your city ALL RIGHTS RESERVED COPYRIGHT DENVER ELECTRONICS A S Made for iPod and Made for iPhone mean that an electronic accessory has been designed to connect specifically to iPod or iPhone respectively and has...

Reviews: