


230V~50Hz
230V~50Hz
DRS-1400
230V ~50Hz
130W
DVD & AMPLIFIER SYSTEM
DRS-1400
DVD HOME THEATER
EJECT
PRE/TUN
PLAY
AUTO
STOP
MEMO
NEXT
UP
INPUT
PREV
DOWN
6
23
FRONT AND
BACK PANELS
SYSTEM SETUP
PREFERENCE SETUP
During stop mode, press the SETUP button
to access the INITIAL SETUP menu, which
includes items of dubbing language, subtitle,
disc menu language, age control, default
values and main menu.
Preset values are essential to a DVD player.
The user may change these items as desired.
TV TYPE
Follow the operation instructions stated in
DVD menu setup in combinution with the
desired option in the following figure.
"
"
This product supports output of various
system, including MULTI NTSC
PAL.
1)If your TV set has only NTSC or PAL system,
the screen will blink and become colourless
when a wrong system is selected. In this case,
press the N/P button on the R.C to return to
normal, screen always remember to select the
correct system.
2)For more information of output format, refer
to the instructions or your TV set.
AUDIO LANGUAGE
Follow the operating instructions stated in
" DVD MENU SETUP" in combination with the
desired option in the following figure.
SET TV STANDARD
AUDIO
SUBTITLE
DISC MENU
PARTENTAL
DEFAULT
MAIN PAGE
PREFERENCE PAGE
MULTI
TV TYPE
PAL
NTSC
PREFERRED SUBTITLE LANGUAGE
PREFERENCE PAGE
ENGLISH
FRENCH
SPANISH
CHINESE
JAPANESE
KOREAN
RUSSIAN
THAI
OTHERS
TV TYPE
AUDIO
SUBTITLE
DISC MENU
PARENTAL
DEFAULT
MAIN PAGE
This machine provides English, French,
Spanish, Chinese and Japanese Korean,
Russian, German and Others as the built-in
disc dubbing language options.
BRIGHTNESS
Follow the operation instructions stated in
"DVD menu setup " in combination with desired
option in the following figure.
Press right arrow button to enter adjustment
mode; press up and down buttons to make
adjustment.
Press left arrow button to return to setup menu.
VIDEO SETUP PAGE
BRIGTNESS
BRIGTNESS
SHARPNESS
CONTRAST
MAIN PAGE
O
CONTRAST
Follow the operation instructions stated in
"DVD menu setup " in combination with desired
option in the following figure.
Press right arrow button to enter adjustment
mode; press up and down buttons to make
adjustment.
Press left arrow button to return to setup menu.
1
6
7
5
2
3
4
8
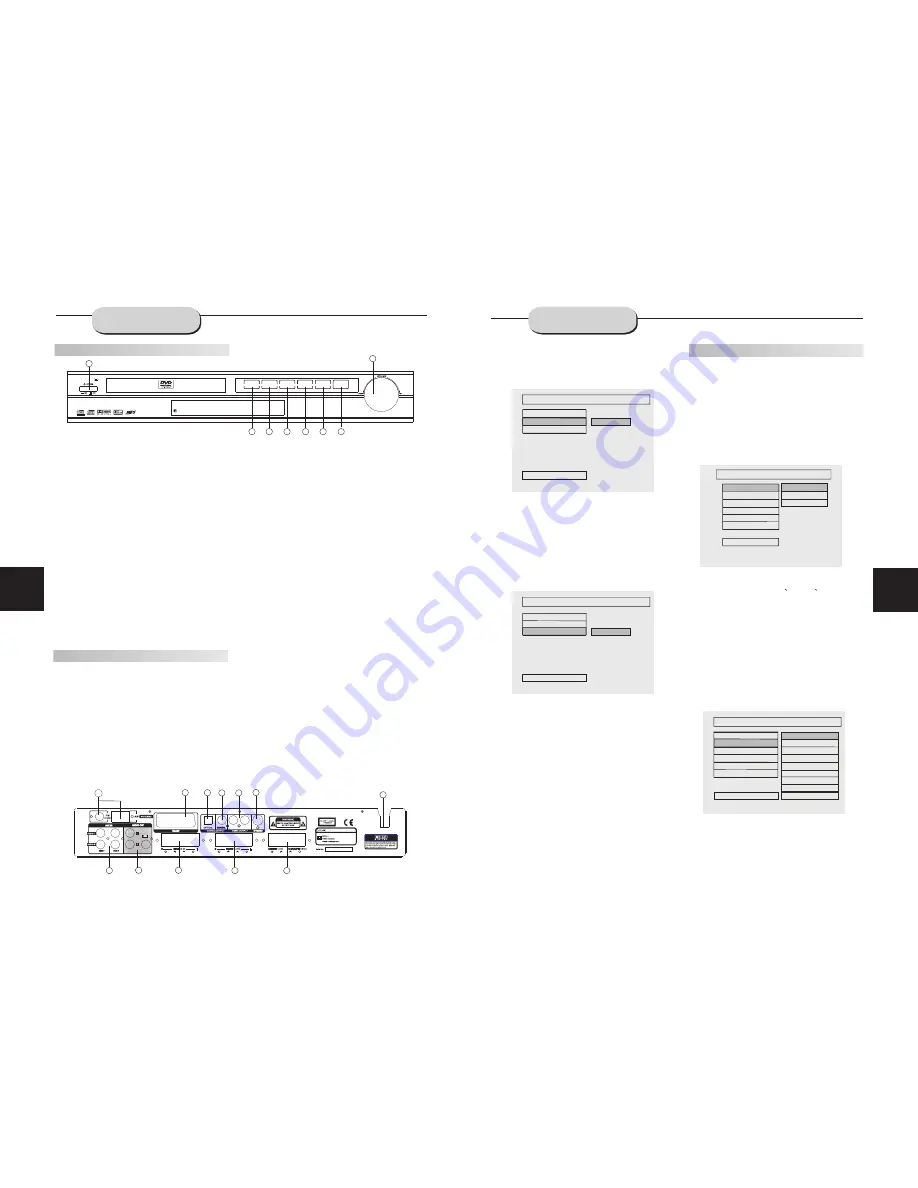
Front Panel Functions
Back Panel Functions
1. ANTENNA
Use to connect the provided indoor FM and
AM loop antennas.
2. AUX IN
Use to connect input for both auxiliary 1 and 2
music sources.
3. AUDIO OUT
Use to connect both the right and left channel
line outputs as well as subwoofer output.
4. VIDEO OUTPUT
5. S-VIDEO OUTPUT
6. REAR
Use to connect the four terminals of the left
and right surround sound speakers.
7. FRONT/MAIN
Use to connect the four terminals of the left
and right front or main speakers.
8. CENTER/SUBWOOFER
Use to connect the four terminals of the center
and subwoofer speakers.
9. COAXIAL OUTPUT
10. 230V/50Hz
This unit comes with an AC power cord. Be
sure its prongs are dry before plugging it into an
electrical outlet. Take caution not to overextend
the cord or walk on it.
11. SCART OUTPUT
12. OPTICAL OUTPUT
4
6
7
10
1
2
3
5
8
9
11
12
VIDEO SETUP PAGE
CONTRAST
BRIGTNESS
CONTRAST
MAIN PAGE
O
SHARPNESS
1. POWER
Before plugging the power cord into the AC
outlet, check to make sure all of the connection
s have been properly completed. When they
have been, carefully plug power cord into outlet.
Press the POWER button on the front panel
to power the unit.
When the unit is initially powered, a brief surge
of electricity may cause interference with other
electronic equipment on the same circuit. If this
occurs, connect the unit to an outlet on a
different circuit.
. EJECT /PRE/TUN
Use this button to open and close the disc tray
while in DVD mode. It is disabled when another
signal source is used.
When in the Tuner mode, this button is used to
select preseting or tuning mode.
3. PLAY /AUTO
Use this button to begin play function while in
DVD mode.
When in the tuner mode, you may press this
button for automatic search..
2
4. STOP /MEMO
Use this button to stop play function while in DVD
mode.
While in the tuner mode, this button is used to
memory station.
5. PREV /DOWN
While in the DVD status, you may press this
button for previous track.
While in the tuner mode, you may press this bu-
tton for radio down search.
6. NEXT /UP
Button.
While in the DVD status, you may press this
button for next track. .
While in the tuner mode, you may press this bu-
tton for radio up search.
7. INPUT SIGNAL SOURCE
Use this button to select the proper input signal
source. (Note: The selected input will correspond to
the selected input terminal on the rear panel.)
8. VOLUME
Use this button to control the unit's volume. It
controls all six channels simultaneously.


