background image

.

i

u

.

Q0

o

G

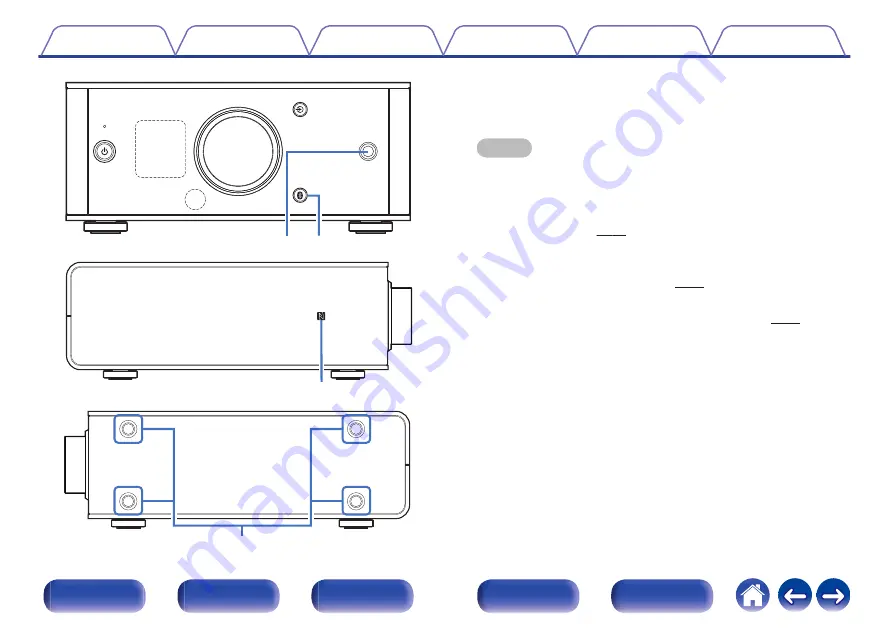
Headphones jack

Used to connect headphones.
When the headphones are plugged into this jack, audio will no longer

be output from the speaker terminals.

NOTE

0

To prevent hearing loss, do not raise the volume level excessively when using

headphones.

H

Bluetooth button (

V

)

This switches the input to Bluetooth. This is also pressed during the

pairing operation.  (

v

 p. 42)

I

N-Mark (

Q

)

Touch this mark with a Bluetooth device that includes the NFC function

when pairing (registering) with it.  (

v

 p. 46)

J

Installation holes for vertical installation feet

These are used when the unit is installed vertically.  (

v

 p. 16)

Contents

Connections

Playback

Settings

Tips

Appendix

8

Front panel

Display

Rear panel

Remote

Index

Summary of Contents for PMA-60

Page 1: ...PMA 60 INTEGRATED AMPLIFIER Owner s Manual Contents Connections Playback Settings Tips Appendix 1 Front panel Display Rear panel Remote Index...

Page 2: ...ertically 16 Before using the remote control unit 18 Operating range of the remote control unit 19 Connecting speakers 20 Speaker connection 21 Connecting a PC or Mac 22 Connecting to a device with di...

Page 3: ...tening to music via a analog connection AUX 40 Listening to music on a Bluetooth device 41 Settings Menu map 49 Source Direct 51 Bass 51 Treble 51 Balance 51 H P AMP Gain 51 Bluetooth 52 Auto Standby...

Page 4: ...re to keep it for future reference Accessories Check that the following parts are supplied with the product Caps silver x4 USB cable Remote control unit RC 1220 built in battery Power cord Quick Start...

Page 5: ...m Technologies International Ltd registered in the United States and other countries used with permission 0 High Bitrate and High Sampling with Advanced AL32 Processing Plus A high bitrate and high sa...

Page 6: ...oth enabled devices such as smartphones and tablets with this unit to listen to music while browsing email and Web sites in the Internet away from this unit In addition this unit supports high quality...

Page 7: ...ircuit has operated 0 Power does not turn on Power is turned off v p 56 0 Protection circuit v p 64 C Display This displays various pieces of information v p 9 D Remote control sensor This receives si...

Page 8: ...nes H Bluetooth button V This switches the input to Bluetooth This is also pressed during the pairing operation v p 42 I N Mark Q Touch this mark with a Bluetooth device that includes the NFC function...

Page 9: ...ed input source USB DAC COAXIAL OPTICAL 1 OPTICAL 2 AUX Bluetooth B Information display Displays items such as information on the audio signal being input or the name of a Bluetooth device Contents Co...

Page 10: ...rs Used to connect devices equipped with PC and digital audio output connectors 0 Connecting a PC or Mac v p 22 0 Connecting to a device with digital audio output connectors v p 23 D Speaker terminals...

Page 11: ...hese select menu items C BACK button Returns to the previous item D Bluetooth button V This switches the input to Bluetooth This is also pressed during the pairing operation v p 42 E INPUT SELECT butt...

Page 12: ...ower on to standby v p 27 H ENTER button This determines the selection I AMP SETUP button The setting menu is displayed on the display v p 50 J VOLUME buttons df These adjust the volume level v p 29 K...

Page 13: ...m buttons 0 Skip buttons 8 9 0 Play pause button 1 3 0 Stop button 2 E Random button P F PROGRAM button G ENTER button H Information button INFO I Repeat button L J MODE button K Number buttons 0 9 10...

Page 14: ...4 Connecting the power cord 25 NOTE 0 Do not plug in the power cord until all connections have been completed 0 Do not bundle power cords together with connection cables Doing so can result in humming...

Page 15: ...u can select how to install this unit according to the installation place and your preference Installing horizontally The feet are initially attached to the unit for horizontal installation Contents C...

Page 16: ...place next to a laptop computer 1 Remove the feet 0 Rotate each of the 4 feet counter clockwise to remove 2 Insert the supplied caps silver into the holes from which the feet were removed Contents Con...

Page 17: ...the caps However be careful not to damage the unit when using tools 4 Rotate the removed feet clockwise to attach them NOTE 0 After attaching the feet adjust the height of the feet as necessary so tha...

Page 18: ...on the battery faces upwards 3 Put the back cover back on and tighten the screws CR2025 NOTE 0 If the battery should have a leakage immediately replace and dispose of the battery In this case there i...

Page 19: ...nt the remote control unit at the remote sensor when operating it Approx 7 m 30 30 Horizontal installation 30 30 Approx 7 m Vertical installation Contents Connections Playback Settings Tips Appendix 1...

Page 20: ...d result in electric shock 0 Use speakers with impedance of 4 16 ohms o Connecting the speaker cables Carefully check the left L and right R channels on the speakers being connected to this unit and b...

Page 21: ...Speaker connection w q w q R L Contents Connections Playback Settings Tips Appendix 21 Front panel Display Rear panel Remote Index...

Page 22: ...ting this unit to your computer install the driver software in your computer v p 31 0 Download the driver software from the PMA 60 page of the Denon website 0 Use a cable that is 3 m or less to connec...

Page 23: ...s to this unit and convert the signals for playback using the D A converter of this unit v p 39 OPTICAL OUT COAXIAL OUT CD player Digital device o Audio signals that can be played back See D A Convert...

Page 24: ...udio output connectors This unit can be connected to an analog device such as a CD player AUDIO OUT L R CD player Analog device L L R R Contents Connections Playback Settings Tips Appendix 24 Front pa...

Page 25: ...ompleting all the connections insert the power plug into the power outlet Power cord supplied To household power outlet 230V 50 60 Hz Contents Connections Playback Settings Tips Appendix 25 Front pane...

Page 26: ...9 Switching the display s brightness 29 Playing a device Connecting and playing back from a computer USB DAC 30 Listening to music via a digital connection COAXIAL OPTICAL 1 OPTICAL 2 39 Listening to...

Page 27: ...om standby mode Switching the power to standby 1 Press X Turns the display off 0 You can also switch the power to standby by pressing AMP POWER X on the remote control unit NOTE 0 When the power is in...

Page 28: ...TICAL 1 connector OPTICAL 2 Plays back the device connected to the OPTICAL 2 connector AUX Plays back the device connected to the AUX connector 0 You can also use INPUT SELECT df on the remote control...

Page 29: ...htness The display brightness can be adjusted between three levels 1 Press DIMMER on the remote control unit 0 The brightness of the display switches each time the button is pressed 0 The DIMMER butto...

Page 30: ...s 10 0 Mac OS X 10 10 10 11 or macOS 10 12 USB 0 USB 2 0 USB High speed USB Audio Class Ver 2 0 NOTE 0 This unit was checked the operation using the system requirements by us but it does not guarantee...

Page 31: ...connected by a USB cable and the computer is switched on before installation disconnect the USB and restart the computer 2 Download the dedicated driver from the Download section of the PMA 60 page o...

Page 32: ...yed Click Next e D Read the Software Licensing Agreement and click I accept the terms of the License Agreement E Click Next t r Contents Connections Playback Settings Tips Appendix 32 Front panel Disp...

Page 33: ...n start dialog 0 The installation starts Do not perform any operation on the PC until the installation is completed y y G Click Next u Contents Connections Playback Settings Tips Appendix 33 Front pan...

Page 34: ...Click Yes o 5 With the unit power off connect the unit and PC using a USB cable supplied 0 For details on connections see Connecting a PC or Mac v p 22 Contents Connections Playback Settings Tips App...

Page 35: ...he sound menu window is displayed C Check that there is a checkmark next to Default Device under in PMA 60 of the Playback tab 0 When there is a checkmark for a different device click PMA 60 and Set D...

Page 36: ...not occur correctly if connected to the PC before the dedicated driver has been installed 0 Operation may fail in some PC hardware and software configurations 0 Player software supporting the Audio St...

Page 37: ...rsor to Go on the computer screen and then click Utilities 0 The utility list is displayed E Double click Audio MIDI Setup 0 The Audio Devices window is displayed F Check that Use this device for soun...

Page 38: ...puter v p 22 1 Press q to switch the input source to USB DAC Start playback on the computer s player software The digital audio signal that is being input is shown as follows in the display or xxx is...

Page 39: ...n the computer disconnect the USB cable and restart the computer 0 The sampling frequency of the music playback software and sampling frequency displayed on this unit may differ 0 Use a cable that is...

Page 40: ...his causes noise and could damage the speakers Listening to music via a analog connection AUX 1 Press q to switch the input source to AUX 2 Play back music on the connected device The speakers output...

Page 41: ...d the Bluetooth device to be connected This unit can store pairing information for a maximum of 8 devices NOTE 0 You cannot simultaneously output music from multiple Bluetooth devices o How to establi...

Page 42: ...details see the owner s manual for your Bluetooth device Bluetooth ON 3 Press V for 3 seconds or longer Pairing appears on the display and the unit enters the pairing mode 0 When you press V for the...

Page 43: ...M A 6 0 0 When Denon PMA 60 is not displayed in the screen on the Bluetooth device search for devices on the Bluetooth device 0 When you are prompted for a pass key in the screen on the Bluetooth devi...

Page 44: ...device you want to perform pairing for 0 When no Bluetooth device is connected No Connection appears on the display NOTE 0 The pairing mode on this unit lasts for approx 5 minutes When the pairing mo...

Page 45: ...s displayed in the screen on the Bluetooth device Power to this unit is automatically turned on and this unit attempts to establish the Bluetooth connection When the device is connected via Bluetooth...

Page 46: ...erations as instructed by the Bluetooth device 3 Play back music on the Bluetooth device This unit outputs music from the Bluetooth device 0 When you touch the N Mark Q on this unit with the Bluetooth...

Page 47: ...nnected Listening to music on a Bluetooth device v p 41 If frequently used devices are connected it is useful for switching the playback device because you do not have to reconnect them Perform pairin...

Page 48: ...played back 2 Play back the device that you want to output music from 0 Turn the power of this unit to standby before turning the Bluetooth function of the Bluetooth device off Contents Connections Pl...

Page 49: ...nt 51 Bass Adjusts the bass sound 51 Treble Adjusts the treble sound 51 Balance Adjust the left right volume balance 51 H P AMP Gain Set the gain of the headphone amplifier Set this according to the i...

Page 50: ...operated then press ENTER 3 Use uio p to change to desired setting 4 Press ENTER to enter the setting 0 To return to the previous item press BACK or o 0 Exiting the Menu press AMP SETUP while the menu...

Page 51: ...one amplifier Set this according to the impedance of the connected headphones It is recommended that this is set on the Low side if the headphones have low impedance and on the High side if they have...

Page 52: ...ion 0 When Bluetooth is Off the input source cannot be switched to Bluetooth Auto Standby When there is no input signal and operation for 30 minutes this unit automatically enters the standby mode On...

Page 53: ...bleshooting Power does not turn on Power is turned off 56 No sound comes out 57 Sound is distorted or interrupted or noise occurs 58 Desired sound does not come out 58 Files on a computer cannot be pl...

Page 54: ...h devices connected When multiple Bluetooth devices are connected and you want to switch to a different Bluetooth device stop playback on the device that is currently played back and play back the Blu...

Page 55: ...te properly check the corresponding symptoms in this section If the symptoms do not match any of those described here consult your dealer as it could be due to a fault in this unit In this case discon...

Page 56: ...d due to a rise in temperature within this unit Turn the power off wait about an hour until this unit cools down sufficiently and then turn the power on again 27 0 Please re install this unit in a pla...

Page 57: ...Check that a proper input source is selected 28 0 Check that power to this unit and the connected devices is on 0 Adjust to an appropriate volume level on this unit and the connected devices 29 0 To...

Page 58: ...c from a computer 0 During playback of music from the computer do not run any applications other than the player software o Desired sound does not come out Symptom Cause Solution Page No sound comes o...

Page 59: ...it is not selected as the playback device 0 Select this unit as the playback device in the sound settings on the computer 30 Unlocked is displayed 0 When digital audio signals cannot be detected prope...

Page 60: ...30 19 0 Remove any obstacle between this unit and the remote control unit 0 The coin shaped lithium battery CR2025 is not positioned correctly Correct the positioning so that the symbol engraved on th...

Page 61: ...tton activate the Bluetooth function and connect again 52 The sound is cut off 0 Bring the Bluetooth device near to this unit 0 Remove obstructions between the Bluetooth device and this unit 0 To prev...

Page 62: ...alues Make settings again 1 When this unit is in the standby mode press X while holding q INITIALIZE appears on the display and this unit restarts NOTE 0 Pairing information stored on this unit is als...

Page 63: ...a Bluetooth device that supports this specification is connected you can perform high quality streaming distribution of monaural and stereo audio data Bluetooth communications The radio waves broadcas...

Page 64: ...ber of readings taken in one second is called the sampling frequency The larger the value the closer the reproduced sound is to the original Pairing Pairing registration is an operation that is requir...

Page 65: ...ies International Ltd Qualcomm is a trademark of Qualcomm Incorporated registered in the United States and other countries used with permission aptX is a trademark of Qualcomm Technologies Internation...

Page 66: ...tortion 0 004 Digital in Rated output 3 dB 8 ohms 1 kHz S N ratio 110 dB Digital in 25 W 8 ohms 1 kHz IHF A 0 Digital input signal Audio formats Digital audio interface Linear PCM Coaxial input 0 5 Vp...

Page 67: ...tion range varies depending on the influence of such factors as obstructions between devices electromagnetic waves from microwave ovens static electricity cordless phones reception sensitivity antenna...

Page 68: ...o Dimensions Unit mm 200 6 80 86 6 154 30 170 23 23 240 258 18 258 40 o Weight 2 7 kg Contents Connections Playback Settings Tips Appendix 68 Front panel Display Rear panel Remote Index...

Page 69: ...v M Multi point function 47 Muting 29 v N NFC function 46 64 v P PC 22 Protection circuit 64 v R Rear panel 10 Remote control unit 11 Resetting factory settings 62 v S Source direct 51 Speakers 20 v...

Page 70: ...www denon com 3520 10552 00ADA Copyright 2017 D M Holdings Inc All Rights Reserved 70...

Reviews: