background image

o

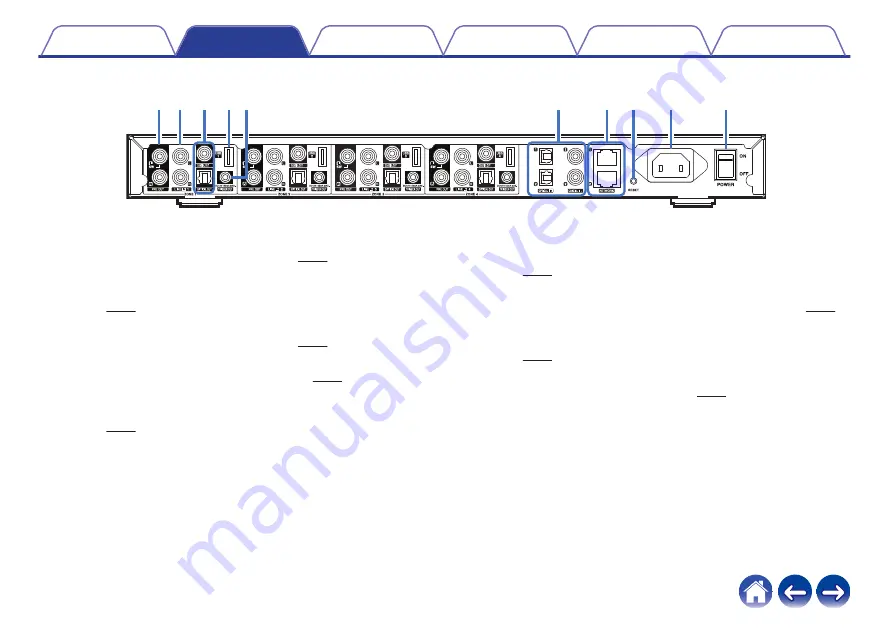
Back panel

.

q w e

t

r

y

u i

o

Q0

A

PRE OUT connectors
Used to connect external amplifiers.  (

v

 p. 14)

B

LINE IN connectors
Used to connect devices equipped with analog audio outputs.

 (

v

 p. 16)

C

Digital Output (OPTICAL OUT/COAXIAL OUT) connectors
Used to connect external amplifiers.  (

v

 p. 14)

D

USB port
Used to connect USB storage devices.  (

v

 p. 15)

E

TRIGGER OUT jack
Used to connect devices equipped with a trigger function.

 (

v

 p. 15)

F

Digital Input (OPTICAL IN/COAXIAL IN) connectors
Used to connect devices equipped with digital audio outputs.

 (

v

 p. 16)

G

NETWORK connectors
Used to connect this unit to a wired Ethernet network.  (

v

 p. 19)

H

RESET button
Various settings are reset to the factory default values.

 (

v

 p. 52)

I

AC inlet
Used to connect the power cord.  (

v

 p. 18)

J

Master Power Switch (POWER)

Contents

Setup

Use

Troubleshooting

Status LED

Appendix

10

Summary of Contents for HEOS LINK

Page 1: ...NETWORK MULTI ROOM PRE AMPLIFIER Owner s Manual HEOS Super Link Contents Setup Use Troubleshooting Status LED Appendix 1...

Page 2: ...s 19 Adding wired HEOS devices 19 Adding wireless HEOS devices 20 Using your HEOS Super Link 21 Selecting a room 21 Listening to radio 22 Playing music stored on your mobile device 22 Playing music fr...

Page 3: ...ting station from the HEOS favorite 39 Making adjustments 40 Changing the name of a HEOS Super Link 40 Changing the name of a zone 40 Adjusting the equalizer 41 Adjusting the balance 41 Adjusting the...

Page 4: ...sometimes 50 I hear a delay when using the external input with my TV 51 I hear noise from the OPTICAL OUT audio 51 Resetting your HEOS device 52 Restoring the HEOS device to factory defaults 52 Contac...

Page 5: ...wse and play music from your own music library or from many online streaming music services 0 True multi room audio play different songs in different rooms or the same song in every room 0 Utilizes yo...

Page 6: ...ireless network please contact your local Denon dealer or electronics retailer to assist you with purchasing and installing a wireless network in your home High Speed Internet Connection HEOS accesses...

Page 7: ...ndroid mobile device that meets these minimum requirements iOS Minimum Requirements 0 iOS version 7 0 or later 0 iPhone 4 or newer 0 iPad 2 or newer 0 iPod touch 5th generation or newer Android Minimu...

Page 8: ...k Ethernet cable Rack mount brackets Thank you note Quick Start Guide Safety Instructions Warranty North America user only Extended Protection Plan North America user only for North America for Europe...

Page 9: ...This is lit as follows according to the power status v p 54 0 White Power on 0 Off Deep Standby 0 Red When all Zone enter Quick Start Mode C Network indicators Flashes green to indicate network activi...

Page 10: ...rage devices v p 15 E TRIGGER OUT jack Used to connect devices equipped with a trigger function v p 15 F Digital Input OPTICAL IN COAXIAL IN connectors Used to connect devices equipped with digital au...

Page 11: ...HEOS multi room audio functionality to an external device which offers audio amplification You should place your HEOS Super Link in a convenient location near the amplification device you are connect...

Page 12: ...EOS Super Link if you want to mount the HEOS Super Link in a standard EIA equipment rack 1 Remove the two screws on each side of the HEOS Super Link 2 Align the brackets with the screw holes and reatt...

Page 13: ...uper Link Zones if desired You can also play different sources in different zones Connection and function of page 14 to 18 are ZONE1 ZONE2 ZONE3 and ZONE4 are same as ZONE1 ZONE1 ZONE2 ZONE3 ZONE4 ZON...

Page 14: ...V receiver using the appropriate cables R L R L AUDIO AUDIO R L IN IN OPTICAL AUDIO IN COAXIAL Your amplifier or AV receiver or or o Connecting a subwoofer Connect the PRE OUT L output to an input on...

Page 15: ...rigger input connector connect it to the TRIGGER OUT jack of this unit using a 3 5mm cable not included A signal up to 12 V 150 mA is output from the TRIGGER OUT jack Power amplifier NOTE 0 Use a mona...

Page 16: ...IN or OPTICAL IN input to an audio playback device CD player portable music player etc using the appropriate cables R L R L AUDIO AUDIO R L OUT OUT OPTICAL OUT COAXIAL AUDIO Analog device Digital devi...

Page 17: ...k to your network Router NOTE 0 Each HEOS Super Link contains four HEOS modules and therefore always counts as four devices towards the maximum number of 32 HEOS devices supported on any one network U...

Page 18: ...AC 120 V 60 Hz Getting the HEOS app The HEOS app is the heart of the HEOS experience Using your mobile device and the HEOS app you can setup browse explore and control your HEOS system right in the p...

Page 19: ...supported on any one network Up to 8 HEOS Super Link devices are supported on a single network Adding wired HEOS devices Just connect the HEOS devices to your home network using an Ethernet cable and...

Page 20: ...evices to your HEOS system by selecting Add Device from the HEOS app s settings menu and follow the instructions 1 2 Add Device Settings Music NOTE 0 HEOS Super Link can not be connected to a wireless...

Page 21: ...system which one you want to control 1 Select the Room you want to control 2 Select the Music tab to select a music source or the Now Playing tab to control what is currently playing in the selected r...

Page 22: ...ular categories and select a station that appeals to your mood NOTE 0 If you have a TuneIn account you can sign into the TuneIn service under Settings Music Sources TuneIn and access all of your My Fa...

Page 23: ...from the Music tab 2 Select the name of your networked PC or NAS Network Attached Storage server 3 Browse the music on your PC NAS and select something to play NAS Network Attached PC Storage PC Audi...

Page 24: ...analog RCA stereo input on the back of the HEOS Super Link 2 Select Inputs from the Music tab 3 Select the name of the HEOS Super Link and which input to which you connected the audio device in step...

Page 25: ...evices 1 Connect an external audio device to the digital optical coaxial or analog RCA stereo input on the back of the HEOS Super Link 2 Select Inputs from the Music tab 3 Select the name of the HEOS...

Page 26: ...onnected the audio device in step 1 4 Browse the music on your USB device and select something to play NOTE 0 It may take several minutes for the name of your HEOS Super Link to appear in the USB Musi...

Page 27: ...you will have access to all of your associated music services play history and custom playlists even if you are at a friend s house listening to music on their HEOS system o Signing up for a HEOS acc...

Page 28: ...for the selected music service You only have to enter your account information once as the HEOS account service will securely remember your login information so you don t have to enter it each time yo...

Page 29: ...ngs menu 2 Select Music Sources 3 Select Inputs 4 Select the HEOS devices which you connect your external audio source device to o Changing the name of the inputs 1 Select the name of the input you wa...

Page 30: ...ttings a icon located in the upper left corner of the main Music menu to display the Settings menu 2 Select Music Sources 3 Select This iPhone iPod iPad Phone 4 Toggle This iPhone iPod iPad Phone to O...

Page 31: ...and hold your finger on room that is not playing music 2 Drag it into the room that is playing music indicated by the red outline and lift your finger The two rooms will be grouped together into a si...

Page 32: ...rooms NOTE 0 You can not remove the first room that started playing the music before grouping 2 1 Song Name 3 Song Name 2 Song Name 1 Bedroom Dining Living Kitchen Drag one room into another to group...

Page 33: ...joined together and begin playing the same music in perfect sync 1 2 Song Name 1 Bedroom Dining Kitchen Drag one room into another to group them Rooms Song Name 4 Song Name 3 Song Name 2 Song Name 1...

Page 34: ...ill stop playing in every room except the original master room that was playing before you grouped the rooms together 1 2 Song Name 1 Bedroom Dining Dining Kitchen Drag one room into another to group...

Page 35: ...1 Tap the Music tab and select a music source Now Playing Music Rooms This Phone Music Music Servers USB Music Playlists History 0 All music services displayed may not be available in your location Co...

Page 36: ...m immediately Play Next Inserts the item into the queue after the current song and plays it when the current song ends Add to End of Queue Adds the item to the end of the queue 0 When you select a rad...

Page 37: ...our queue by dragging the list f icon on the right side of each track row up or down Deleting songs from the play queue You can remove songs one at a time from the Now Playing Queue 1 Tap the Now Play...

Page 38: ...t you can recall later The new playlist will be available from the Playlists button on the Music tab on every controller app connected to your HEOS system 1 Tap the Now Playing tab 2 Tap the Queue d i...

Page 39: ...HEOS favorite Select a station of an online music source When the action menu screen is displayed select Add Station to HEOS Favorites NOTE 0 This can also be done by selecting Add Station to HEOS Fa...

Page 40: ...ces to display a list of your devices 3 Select the HEOS Super Link and the Zone you want to adjust Changing the name of a HEOS Super Link 1 Select Name 2 Select or enter a new name for your HEOS Super...

Page 41: ...such as AUX input WAV FLAC and PCM will be transcoded to ensure the highest level of reliability for the audio stream 1 Select Quality 2 Select Normal default or High 0 If you have selected High and y...

Page 42: ...l be disappeared and forced to change Using a subwoofer 1 Select Subwoofer 2 Enable the Sub Out L setting 0 If you enable the IP control Subwoofer will be disappeared and forced to change Adjusting th...

Page 43: ...r external input audio from this unit through a different HEOS device 1 Select TV Sound Grouping o Enable Enables grouping o Audio Delay Sets the delay for the audio NOTE 0 The audio may cut out if th...

Page 44: ...tandby v p 49 3 Select Save Settings to apply the new settings or Cancel Changes to revert to the previous settings NOTE 0 Deep Standby needs to be set in all four zones to enable this setting o Firmw...

Page 45: ...echnical details about the HEOS device 1 Select Advanced 2 Select ABOUT tab 3 Scroll down to see information about the device s a Hardware b Software c Device Contents Setup Use Troubleshooting Status...

Page 46: ...4 Select the Zone you want to set 5 Select Control 6 Select the method which is most appropriate for your configuration o IP Control IP Control is available for Denon AV receiver models sold after 20...

Page 47: ...that supports 12 V trigger input The HEOS app can control the power on and off for the amp 1 Select Trigger 2 Select Done NOTE 0 You can test the connection to the amp by pressing the power on off in...

Page 48: ...lect the Settings a icon located in the upper left corner of the main Music menu to display the Settings menu 2 Select Software Update n Check for Update Follow the instructions on screen to install a...

Page 49: ...icator will be red o Deep Standby The device also has the ability to automatically enter Deep Standby whenever the wired network connection is removed for more than 60 minutes in Quick Start Mode Powe...

Page 50: ...Solution Refer to Page 0 Make sure your Internet connection is operating correctly If you are sharing your network with other users or devices they may be using most of your bandwidth especially if th...

Page 51: ...s because the HEOS system must buffer the audio before it sends it out to the HEOS devices so that it arrives at all devices at the same time 24 0 You can avoid this delay by listening only to the dev...

Page 52: ...to its factory defaults will clear all of the settings and restore the original software which was installed at the factory Caution 0 All settings will be erased and the software will likely be downg...

Page 53: ...Support Email Support HEOSbyDenon com Live Chat www HEOSbyDenon com LiveChat Telephone Toll Free 855 499 2820 M F 10 00AM to 10 00PM EST Sat 12 00PM to 8 00PM EST For the other region If you need add...

Page 54: ...o AC power Master Power Switch OFF Deep Standby off ON Power ON solid Power Management Quick Start Mode When all Zone enter Quick Start Mode solid Error Hardware protection Refer to BASIC TROUBLESHOOT...

Page 55: ...Network indicators Device Operation Description Front LED Action OFF Not Connected to your network off Connect Connected to your network blink Contents Setup Use Troubleshooting Status LED Appendix 5...

Page 56: ...ED Action OFF No AC Power Master Power Switch OFF Deep Standby off Master Power Switch ON Booting blink ON Ready Configured and connected to your network solid Not Connected to your network solid Cont...

Page 57: ...Device Operation Description Front LED Action Update Updating blink Rebooting blink Ready Configured and connected to your network solid Contents Setup Use Troubleshooting Status LED Appendix 57...

Page 58: ...on Description Front LED Action Reset Soft reset Clear user settings fast blink Hard reset Factory restore blink Rebooting blink Ready Not Configured solid Contents Setup Use Troubleshooting Status LE...

Page 59: ...Description Front LED Action Errors Firmware Error slow blink NOT fade Hardware Error fast blink Network Error solid Volume Change quick blink Mute slow blink Contents Setup Use Troubleshooting Status...

Page 60: ...Device Operation Description Front LED Action Power Management Quick Start mode When all Zone enter Quick Start Mode solid Deep Standby off Contents Setup Use Troubleshooting Status LED Appendix 60...

Page 61: ...wma9 CBR CBR 48 192 kbps 44 1 48 88 2 96 176 4 192 kHz 16 24 bit flac flac 44 1 48 88 2 96 176 4 192 kHz 16 24 bit m4a ALAC NOTE 0 Files protected by DRM such as Apple s Fairplay DRM are not supported...

Page 62: ...to 40 kHz 1 3dB 0 PRE OUT Optical IN Coaxial IN THD N 0 003 S N ratio 110 dB Frequency response 10 Hz to 80 kHz 1 3dB Sampling frequency 192kHz 0 Digital OUT Coaxial 0 5 Vp p Optical 15 21dBm 0 Digita...

Page 63: ...95 F 5 C 35 C Power supply AC 120 V 60 Hz for North America AC 220 240 V 50 60 Hz for Europe UK and Australia Power consumption 60 W Power consumption in Deep Standby Mode 0 3 W Contents Setup Use Tr...

Page 64: ...7 430 19 1 8 484 1 3 4 44 2 50 1 4 6 15 1 8 384 14 7 8 375 1 8 3 1 4 6 o Weight 10 lbs 9 oz 4 8 kg with brackets 10 lbs 2 oz 4 6 kg w o brackets For the purpose of improvement the specifications and d...

Page 65: ...d the Google Play logo are trademarks of Google Inc Apple the Apple logo iPad iPhone and iPod touch are trademarks of Apple Inc registered in the U S and other countries App Store is a service mark of...

Page 66: ...HEOSbyDenon com 3520 10565 00ADA Copyright 2017 D M Holdings Inc All Rights Reserved 77...

Reviews: