ENGLISH
2
Getting Started
Getting Started
ENGLISH
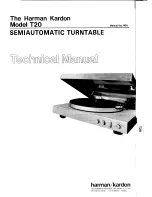
Turntable sheet
Square hole
Turntable
Ribbon tape
Counterweight
Tone arm
Lock nut
Head shell with
cartridge
Center spindle
Twist tie for
clamping
the tone arm
Stylus pressure
adjustment ring
Roller
Belt
Ribbon tape
Square hole
Equalizer
switch
Hinge retainer
section
Holder
Dust
cover
Hinge
Cabinet
• The equalizer switch is set to the “ON” position upon shipment
from the factory. Be sure to check before mounting the turntable
and turntable sheet.
• The sound may be extremely weak or distorted if the equalizer
switch is not properly set.
Assembly
Mount the turntable on the center spindle.
1
Turn the turntable so that the roller is visible through
the square hole with the ribbon tape for catching the
belt.
2
Pinch the ribbon tape and catch the belt on the outer
center of the roller.
• Remove the ribbon tape once the belt is caught.
• Turn turntable slowly 5 or 6 turns. The belt is caught at the
center of the roller.
3
Mount the turntable sheet.
4
Mounting the turntable
Mounting the counterweight
Insert the counterweight onto the shaft at the back of the
tone arm and screw it in.
Mount with the stylus pressure adjustment ring towards the
front.
Mounting the head shell with cartridge
Insert the head shell with cartridge onto the tone arm
and fasten it in place with the lock nut (
page 6).
Insert the 2 included hinges securely into the holders
at the back of the cabinet.
1
Mount the hinge retainer sections of the dust cover
onto the hinges.
• Insert fully in the direction of the arrow.
• When removing the dust cover, open the dust cover fully then
pull out in the direction opposite the arrow.
2
• Hold the dust cover near the hinge retainer sections when mounting
and removing it.
Once assembly is finished, remove the twist tie for
clamping the tone arm.
OFF:
When connecting to the PHONO input terminal
(The record player’s equalizer cannot be used.)
ON:
When connecting a terminal other than the PHONO input terminal
(The record player’s equalizer can be used.)
This record player comes with a built-in equalizer.
Switch as shown below according to the terminal being used.
Mounting the dust cover
About the equalizer switch
NOTE:
• Do not remove the twist tie for clamping the tone arm until
assembly is completed.
• Do not connect the power supply cord until assembly is
completed.