background image

– 25 –

SP

Espa

ñ

ol

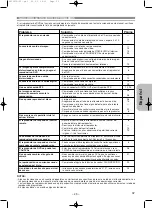
GUÍA PARA LA SOLUCIÓN DE PROBLEMAS

Si el reproductor de DVD no funciona correctamente al utilizarlo de acuerdo con las instrucciones de este manual, verifique
el reproductor consultando la lista de comprobación siguiente.

NOTAS:

• Algunas funciones no se encuentran disponibles en ciertos modos específicos, pero esto no indica mal funcionamiento. Lea

las descripciones de este manual de instrucciones para conocer detalles acerca de las operaciones correctas.

• Las funciones de reproducción desde una pista específica y reproducción aleatoria no pueden utilizarse durante el modo de

reproducción programada.

• En algunos discos, se prohíben algunas funciones.

Problema

Solución

Página

– Compruebe si el cable de alimentación de CA está conectado 

correctamente.

– Desconecte el cable de alimentación una vez, espere 5 a 10 

segundos y vuelva a conectarla.

– Compruebe si el televisor está encendido.
– Compruebe la conexión de vídeo.
– Compruebe la conexión del cable de VÍDEO/AUDIO al televisor. 
– Compruebe si el modo PROGRESIVO ha sido ajustado 

correctamente.

– A veces puede producirse una ligera distorsión de la imagen. 

Esto no indica mal funcionamiento.

– Conecte el reproductor directamente al televisor.

– Conecte el reproductor de DVD directamente al televisor.
– Asegúrese de que el disco sea compatible con el reproductor 

de DVD.

– Ajuste el volumen.
– Compruebe que los altavoces están conectados correctamente.

– Compruebe las conexiones digitales.
– Compruebe los ajustes de audio.

– Use un conector DIGITAL OUT al emitir sonido DTS.

– Compruebe si el disco tiene huellas dactilares o rayas y 

límpielo con un paño suave desde el centro hacia el borde.

– Limpie el disco.

– Limpie el disco.
– Asegúrese de que el lado de la etiqueta esté hacia arriba.
– Compruebe si el disco tiene algún defecto; para ello, intente 

reproducir otro disco.

– Desactive la función de control acceso o cambie el nivel de acceso.
– Cargue un disco que pueda reproducirse en este reproductor.

– Apague y vuelva a encender el reproductor para reinicializarlo.

– Apunte el control remoto directamente hacia el sensor del 

panel delantero del reproductor.

– Disminuya la distancia al reproductor.
– Cambie las pilas del control remoto.
– Vuelva a instalar las pilas observando la polaridad correcta 

(/–) de las mismas.

– Para reinicializar completamente el reproductor, desconecte el cable 

de CA de la toma de corriente de CA durante 5 a 10 segundos.

– Puede ser que el disco reproducido no admite ciertas operaciones. 

Consulte las instrucciones suministradas con el disco.

– Antes de enviar el reproductor de DVD al servicio técnico, use un 

CD/DVD de limpieza (disponible en el comercio) para limpiar la lente.

–No es posible cambiar el ángulo en DVDs que no contienen 

escenas grabadas desde diferentes ángulos. En algunos casos, 
sólo se graban escenas específicas desde diferentes ángulos.

– Compruebe el ajuste de la función de control “CLASIFICACIÓN”.

– Introduzca la contraseña predeterminada “4737”; esto borrará 

la contraseña anterior.

El reproductor no se enciende

Ausencia de sonido o imagen

Imagen distorsionada

La imagen aparece completamente 
distorsionada o en blanco y negro al 
reproducir un DVD

Ausencia de sonido o sonido 
distorsionado

Ausencia de audio en la salida digital

No se emite sonido DTS

La imagen se detiene 
momentáneamente durante la 
reproducción

No se puede reproducir el disco

No se regresa a la pantalla inicial al 
extraer el disco

El reproductor no responde al control 
remoto

Los botones no funcionan o el 
reproductor deja de responder

El reproductor no responde a ciertos 
comandos durante la reproducción

El reproductor de DVD no puede leer 
CDs/DVDs

No se puede cambiar el ángulo de 
cámara

La reproducción no comienza cuando 
se selecciona el título 

Ha olvidado la contraseña para el nivel 
de acceso

––

––

––
13
13
22

––

13

13

6

––
12

12
23

12, 23

26

26

26
14
––

23

6

––

8

––
10
10

––

6

26

21

23

23

E61H0UD(SP).qx3  05.6.3 09:33  Page 25

Summary of Contents for 556S - Progressive Scan DVD Player

Page 1: ...DVD 556 DVD VIDEO PLAYER E61H0UD EN qx3 05 6 3 09 28 Page 1 ...

Page 2: ...ade wider than the other This plug will fit into the power outlet only one way This is a safety feature If you are unable to insert the plug fully into the outlet try reversing the plug If the plug should still fail to fit contact your electrician to replace your obsolete outlet Do not defeat the safety purpose of the polarized plug 13 Power Cord Protection Power supply cords should be routed so t...

Page 3: ...LECTRIC SHOCK MATCH WIDE BLADE OF PLUG TO WIDE SLOT FULLY INSERT Non use periods Turn off the unit when it is not in use Unplug the unit from the household AC outlet if it is not to be used for a long time Unplug the unit during lightning storms Please read this operating instructions carefully before using your DVD player and keep it for future reference Important The main power supply is engaged...

Page 4: ...e are no parts you can service inside Refer all servicing to qualified ser vice personnel 2 Slot and openings in the cabinet and at the side or bottom are provided for ventilation To ensure reliable operation and to protect the unit from overheating these opening must not be blocked or covered Avoid enclosed spaces such as book cases unless proper ventilation is provided 3 Keep the unit away from ...

Page 5: ...ion refers to viewing of JPEG discs Description refers to playback of discs formatted with WMA WMA JPEG MP3 CD DVD RC 10 09 AA R6P batteries 2 Operating Instructions 1 Service Station List 1 Warranty Card 1 Audio cable 1 Video cable 1 Remote control 1 Please check to make sure the following items are included with the main unit in the carton U S Patent Nos 4 631 603 4 819 098 4 907 093 5 315 448 a...

Page 6: ...tible recording conditions characteristics of the recorder or special properties of discs 5 You can play back discs which bear the marks above If you use nonstandardized discs this unit may not play them back Even if they are played back the sound or video quality will be compromised 6 Only the discs recorded in the video format and finalized can be played back Unfinalized discs cannot be played b...

Page 7: ...Automatic detection of discs This player automatically detects if a loaded disc is DVD Video Audio CD MP3 JPEG or WMA Playing back an MP3 disc You can enjoy MP3 files which are recorded on CD R RW Direct Search You can search the desired title chapter and track with numeric button during playback or in stop mode On screen display Information about the current operation can be dis played on a TV sc...

Page 8: ... Button page 16 11 STILL PAUSE Button page 14 12 Display Remote Sensor Window 13 A B REPEAT Button page 16 14 ZOOM Button page 15 15 CLEAR Button page 15 16 ANGLE Button page 20 17 MENU Button page 14 18 ENTER Button page 14 19 Cursor Buttons page 14 20 RETURN Button page 16 21 SEARCH MODE Button page 15 22 h Fast Reverse SEARCH Button page 15 Press more than 2 seconds when you use the front panel...

Page 9: ... disc rapidly SEARCH MODE Button Numeric Buttons CLEAR Button To open or close the disc tray To open or close the disc tray To select a chapter or title directly To select a track directly To clear the markers To clear the numbers entered incorrectly To cancel the A point for A B Repeat To clear the markers CD To clear the numbers entered incorrectly To cancel the A point for A B Repeat CD CD MP3 ...

Page 10: ... Use AA R6P batteries in this remote control unit Replace the batteries with new ones approximately once a year though this depends on the frequency with which the remote control unit is used If the remote control unit does not operate within a close proximity of the main unit replace the batter ies with new ones even if less than a year has passed The included batteries serve only for verifying o...

Page 11: ...ible with progressive scanning 525p 480p connect the TV to the COMPONENT VIDEO OUT jacks of the DVD player and set PROGRESSIVE to ON in the display setting Next set your TV to the progressive scan mode Refer to page 22 for instructions on changing the display setting P SCAN will appear on the display of the unit If your TV is not compatible with progressive scanning set PROGRESSIVE to OFF refer to...

Page 12: ...he following shows examples of connections commonly used to connect the DVD player to TV and other components If using this DVD player to play back a DVD in a Dolby Digital 5 1 channel surround or DTS surround format the DVD player outputs a Dolby Digital or DTS data stream from its OPTICAL or COAXIAL DIGITAL OUT jacks By hooking up the player to a Dolby Digital or DTS decoder you can enjoy more c...

Page 13: ...5 ohm coaxial antenna termi nal on your TV Follow the instruction supplied with the RF Modulator for more details If your TV s 75 ohm coaxial antenna terminal is already occupied by an antenna or cable box connection remove that cable from your TV s antenna terminal and reconnect it to the coaxial antenna input terminal of the RF Modulator usually marked ANT IN then connect the RF modulator to you...

Page 14: ...ohibited operation has been encountered by the DVD player or the disc With DVDs that use some titles for playback program signals playback may start from the second title or it may skip these titles During the playback of two layered disc pictures may stop for a moment This happens when the 1st layer switches to the 2nd layer This is not a malfunction The operation may vary when you play back DVDs...

Page 15: ... SEARCH MODE button 29 By using the SKIP buttons H H G G During playback press the SKIP G G button to move to the next chapter Press it repeatedly to skip to subsequent chap ters Press the SKIP H H button to go back to the beginning of the current chapter Press it repeatedly to go to the previ ous chapters Chapter number will appear briefly on the front display panel If the SKIP H H or G G button ...

Page 16: ...n the TV screen Within 30 seconds enter a desired disc time point on the disc with the Numeric buttons Playback will start at the specified time For Time Search 0 appears automatically when there is no need to enter a number For example 0 0_ _ _ appears in the time search screen if the total time of the disc is less than 10 minutes Press the CLEAR button to erase an incorrect input 3 2 1 CD DVD 1 ...

Page 17: ...uffles the playback order of tracks instead of playback in the original sequence In stop mode press the RANDOM button The random screen will appear Press the PLAY button to start random playback NOTES To repeat the current track in the random selection press the REPEAT button repeatedly until TRACK appears during playback To repeat the entire random selection press the REPEAT button repeatedly unt...

Page 18: ...ture CDs You can enjoy picture images on the television set by playing back the Picture CDs For details of Kodak Picture CD contact a shop that provide developing service of Kodak Inc Applicable MP3 file Remarks Sampling frequency 44 1kHz 48kHz It is prohibited to record MP3 sound on a digital device when the connection is made digitally Type MPEG1 audio layer 3 MP3 files recorded at fixed bit rat...

Page 19: ...ayback Current file name will be dis played Press the DISPLAY button again Title name based on tag infor mation of currently played back file will be displayed Press the DISPLAY button for the third time Artist name based on tag infor mation of currently played back file will be displayed Press the DISPLAY button again Current track number total tracks and elapsed time will be displayed Current re...

Page 20: ...1 8 2 8 8 8 Camera Angle 1 ENG Dolby D 3 2 1ch 48k 3 2 FRE Dolby D 3 2 1ch 48k 3 3 JPN Dolby D 3 2 1ch 48k 3 HELLO Bon jour NOTES The sound mode cannot be changed during playback of discs not recorded in double sound Some discs allow to change audio language setting on the disc menu Operation varies between discs Refer to the manual accompanying the disc Pressing the AUDIO button may not work on s...

Page 21: ... Audio CD playback only This function cannot be used during Dialog Speed refer to page 19 DVD SETUP In Setup menu QUICK mode CUSTOM mode and INITIALIZE mode refer to pages 21 23 are available QUICK mode consists of the setting menus frequently used and they are accompanied with mark You can make all settings in CUSTOM mode QUICK Language options are not available with some discs Press the SETUP bu...

Page 22: ...Default 4 3 LETTER BOX Press the Cursor buttons K or L for an item selection then press the ENTER button Select 4 3 LETTER BOX for a black bars appears on top and bottom of the screen Select 4 3 PAN SCAN for a full height picture with both sides trimmed Select 16 9 WIDE if a wide screen TV is connected to the DVD player STILL MODE Default AUTO Press the Cursor buttons K or L for an item selection ...

Page 23: ...ns K or L to select PASSWORD CHANGE then press the ENTER button 3 Enter a new four digit password then press the ENTER button 4 Press the SETUP button to exit 4 1 7 6 5 4 3 2 1 RATINGS RATING LEVEL ALL PASSWORD CHANGE PASSWORD RATINGS Please enter a 4 digit password RATINGS RATING LEVEL ALL 8 7 NC 17 6 R 5 4 PG13 3 PG L This allows you to return all selections of SETUP except for RATINGS to their ...

Page 24: ... Malay 5965 Malayalam 5958 Maltese 5966 Maori 5955 Marathi 5964 Moldavian 5961 Mongolian 5960 Nauru 6047 Nepali 6051 Norwegian NOR 6061 O R Occitan 6149 Oriya 6164 Oromo Afan 6159 Panjabi 6247 Pashto Pushto 6265 Persian 5247 Polish 6258 Portuguese POR 6266 Quechua 6367 Rhaeto Romance 6459 Romanian RUM 6461 Russian RUS 6467 S Samoan 6559 Sangho 6553 Sanskrit 6547 Scots Gaelic 5350 Serbian 6564 Serb...

Page 25: ...ther disc Cancel Ratings control or change the control level Insert a correct disc that plays on this player Reset the player by turning it off then on again Aim the remote control directly at the sensor on the front of the player Reduce the distance to the player Replace the batteries in the remote control Re insert the batteries with their polarities signs as indicated To completely reset the pl...

Page 26: ... 17 3 32 435mm H 2 61 64 75mm D 12 13 64 310mm including protruding parts MASS 5 06 lbs 2 3 kg REMOTE CONTROL UNIT RC 1009 Infrared pulse type Supply DC 3V 2 R6P AA batteries Cleaning the Cabinet Use a soft cloth slightly moistened with a mild detergent solution Do not use a solution containing alcohol spirits ammonia or abrasives Cleaning Discs When a disc becomes dirty clean it with a cleaning c...

Page 27: ... 27 NOTE E61H0UD EN qx3 05 6 3 09 28 Page 27 ...

Page 28: ...nte de una forma Esto es una característica de seguridad Si no puede enchufar completamente la clavija en la toma de corriente inténtelo dándola la vuelta Si sigue sin poder enchufarla póngase en contacto con un electricista para que le cambie la toma de corriente obsoleta No anule la función de seguridad de la clavija polarizada 13 Protección del cable de alimentación El cable de alimentación deb...

Page 29: ...ara consultarlas en el futuro en caso de ser necesario Cuando no utilice el aparato Apáguelo cuando no lo utilice Desenchúfelo de la toma de CA si no va a utilizarlo durante mucho tiempo Desenchúfelo durante las tormentas eléctricas Importante El suministro de alimentación principal se activa cuando la clavija principal se enchufa en una toma de CA 120 V 60 Hz Para utilizar este aparato presione e...

Page 30: ...dad cuando es movido de un lugar frío a un lugar caliente o después de calentar una habitación fría o bajo condiciones de alta humedad No utilice el reproductor DVD por lo menos por 2 horas hasta que su interior esté seco Advertencia acerca del rocío 1 No intente abrir la caja En el interior no hay piezas que usted pueda reparar Solicite todas las reparaciones al personal de servicio cualificado 2...

Page 31: ...s La copia la emisión la muestra al público y el préstamo de los discos sin la debida autorización están prohibidos Este producto incorpora tecnología de protección del copyright que a su vez está protegida por patentes y otros derechos de la propiedad intelectual de los EE UU La utilización de esta tecnología de protección del copyright deberá contar con la autorización de Macrovision y ésta se l...

Page 32: ...den reproducirse Según el estado de grabación de un disco éste puede no reproducirse de ninguna manera o normalmente la imagen o sonido puede no ser continua etc 7 Si queda demasiado espacio de grabación en un disco la parte usada es de menos de 55 mm en total puede no reproducirse correctamente 8 No pegue papel o ponga etiquetas en el disco Pueden dañar el disco y la unidad puede no leerlo correc...

Page 33: ...os niños Detección automática de discos El reproductor detecta automáticamente si el disco introducido es un DVD de Vídeo un CD de Audio un CD MP3 JPEG o WMA Reproducción de discos MP3 Puede disfrutar de archivos MP3 grabados en un CD R RW Búsqueda directa Durante el modo de reproducción o parada puede utilizar los botones numéricos para buscar el título el capítulo o la pista deseados Visualizaci...

Page 34: ...ágina 14 18 Botón ENTER página 14 19 Botones del Cursor página 14 20 Botón RETURN página 16 21 Botón SEARCH MODE página 15 22 Botón h Retroceso rápido página 15 Presione más de 2 segundos cuando utilise los botones del panel frontal para esta función 23 Botón g Avance rápido página 15 Presione más de 2 segundos cuando utilise los botones del panel frontal para esta función 24 Botón SETUP página 22...

Page 35: ... la reproducción Para conectar la alimentación o poner el reproductor en modo de espera Para marca un segmento entre A y B para la reproducción repetida Para repetir la reproducción de un título o capítulo Para establecer el control de la imagen Para activar desactivar el nivel de negro Para activar el sonido 3D sistema de sonido envolvente virtual Para establecer la voz en avance rapido Para ampl...

Page 36: ...dad de control remoto Cambie las pilas por otras nuevas aproximadamente una vez al año aunque esto dependerá de la frecuencia con la que se use la unidad de control remoto Si la unidad de control remoto no funciona a una corta distancia de la unidad principal cambie las pilas por otras nuevas incluso si ha transcurrido menos de un año Las pilas incluidas sólo sirven para verificar el funcionamient...

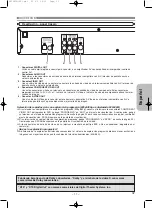
Page 37: ...525i 480i Si su televisor es compatible con la exploración progresiva 525p 480p conecte el televisor a los conectores COMPONENT VIDEO OUT del reproductor DVD y ponga PROGRESIVO en ENC en el ajuste de visualización A continuación ponga su televisor en el modo de exploración progresiva Consulte la página 22 para conocer instrucciones acerca del cambio del ajuste de visualización P SCAN aparece en la...

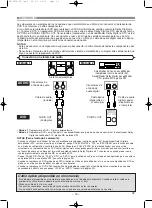
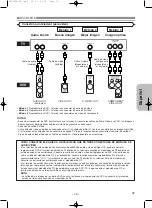
Page 38: ... copyright el sonido digital se muestreará en sentido descendente a 48kHz aunque ponga LPCM en APDO consulte la página 23 AUDIO DVD Conectores de entrada de audio Conectores de entrada de audio digital AUDIO OUT analógico DIGITAL OUT Método 1 Reproductor de DVD Sistema estereofónico Método 2 Reproductor DVD amplificador AV con decodificador incorporado centro de control AV decodificador Dolby Digi...

Page 39: ... de 75 ohmios de su televisor utilizando un modulador de RF audio vídeo estéreo opcional no suministrado Conecte las salidas de audio y vídeo del reproductor de DVD a las entradas de audio y vídeo del modulador de RF y a continuación conecte la salida coaxial del modulador de RF marcada generalmente como TO TV al terminal de antena coaxial de 75 ohmios de su televisor Para más información consulte...

Page 40: ...y no indica mal funcionamiento La operación puede cambiar cuando usted reproduce DVDs con menú de disco Consulte el manual suministrado con el disco para conocer detalles 5 4 3 2 1 WMA JPEG MP3 CD DVD Presione el botón MENU Aparecerá el menú principal del DVD Si la función no está disponible en la pantalla de TV podrá aparecer el símbolo Si el menú está disponible en el disco aparecerá el idioma d...

Page 41: ...adro presione el botón PLAY NOTA Ponga MODO VISTA FIJA en IMAGEN en el menú de visualización si las imágenes quedan borrosas en el modo de pausa consulte la página 22 3 2 1 DVD Reproducción cuadro por cuadro F Esta función permite ampliar la imagen de video y hacer una panorámica de la imagen ampliada con zoom Presione el botón ZOOM durante la reproducción La reproducción continuará Presione repet...

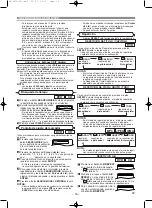
Page 42: ...ón ENTER El título o la pista y el tiempo de reproducción transcurrido aparecerán en la pantalla del televisor Para volver más adelante al marcador presione repetidamente el botón SEARCH MODE durante la reproducción y los botones del Cursor s o B para elegir el marcador deseado y luego presione el botón ENTER Presione el botón SEARCH MODE o RETURN para salir NOTAS Abrir la bandeja del disco descon...

Page 43: ...as veces hasta que aparezca el mensaje PISTA durante la reproducción Para repetir todo el programa presione el botón REPEAT varias veces hasta que aparezca el mensaje TODO durante la reproducción Si se memorizaron ocho pistas o más en un programa utilice el botón SKIP H H o G G para ver todas las pistas Cuando una carpeta está abierta Presione el botón del Cursor B B cuando desea ir a la siguiente...

Page 44: ...ntos de la página anterior El número de pista del elemento actualmente resaltado y las pistas totales se muestran en la parte central inferior de la pantalla Si se muestra G en la parte inferior derecha utilice el botón SKIP G para ver la página siguiente si se muestra H en la parte inferior izquierda utilice el botón SKIP H para ver la página anterior La visualización de todos los elementos del m...

Page 45: ...bién se puede visualizar información de fichas de WMA con un mínimo de 64 caracteres El sistema puede reconocer archivos con extensión Joliet en formato Unicode de hasta 64 caracteres Esta unidad no puede reproducir archivos WMA con protección de copyright Presione el botón DISPLAY durante la reproducción Aparecerá el nombre del archivo que se está reproduciendo Presione el botón DISPLAY otra vez ...

Page 46: ...ncuentra disponible en los discos grabados en el formato Dolby Digital y esta función se puede hacer un poco más rápida o lenta manteniendo la calidad del sonido como el de la reproducción normal Durante la reproducción presione repetidamente el botón MODE hasta que aparezca el ajuste de velocidad de diálogo APDO aparece en la pantalla del televisor Presione el botón ENTER o los botones del Cursor...

Page 47: ...quierdo están activos estéreo L ch sólo el canal izquierdo está activo R ch sólo el canal derecho está activo NOTA El ESTÉREO sólo puede salir cuando se reproducen DTS CD 1 CD Modo de sonido estereofónico Los canales derecho e izquierdo están activos estéreo Sólo el canal izquierdo está activo ESTÉREO L ch R ch Sólo el canal derecho está activo Puede disfrutar del efecto del sonido envolvente con ...

Page 48: ...e 4 3 LETTER BOX para que aparezcan franjas negras en la parte superior e inferior de la pantalla Seleccione 4 3 PAN SCAN para ver la imagen con toda su altura y ambos lados recortados Seleccione 16 9 WIDE si se ha conectado un televisor de pantalla panorámica al reproductor DVD MODO VISTA FIJA Predeterminado AUTO Presione los botones del Cursor K o L para seleccionar un elemento AUTO IMAGEN o CUA...

Page 49: ...EL ACCESO Nivel de clasificación le permite establecer el nivel de clasificación de sus discos DVD La reproducción se detendrá si la clasificación del disco sobrepasa el nivel que usted haya puesto Presione el botón SETUP en el modo de parada Presione los botones del Cursor s o B para seleccionar CUSTOM y luego presione el botón ENTER Presione los botones del Cursor s o B para seleccionar CLASIFIC...

Page 50: ...149 Oriya 6164 Oromo Afan 6159 Pashto Pushto 6265 Persa 5247 Polaco 6258 Portugués POR 6266 Punjabí 6247 Quechua 6367 Rhaeto Romance 6459 Romano RUM 6461 Ruso RUS 6467 S Samoano 6559 Sangho 6553 Sánscrito 6547 Serbio 6564 Serbocroata 6554 Sesotho 6566 Setswana 6660 Shona 6560 Sindhi 6550 Siswat 6565 Somalí 6561 Suahili 6569 Sueco SWE 6568 Sundanese 6567 T Tagalo 6658 Tailandés 6654 Tajik 6653 Tami...

Page 51: ...ión de control acceso o cambie el nivel de acceso Cargue un disco que pueda reproducirse en este reproductor Apague y vuelva a encender el reproductor para reinicializarlo Apunte el control remoto directamente hacia el sensor del panel delantero del reproductor Disminuya la distancia al reproductor Cambie las pilas del control remoto Vuelva a instalar las pilas observando la polaridad correcta sig...

Page 52: ...64 310mm incluyendo las partes salientes PESO 5 06 lbs 2 3 kg UNIDAD DE CONTROL REMOTO RC 1009 Impulsos infrarrojos Alimentación DC 3 V 2 pilas R6P AA ESPECIFICACIONES Limpieza de la cubierta Use un paño suave ligeramente humedecido en una solución de detergente suave No utilice una solución que contenga alcohol gasolina amoníaco o sustancias abrasivas Limpieza de los discos Cuando un disco esté s...

Page 53: ... 27 NOTE E61H0UD SP qx3 05 6 3 09 33 Page 27 ...

Page 54: ...TOKYO JAPAN www denon com 1VMN21037 E61H0UD Printed in China 00D 511 4341 003 Denon Brand Company D M Holdings Inc E61H0UD EN qx3 05 6 3 09 28 Page 28 ...

Reviews: