4
Features
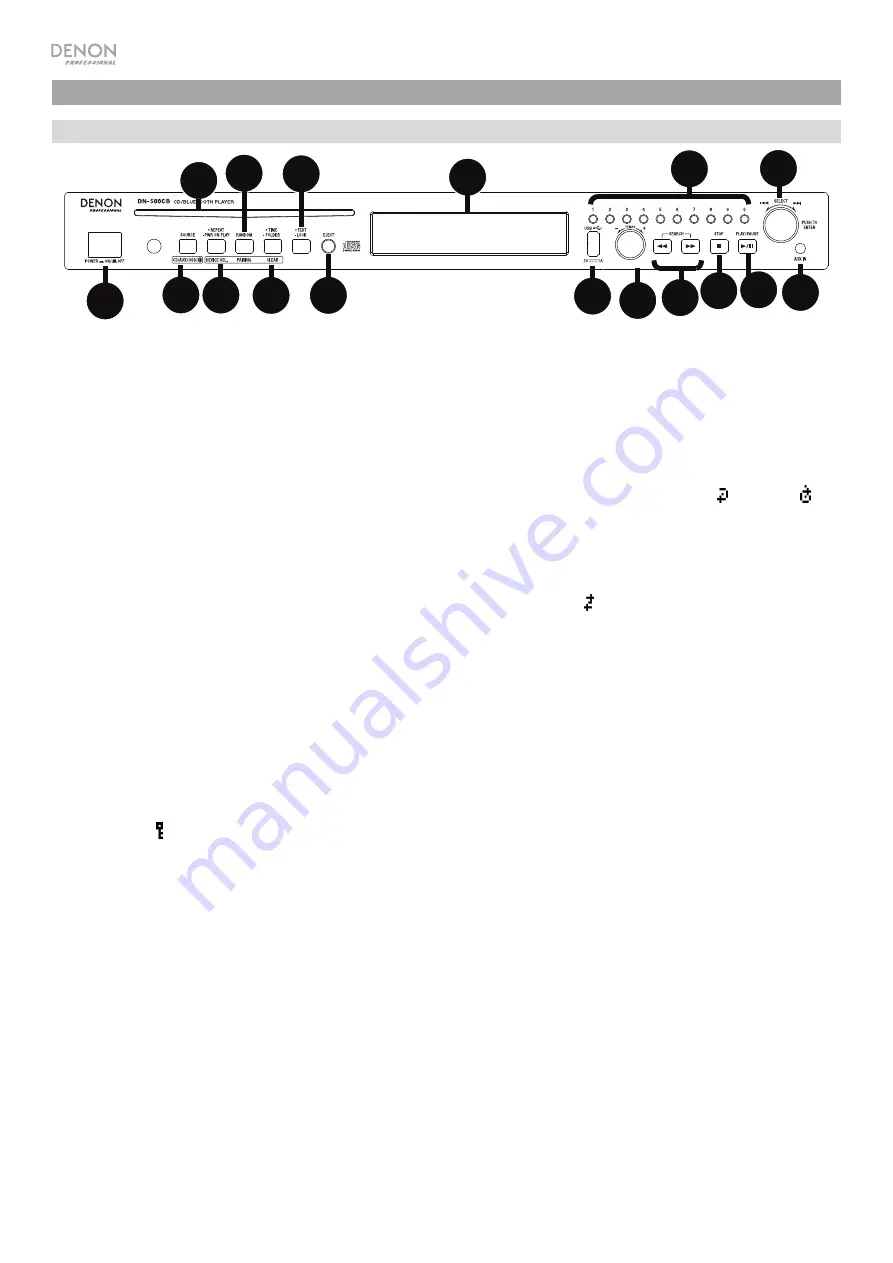
Front Panel
1.
Power Button:
Press this button to turn the unit on or off. Make sure the
AC In
is properly connected to a power outlet. Do not turn the unit
off during media playback—doing so could damage your media.
2.
Aux In:
Connect an optional device to this input using a 1/8” (3.5mm) TRS cable. See
Operation
>
Playing Audio from an External Device
for more information.
3.
USB Port:
Connect a mass-storage-class USB device to this port.
4.
CD Slot:
Insert a CD into this slot. See
Operation
>
Playing Audio CDs
for more information.
5.
CD
/
AUX
/
USB/BT Button:
Press this to enter Media Selection screen. See
Operation
>
Selecting Media Playback Mode
for more
information.
6.
Repeat Button:
In CD or USB Mode, press this button to switch between Repeat Playback modes:
Repeat One
,
Repeat All
, and
Repeat Off
. See
Operation
>
Playing Audio CDs
for more information.
Power-On Play Button:
Press and hold this button to turn Power-On Play on or off. See
Operation
>
Additional Functions
>
Power-On
Play
for more information.
Device Select:
When in Bluetooth mode,
press the Device Sel. button. The screen will show “BT Device List". Use the
Jog Dial
to navigate
through the list of Bluetooth devices. When you find one you want to pair to, select it by pressing the
Jog Dial
.
7.
Random Button:
In CD or USB Mode, press this button to cycle through Random Play Mode and Single Play Mode (
).
Pairing:
When Bluetooth mode is selected, the device will automatically enter pairing mode. To disconnect from a paired Bluetooth device,
press and hold the Pairing button for 1.5 seconds. If you have set a custom Bluetooth pairing password, it is required to input this password
before pairing. If a custom password was not set, (factory default: 0000) it is not required to input the password.
8.
Time Button:
In CD or USB Mode, press this button to switch the Time Mode in the
display
. See
Operation
>
Playing Audio CDs
for more
information.
Folder:
When in USB mode,
hold this button to switch to Folder View.
Clear:
In Bluetooth mode,
press and hold the Clear button to remove all paired devices from the unit’s memory (and also unpair from a
currently paired device). After the devices have been cleared from the unit’s memory, to connect again to the same device, go to your
Bluetooth device and select “Unpair” or “Forget the Device”, depending on the type of device that you have. You can then select DN-500CB
from your list of Bluetooth devices and connect.
9.
Text Button:
In CD or USB Mode, press this button to switch the display between the track name and artist name.
Lock Button :
Press and hold this button to turn Panel Lock on and off. See
Operation
>
Additional Functions
>
Panel Lock
for more
information.
10.
Eject Button:
Press this to eject the CD in the CD slot.
To force-eject a CD, power off the unit, then press and hold the eject button while
powering the unit back on. To exit force-eject mode, turn the unit off.
11.
Display:
This screen indicates the unit’s current operation. See
Display
for more information.
12.
Tempo Control:
In CD or USB Mode, turn the knob to adjust the tempo of the audio playback in a range from -15% to +15%. Press the
knob to turn Tempo Lock on and prevent changes to the tempo setting. Press the knob again to turn off Tempo Lock.
13.
Search Buttons:
In CD or USB Mode, press and hold one of these buttons to rewind/fast-forward. The track will rewind/fast-forward at
5
times the normal playback speed.
14.
Stop Button:
Press this button to stop playback. To view current firmware version, hold the stop button while powering on the unit.
15.
Play
/
Pause Button:
Press this button to start, resume, or pause playback.
16.
Number Buttons
(
0
–
9
)
:
In CD Mode, Press one of these buttons to directly select a track to play. If the track number is two digits, press the
buttons in succession (e.g.,
1
then
2
for Track 12).
17.
Jog Dial:
Turn this dial to browse the options shown in the display. Press this dial to confirm a selection. In CD and USB mode this is used to
browse and select tracks.
1
2
3
5 6 8
10
11
16
12 13 14 15
17
4 7
9


