3
Features
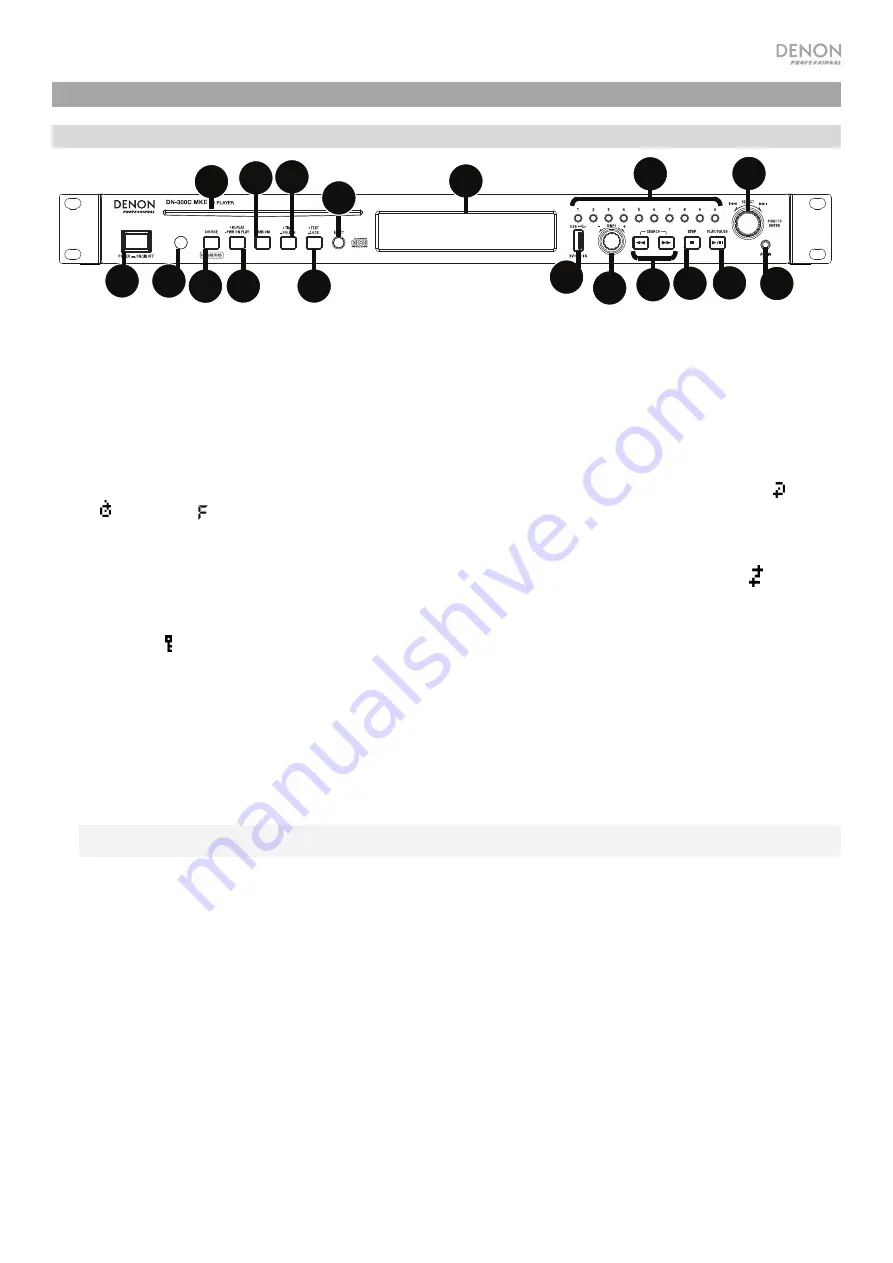
Front Panel
1.
Power Button:
Press this button to turn the unit on or off. Make sure the
AC In
is properly connected to a power outlet. Do
not turn the unit off during media playback—doing so could damage your media.
2.
Aux In:
Connect an optional device to this input using a 1/8” (3.5mm) TRS cable. See
Operation
>
Playing Audio from an
External Device
for more information.
3.
USB Port:
Connect a mass-storage-class USB device to this port.
4.
CD Slot:
Insert a CD into this slot. See
Operation
>
Playing Audio CDs
for more information.
5.
Source:
Press this to enter Media Selection screen. See
Operation
>
Selecting Media Playback Mode
for more information.
6.
Repeat Button:
In CD or USB Mode, press this button to switch between Repeat Playback modes:
Repeat One
,
Repeat
All
,
Repeat FLD
(folder), and
Repeat Off
. See
Operation
>
Playing Audio CDs
for more information.
Power-On Play Button:
Press and hold this button to turn Power-On Play on or off. See
Operation
>
Additional Functions
>
Power-On Play
for more information.
7.
Random Button:
In CD or USB Mode, press this button to cycle through Random FLD/Random Play Mode
, Single Play
Mode
S,
and Normal Play Mode.
8.
Text Button:
In CD or USB Mode, press this button to switch the display between the file name and other text information.
Lock Button :
Press and hold this button to turn Panel Lock on and off. See
Operation
>
Additional Functions
>
Panel
Lock
for more information.
9.
Time Button:
In CD or USB Mode, press this button to switch the Time Mode in the
display
. See
Operation
>
Playing Audio
CDs
for more information.
Folder Button:
Press and hold this button to select a folder.
10.
Eject Button:
Press this to eject the CD in the CD slot. To force-eject a CD, power off the unit, then press and hold the eject
button while powering the unit back on. To exit force-eject mode, turn the unit off.
11.
Display:
This screen indicates the unit’s current operation. See
Display
for more information.
12.
Remote Sensor:
Point the remote control at this sensor when operating it. See
Remote Control
>
Operating Range
for
more information.
Note:
If the
remote sensor
is exposed to direct sunlight, strong artificial light (like from an interverter-type fluorescent lamp),
or infrared light, the unit or remote control may not function properly.
13.
Search Buttons:
In CD or USB Mode, press and hold one of these buttons to rewind/fast-forward. The track will rewind/fast-
forward at
5
times the normal playback speed.
14.
Stop Button:
Press this button to stop playback. To view current firmware version, hold the stop button while powering on
the unit.
15.
Play
/
Pause Button:
Press this button to start, resume, or pause playback.
16.
Number Buttons
(
0
–
9
)
:
In CD Mode, Press one of these buttons to directly select a track to play. If the track number is two
digits, press the buttons in succession (e.g.,
1
then
2
for Track 12). See
Operation
>
Playing Audio CDs
for more
information.
17.
Jog Dial:
Turn this dial to browse the options shown in the display. Press this dial to confirm a selection. In CD and USB
mode this is used to browse and select tracks.
18.
Tempo Control:
In CD or USB Mode, turn the knob to adjust the tempo of the audio playback in a range from -15% to
+15%. Press the knob to turn Tempo Lock on and prevent changes to the tempo setting. Press the knob again to turn off
Tempo Lock.
1
2
3
5 6
8
10
11
16
12
13 14 15
17
4 7 9
18


