


5
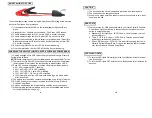
5. Attach output cables to the battery and chassis as indicted below. Never
allow the output clamps to touch one another.
a) Check the battery level of the Jump Pack.
b) Insert the smart alligator clip connector into the end of the Jump Pack.
c) Connect the RED positive clip to the positive post on the battery, then
the BLACK negative clip to the negative post on the battery.
d) If connected correctly the LED should turn green. Wait 5 to 10 seconds
then start your vehicle.
e) Remove the clips immediately after the vehicle has started.
CAUTION
1) Do not immerse in water.
2) Do not use or store the VEHICLE JUMP STARTER
near sources of fire or
heater.
3) Do not put the VEHICLE JUMP STARTER
into a fire or apply direct heat to
it.
4) Do not pierce the VEHICLE JUMP STARTER
casing.
5) Do not strike, throw, or subject the VEHICLE JUMP STARTER
to severe
physical shock.
6) Do not attempt to modify the VEHICLE JUMP STARTER
in any way.
7) Do not place the VEHICLE JUMP STARTER
in a microwave oven or
pressurized container.
8) Do not use the VEHICLE JUMP STARTER if it gives off an odor or
generates heat
9) Do not insert any metal object into the cable input opening as this could
cause a spark and electric shock.
10) Do not use the VEHICLE JUMP STARTER
as a battery charger or power
supply.
6
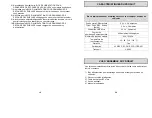
PRODUCT SPECIFICATIONS
Vehicle Jump Starter & Portable Power Bank
Standard USB Output port
5VDC, 2.4Amp
Type – C USB, In (Out) port
5VDC, 3Amp
Micro USB Input port
5VDC, 2Amp
Start Current/Peak Current
400Amp/800Amp
Model Part Number
030-1010-CA
Operating Temperature
-4 -140°F (-20 - 60°C)
Warranty
1 year
Certification
UL 2743, CEC, DOE, FCC, ICES-001
Transportation
UN38.3
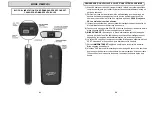
PRODUCT OVERVIEW
Below is a list of items that should be included in your retail box:
1) Vehicle Jump Starter & Portable Power Bank
2) Smart Alligator Clips
3) Micro USB Charging Cable
4) Carry Bag
5) Instruction Manual