background image


Chapter 1 Introduction   

Chapter 2 System Standard Items   

One HDMI camera, 
 
One 12V/2A power adapter, 
 
One HDMI cable (2-meters length), 
 
One SD card (16Gb capacity, class 10), 
 
One mouse (with 1.5-meters cable), 


One USB2.0 cable (gold plated connector).   


1. 

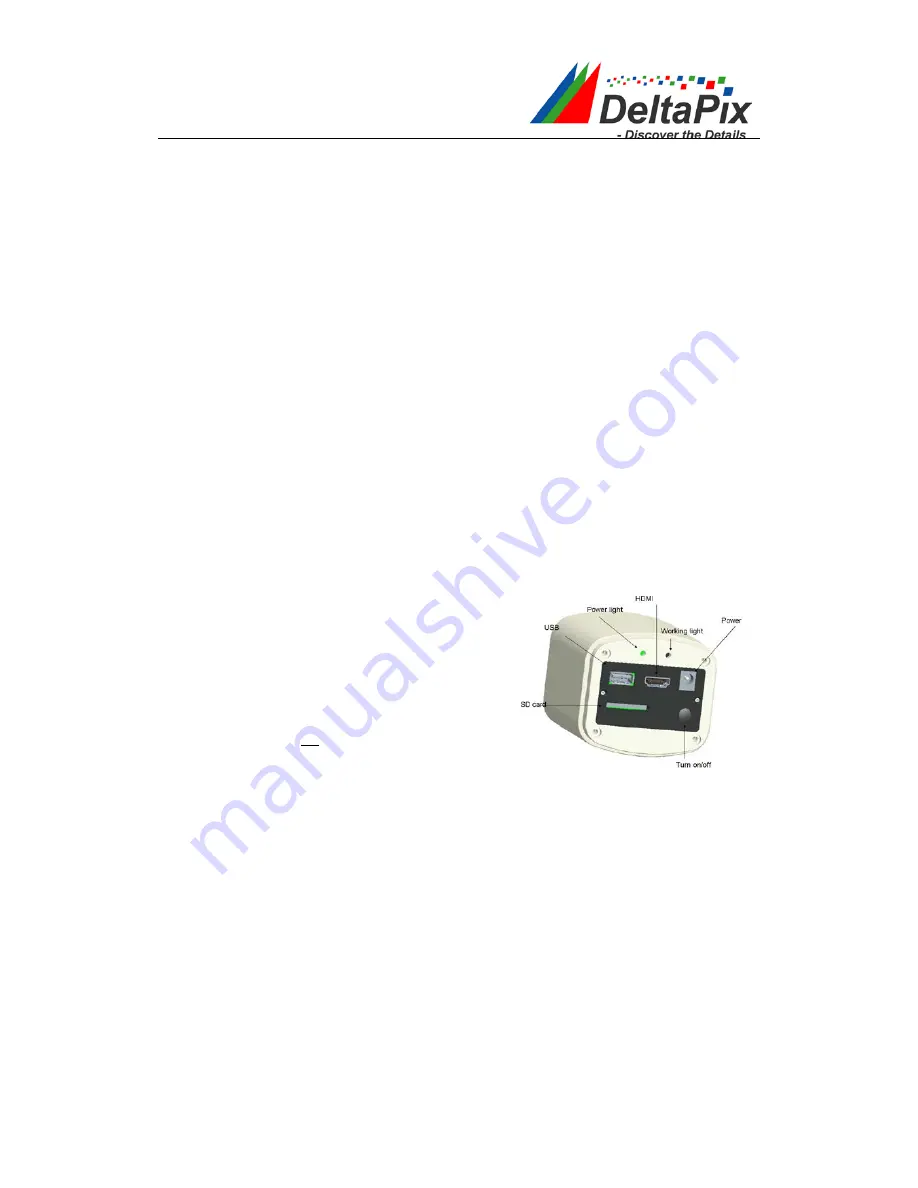
USB interface


A: Connect a mouse to the USB port. Use the 
mouse to control the camera directly. 
 
B: Connect the USB port to the PC to make 
the camera work as a 

Driver-Free

  camera. 

Use  InSight Basic  software  with dongle  to 
control it (similar as  to  using the other USB 
cameras). 
 

Note: No driver installation is needed when connecting a/the HDMI camera to 
a/the PC via USB port. 
 

HDMI interface


Use the HDMI cable to connect a/the HDMI camera to the monitor. Image data 
is transferred and displayed on the monitor according to the HDMI protocol. 
 
3. 

Power interface


Please use the provided 

12V/2A

 power supply. When power is plugged in, the 

red light is on. When the camera is turned on, the blue light is on. 
 
4.

ON/OFF key


Press and hold

 the ON/OFF key until the blue light is on or off to turn the HDMI 

Summary of Contents for HDMI16MDPX

Page 1: ...performance please familiarize yourself fully with the use of this camera We recommend that you read the manual thoroughly before operating the camera Chapter 1 Introduction 2 Chapter 2 System Standa...

Page 2: ...a Use InSight Basic software with dongle to control it similar as to using the other USB cameras Note No driver installation is needed when connecting a the HDMI camera to a the PC via USB port HDMI i...

Page 3: ...left the factory It is used to avoid the dust accumulation during transportation Chapter 3 HDMI Operation Step 1 Connect the camera 1 Plug in the 12V 2A power supply Use the HDMI cable to connect the...

Page 4: ...side of the screen Capture and Setting icons will appear See image 1 Click Setting to get parameter setting menu See image 2 Image 1 Image 2 Selectable languages choose between English Chinese German...

Page 5: ...5 Step 3 Move the cursor to the right side of the screen When moving the cursor to the left side of the screen calibration and viewing settings menu will appear See image 3 Image 3...

Page 6: ...ication in and it can also fill in user defined Mag value if needed a This data only needs to be entered if the user wishes to use the same camera to capture images at different objective settings and...

Page 7: ...7 groups of calibration files 5 Click to complete the calibration settings 6 Click to go to the image measurement page 7 Right click anywhere on the live image to get the measurement menu...

Page 8: ...8 1 Scale Bar Turn the scale bar on off on the image...

Page 9: ...ric circles 10 Bicircle Get the distance between the center points of two circles 11 Angle Measure angles 12 Setting 1 Set the measurement line width color and font color 2 Magnifier On off Switch the...

Page 10: ...k the photo album and videos 1 Check the album and delete the pictures you do not wish to keep 2 Check the video and delete the video you do not wish to keep To delete videos successfully make sure it...

Page 11: ...ll DeltaPix Insight 2 Connect the dongle to a USB port 3 Use USB cable to connect the HDMI camera to the PC 4 Plug in the 12V 2A power supply Press and hold the ON OFF key until the blue light is on t...

Page 12: ...sor please DO NOT open the camera or attempt to clean it Please contact our support team to get further advice Maintenance please contact DeltaPix customer support team for any maintenance if needed C...

Reviews: