Delta VIVOTEK SUPREME MA9322-EHTVL User Manual Download Page 55


VIVOTEK


User's Manual - 55  

Configuration

Click 

Configuration

 on the main page to enter the camera setting pages. Note that only 

Administrators can access the configuration page. 

VIVOTEK provides an easy-to-use user interface that helps you set up your network camera 

with minimal effort. In order to simplify the user interface, detailed information will be hidden 

unless you click on the function item. When you click on the first sub-item, the detailed 

information for the first sub-item will be displayed; when you click on the second sub-item, the 

detailed information for the second sub-item will be displayed and that of the first sub-item will 

be hidden. 

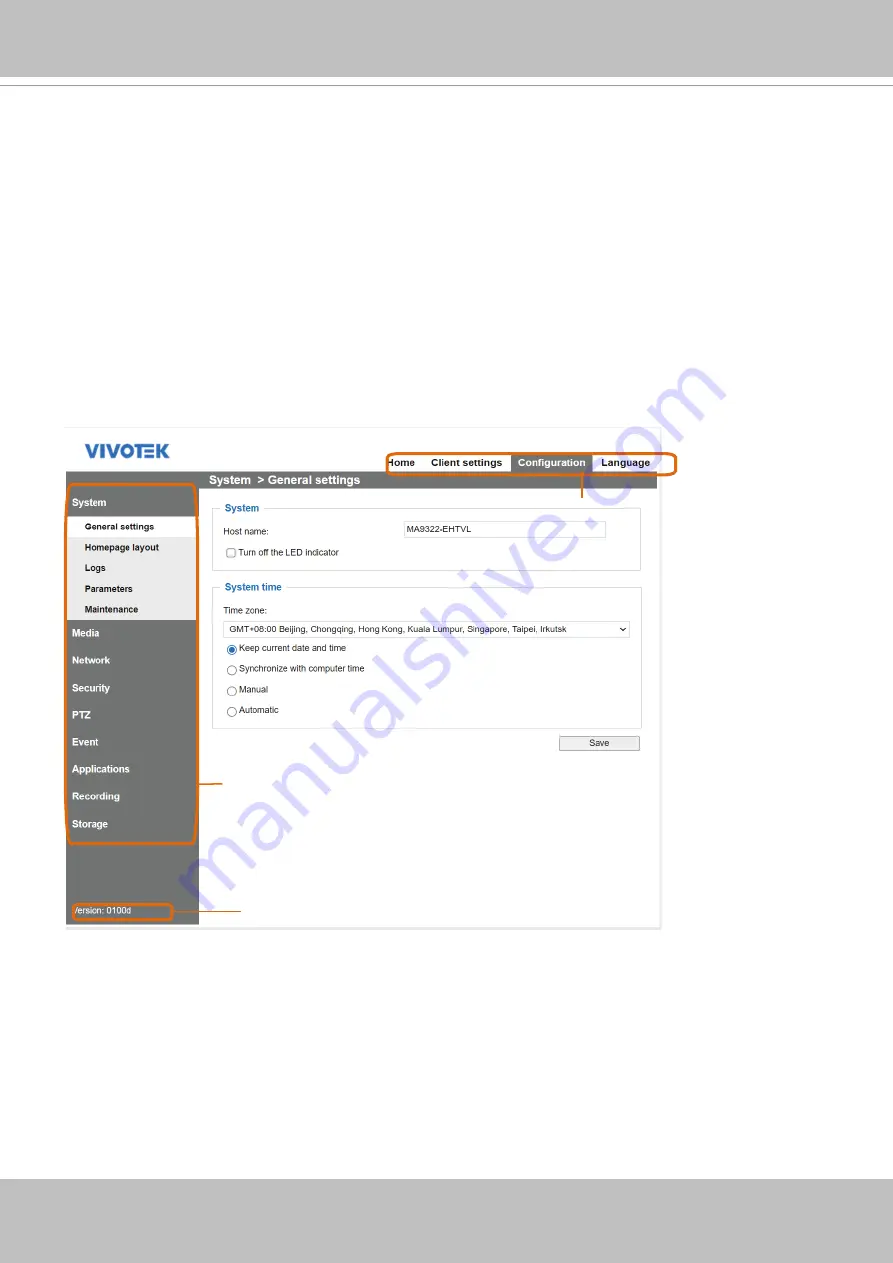
The following is the interface of the main page:

Each function on the configuration list will be explained in the following sections. 

The Navigation Area provides access to all different views from the 

Home

 page (for live viewing), 

Configuration

 page, and multi-language selection.

Configuration List

Firmware Version

Navigation Area

Summary of Contents for VIVOTEK SUPREME MA9322-EHTVL

Page 1: ...User s Manual MA9322 EHTVL Panoramic Multi sensor Network Camera 20MP 360 Surround View IP66 IK10 Remote Focus SNV Smart Stream III PoE 40 C 60 C Wide Operating Temperature Rev 1 0...

Page 2: ...l settings 56 System Homepage layout 59 System Logs 62 System Parameters 65 System Maintenance 66 Media Image 70 Media Video 83 Media Video 85 Media Audio 94 Media profiles 96 Network General settings...

Page 3: ...emote focus lens and 3 axis design along a circular track to enable full 360 coverage This enables the MA9322 EHTVL to capture every angle for comprehensive video coverage from a single IP address mak...

Page 4: ...rward for those who have basic networking knowledge It is designed for various applications including video sharing general security surveillance etc The Configuration chapter suggests ways to best ut...

Page 5: ...Check images for correct field of view pan tilt and zoom focus and adjust as necessary 4 Check and replace the Micro SD memory card as needed Stop edge recording before removing the Micro SD memory c...

Page 6: ...For PoE connection use only UL listed I T E with PoE output 1 La cam ra ne doit tre raccord e qu des r seaux PoE sans routage vers des installations ext rieures 2 Pour les raccordements PoE utilisez u...

Page 7: ...tions PTZ output relay etc and get and set internal parameter values The image and CGI requests are handled by the built in Web server To send URL commands in the address bar of your web browser pleas...

Page 8: ...facilitae an installation function or process WARNING or IMPORTANT These statements indicate situations that can be dangerous or hazardous to the machine or you Electrical Hazard This statement appear...

Page 9: ...le 3 axis adjustable Slide track Microphone contacts J14 header Reset button Status LEDs Through holes for ceiling mount or AM 21C Top mounting plate Threaded holes for AM 529 Safety tether wire J8 he...

Page 10: ...VIVOTEK 10 User s Manual MicroSD card slot For the installation using optional accessories refer to the Optional Accessories Installation Guide IR LED contacts...

Page 11: ...et cables compliant with the 3P ETL standard The camera is able to operate in low temperature environments However when starting these cameras in a very low temperature condition e g 40 C the embedded...

Page 12: ...its remote focus lenses the lens modules can be aiming at different areas at different distances Below are some sample scenarios with lenses shooting directions adapted to them The Zoom function is f...

Page 13: ...VIVOTEK User s Manual 13 3 3 2 1 4 1 When installed at a corner one of its lens can be turned facing downward to cover the area directly underneath the camera...

Page 14: ...ing Refer to the following discussion for more on pendant mount pole mount and corner mount options See the installation details below for how to install the camera to a ceiling 2 Open the dome cover...

Page 15: ...se button Turn the camera counter clockwise and then lift it off the mounting plate 2 3 1 4 Remove the waterproof connectors If you do not need to route I O wires leave the plastic cap in place If you...

Page 16: ...s Manual 6 Attach the alignment sticker to a position you prefer Drill screw holes and a routing hole 64GB 10 I 1 5 Install a MicroSD card if onboard storage is preferred P N 621065800G 160mm Cable h...

Page 17: ...User s Manual 17 7 Route cables through the routing hole and secure the top mounting plate to ceiling by driving the included screws 8 Connect the safety tether wire to the latch anchor on the mountin...

Page 18: ...er s Manual 9 Connect a ground wire to the grounding screw on top of the mounting plate 10 Pass an Ethernet cable through the cable gland through hole M4 20AWG Equipment box Equipment enclosure Equipm...

Page 19: ...User s Manual 19 11 Secure the camera to the mounting plate by aligning and turning clock wise The camera will snap into place 26mm hex socket 12 Install and tighten the components of the waterproof c...

Page 20: ...he Ethernet cable to the RJ45 connector Pass the I O combo cable if applied through the routing hole and attach a rubber seal ring Install the combo cable with the white headers inside the camera and...

Page 21: ...Carefully route the cables along the the camera base On the outside of the cameras the I O wires connection should be protected against moisture by using putties GPIO AC 24V Ext MIC IN Audio Out J9 J1...

Page 22: ...wered up try find the camera using VIVOTEK s Shepherd utility Double click on the camera s entry on Shepherd to open a web console to the camera A browser session will open The program will search for...

Page 23: ...helps you locate and configure your Network Camera in the local network If your camera comes without the CD go to VIVOTEK s website and locate the utility in the Downloads Software page 15 1 Run the S...

Page 24: ...709 MAC 0002D1730202 Ro HS 15 3 The program will search for all VIVOTEK network devices on the same LAN 15 4 After a brief search the installer window will prompt Click on the MAC and model name that...

Page 25: ...Another prompt will request for the password you just configured Enter the password and then you can start configure your camera and see the live view 16 2 Enter the combination of alphabetic and nume...

Page 26: ...r the area of your interest you can check the live view at the installation site at a position of your estimation 17 With a live view displayed on your laptop you can adjust the lens shooting directio...

Page 27: ...ction up or down or rotate the module to cover the area of your interest Note that you do not need any tools when changing the lens shooting direction When adjusting the shooting angle please avoid to...

Page 28: ...Zoom in on the individual lens if necessary The automated focus function can help you acquire the best image 1 2 2x Zoom 6x Zoom 19 Replace the 2 desiccant bags on the sides of the camera This ensures...

Page 29: ...e cover the center of the VIVOTEK logo and align with the alignment mark on the camera body Aim and then turn clockwise T10 x8 21 Secure the dome cover by fastening the T10 anti tamper screws You may...

Page 30: ...tch the indent with VIVOTEK logo If you need to open the dome cover you need to remove the IR cover first Use a medium size flat blade screwdriver as a lever Find the small access holes on the side an...

Page 31: ...lDevice ExternalDC power Dry contact with external DC power source to supply a relay Dry contact is the safest connection to protect devices NC NO Relay Photo Coupler DC DC 0V DC 0V ExternalAC power w...

Page 32: ...be taken in consideration The diagram uses a relay to control the ON OFF condition of the AC device 3 An external relay can be triggered by using DO or by an external power source depending on the ty...

Page 33: ...power injector optional to connect between the Network Camera and a non PoE switch Non PoE Switch PoE Power Injector optional NOTE 1 The camera is only to be connected to PoE networks without routing...

Page 34: ...ease forward the following ports for the Network Camera on the router HTTP port default is 80 RTSP port default is 554 RTP port for video default is 5556 RTCP port for video default is 5557 If you hav...

Page 35: ...22 146 57 120 8000 If you change the port numbers on the Network configuration page please open the ports accordingly on your router For example you can open a management session with your router to c...

Page 36: ...e web console enter Configuration Applications Package management and click on Trend Micro IoT Security Turn on the protection to fend off cyber attacks In here you can let the camera automatically up...

Page 37: ...hould be able to see live video from your camera You may also install the 32 channel recording software from the software CD in a deployment consisting of multiple cameras For its installation details...

Page 38: ...LAN If your network environment is not a LAN follow these steps to access the Netwotk Camera 1 Launch your web browser e g Microsoft Internet Explorer or Mozilla Firefox 2 Enter the IP address of the...

Page 39: ...ection please refer to Security on page 118 If you see a dialog box indicating that your security settings prohibit running ActiveX Controls please enable the ActiveX Controls for your browser 1 Choos...

Page 40: ...y a 32 bit IE browser will be opened IMPORTANT 1 The onscreen Java control can malfunction under the following situations A PC con nects to different cameras that are using the same IP address or the...

Page 41: ...554 please set the RTSP port to 554 For more information please refer to RTSP Streaming on page 106 For example 4 The live video will be displayed in your player For more information on how to configu...

Page 42: ...is limited you will not be able to use a large video size Please set the video streaming parameters as listed below For more information please refer to Stream settings on page 84 Video Mode H 264 Fr...

Page 43: ...ol you may try to remove the plug ins that might have been installed on your computer Remove the following folder C Program Files x86 Camera Stream Controller 2 If you forget the root administrator pa...

Page 44: ...se refer to System on page 56 Camera Control Area Stream profile This Network Camera supports multiple streams simultaneously You can select any of them for live viewing Each profile corresponds to on...

Page 45: ...the hide button to hide or display the control panel Resize Buttons Click the Auto button the video cell will resize automatically to fit the monitor Click 100 is to display the original homepage siz...

Page 46: ...ew Click on this item to display the Global View window The Global View window contains a full view image the largest frame size of the captured video and a floating frame the viewing region of the cu...

Page 47: ...it the web browser video recording stops accordingly To specify the storage destination and file name please refer to MP4 Saving Options on page 51 for details Volume When the Mute function is not act...

Page 48: ...om an external microphone you may need to enable the audio input from Media Audio Refer to page 94 for more information Mute Turn off the Mic volume on the local computer The button becomes the Mic On...

Page 49: ...ore information please refer to Media Image on page75 Title and Time Video title and time can be stamped on the streaming video For more information please refer to Media Image on page 75 Video Contro...

Page 50: ...ecting to the server takes up additional bandwidth and the Network Camera allows up to ten simultaneous accesses UDP multicast This protocol allows multicast enabled routers to forward network packets...

Page 51: ...and time to the end of the file name Local Streaming Buffer Time In the case of encountering unsteady bandwidth live streaming may lag and video streaming may not be very smoothly If you enable this o...

Page 52: ...ck menu If your joystick is not detected if may be defective 2 Click Calibrate or Configure buttons to configure the joystick related settings If you want to assign Preset actions to your joystick the...

Page 53: ...The number of buttons may differ from different joysticks Please follow the steps below to configure your joystick buttons 1 Choosing one of the actions and click Assign will pop up a dialog Then you...

Page 54: ...not sure of the locations of each button use the Properties window in the Game Controllers utility Tips 3 Click the Assign button to assign an action to the button You can delete an association by sel...

Page 55: ...on item When you click on the first sub item the detailed information for the first sub item will be displayed when you click on the second sub item the detailed information for the second sub item wi...

Page 56: ...inished with the settings on this page click Save at the bottom of the page to enable the settings System Host name Enter a desired name for the Network Camera The text will be displayed at the top of...

Page 57: ...at the camera must have the access to the Internet Update interval Select to update the time using the NTP server on an hourly daily weekly or monthly basis Time zone Select the appropriate time zone...

Page 58: ...The format is TZ local_timezone date time date time Here date is in the Mm n d format where Mm 1 12 for 12 months n 1 5 1 for the first week and 5 for the last week in the month d 0 6 0 for Sunday an...

Page 59: ...age using the default settings Follow the steps below to upload a new logo 1 Click Custom and the Browse field will appear 2 Select a logo from your files 3 Click Upload to replace the existing logo w...

Page 60: ...you to choose from The new layout will simultaneously appear in the Preview filed Click Save to enable the settings Font Color of the Video Title Background Color of the Video Area Frame Color Font C...

Page 61: ...ou want to change the color on the right column 3 The palette window will pop up as shown below 4 Drag the slider bar and click on the left square to select a desired color 5 The selected color will b...

Page 62: ...ver 3 When completed click Save to enable the setting You can configure the Network Camera to send the system log file to a remote server as a log backup Before utilizing this feature it is suggested...

Page 63: ...age Email GSM Modem HTTP Digital output VIVOCloud PTZ Deterrent FTP You can install the included VAST recording software which provides an Event Management function group for delivering event messages...

Page 64: ...g is stored in the Network Camera s buffer area and will be overwritten when reaching a certain limit VADP log VADP log contains the information for the onboard VADP packages including memory usage mo...

Page 65: ...VIVOTEK User s Manual 65 System Parameters The View Parameters page lists the entire system s parameters If you need technical assistance please provide the information listed on this page...

Page 66: ...ll see Reboot system now This connection will close After that re access the Network Camera The following message is displayed when the upgrade has succeeded The following message is displayed when yo...

Page 67: ...er s Manual 67 IMPORTANT Through extensive use temporary files may accumulate that disable a firmware upgrade You can use the Clean up function in the Application Package management window to solve th...

Page 68: ...the lens focus position using the previously saved position parameters If none of the options is selected all settings will be restored to factory default The following message is displayed during the...

Page 69: ...lick to export the current server status report such as time logs parameters process status memory status file system status network status kernel message and so on Tips If a firmware upgrade is accid...

Page 70: ...mouse wheel inside the live viewing window and the maximum zoom in will be up to 4 times Position of timestamp and video title on image Select to display time stamp and video title on the top or at th...

Page 71: ...n a vertical side facing or tilted surface in order to accommodate the interior or exterior design of a building The interior of a building can be shaped as a narrow rectangular space such as a corrid...

Page 72: ...Network Camera switches off the IR cut filter at all times for the sensor to accept infrared light thus helping to improve low light sensitivity Synchronize with digital input The Network Camera autom...

Page 73: ...n is more beneficial when the spot of intrusions or an object of your interest is close to the lens and the IR lights For example if an intruder has a chance of getting near the range of 3 meters Smar...

Page 74: ...the Smart IR s calculation of light level To solve this problem you can place an Exposure Exclude window on an unavoidable object in the Exposure setting window See page 77 for how to do it You can a...

Page 75: ...being measured You may also manually tune the color temperature by pulling the RGain and BGain slide bars Image Adjustment Brightness Adjust the image brightness level which ranges from 0 to 100 Contr...

Page 76: ...enable noise reduction in order to reduce noises and flickers in image This applies to the onboard 3D Noise Reduction feature Use the pull down menu to adjust the reduction strength Note that applying...

Page 77: ...ion allows users to configure measurement window s for low light compensation For example where low light objects are posed against an extremely bright background You may want to exclude the bright su...

Page 78: ...calculated out of the remaining of the inclusive window BLC Back Light Compensation This option will automatically add a weighted region in the middle of the window and give the necessary light compe...

Page 79: ...monitor fast changing lighting conditions For example the camera may need to monitor a highway lane or entrance of a parking area at night where cars passing by with their lights on can bring fast cha...

Page 80: ...m the automated Focus function 1 Select a Channel one of the 4 sensors 2 Select from the bottom of the screen whether you want to perform focus adjustment on the Full view or within a Custom focus win...

Page 81: ...w window 3 You can use 4 mouse clicks to create a new masking window You can pull the corner marks to adjust the coverage 4 Enter a Window Name such as Neighbor s window 5 Click Save to preserve the s...

Page 82: ...rawn the numbers of pixels on the sides of windows will appear This allows you to calculate if your current configuration fulfills a requirement for instance for recognizing the faces of persons passi...

Page 83: ...5 Megapixel 4 3 MAX 12fps WDR Pro This is the full resolution at 5 megapixels in a 4 3 screen aspect ratio with the WDR function enabled 4 Megapixel 16 9 MAX 30fps WDR Pro This is the full resolution...

Page 84: ...ze for Stream 2 is set to the 1280 x 960 Click Viewing Window to open the viewing region settings page On this page you can configure the Region of Interest and the Output Frame Size for a video strea...

Page 85: ...e e PTZ function please refer to page 133 Output Frame Size Size of the Live View Window Region of Interest Viewing Region NOTE Please follow the steps below to configure the settings for a stream 1 S...

Page 86: ...fferent viewing devices For example set a smaller frame size and lower bit rate for remote viewing on mobile phones and a larger video size and a higher bit rate for live viewing on web browsers or re...

Page 87: ...I Static scene Activities P P P P I P P P P P P P I P P P P P P P I By dynamically prolonging the intervals for I frames insertion to up to 10 seconds the bit rates required for streaming a video can...

Page 88: ...n motions occur the encoding returns to normal to deliver real time streaming f1 f1 f1 f1 f5 f5 f5 f5 f9 f1 f1 f3 f4 f5 f6 f7 f8 f9 Motions Occur By queuing the old frames from a static scene both the...

Page 89: ...objects move in that area The remainder of the screen where there are no moving objects no pixel changes will still be transmitted in low quality format Manual The Manual mode allows you to configure...

Page 90: ...e Manual mode the non interested area is always transmitted using a low quality format regardless of the activities inside You should also select the Maximum bit rate from the pull down menu as the th...

Page 91: ...a will strive to deliver video streams around or within the bit rate limitation you impose Policy If Frame Rate Priority is selected the Network Camera will try to maintain the frame rate per second p...

Page 92: ...idth For example in low light conditions where a Fixed quality setting is applied video packet sizes can tremendously increase when noises are produced with electrical gains You may also manually ente...

Page 93: ...for smoother video quality If the power line frequency is set to 50Hz the frame rates are selectable at 1fps 2fps 3fps 5fps 7fps 10fps and up to 25fps If the power line frequency is set to 60Hz the f...

Page 94: ...connected via the I O combo cable Internal microphone input gain Select the gain of the external audio input according to ambient conditions Adjust the gain from 0 to 100 External microphone input gai...

Page 95: ...an audio clip if available Because the memory space is limited a recording count down will be available on screen You can also upload an audio file to the camera s flash memory With amplified speaker...

Page 96: ...for each of the 3 default profiles Max view Recording Live view and App The related video stream information will display including stream number resolution codec used frame rate etc The Multicast por...

Page 97: ...each time the camera is connected to the LAN Use fixed IP address Select this option to manually assign a static IP address to the Network Camera 1 You can make use of VIVOTEK Installation Wizard 2 on...

Page 98: ...router so that video streams can be sent out from a LAN To utilize of this feature make sure that your router supports UPnPTM and it is activated PPPoE Point to point over Ethernet Select this option...

Page 99: ...rror Router does not support UPnP port forwarding Steps to enable the UPnPTM user interface on your computer Note that you must log on to the computer as a system administrator to install the UPnPTM c...

Page 100: ...ces Enabling UPnP port forwarding allows the Network Camera to open a secondary HTTP port on the router not HTTP port meaning that you have to add the secondary HTTP port number to the Network Camera...

Page 101: ...above When IPv6 is enabled by default the network camera will listen to router advertisements and be assigned with a link local IPv6 address accordingly IPv6 Information Click this button to obtain t...

Page 102: ...format Please refer to HTTP streaming on page 104 for detailed information If you choose PPPoE as the Network Type the PPP0 address will be displayed in the IPv6 information column as shown below Manu...

Page 103: ...VIVOTEK User s Manual 103...

Page 104: ...ing warning messages will be displayed To access the Network Camera on the LAN both the HTTP port and secondary HTTP port can be used to access the Network Camera For example when the HTTP port is set...

Page 105: ...images will be displayed in your web browser NOTE Microsoft Internet Explorer does not support server push technology therefore you will not be able to access a video stream using http ip address htt...

Page 106: ...ser credentials are encrypted using MD5 algorithm thus providing better protection against unauthorized access The availability of the RTSP streaming for the three authentication modes is listed in th...

Page 107: ...to transmit the data by monitoring the Internet traffic volume By default the RTCP port for video is set to 5557 and the RTCP port for audio is set to 5559 The ports can be changed to values between 1...

Page 108: ...ccordingly If the multicast RTP video ports are incorrectly assigned the following warning message will be displayed Multicast TTL 1 255 The multicast TTL Time To Live is the value that tells the rout...

Page 109: ...eive audio simultaneously By using the Network Camera s built in or external microphone and an external speaker you can communicate with people around the Network Camera Note that as JPEG only transmi...

Page 110: ...AC address This service will examine if the host name is valid and automatically open a port on your router If using DDNS the user has to manually configure UPnP port forwarding Express Link is more c...

Page 111: ...hat before utilizing this function please apply for a dynamic domain account first Safe100 net 1 In the DDNS column select Safe100 net from the drop down list Click I accept after reviewing the terms...

Page 112: ...Register column fill in the Host name Email Key and Confirm Key then click Register After a host name has been successfully created you will see a success message in the DDNS Registration Result colum...

Page 113: ...ort for QoS The network video devices used in the network must be QoS enabled QoS models CoS the VLAN 802 1p model IEEE802 1p defines a QoS model at OSI Layer 2 Data Link Layer which is called CoS Cla...

Page 114: ...hem a particular forwarding treatment for example how much bandwidth to reserve for it Below are the setting options of DSCP DiffServ Codepoint Specify the DSCP value for each application 0 63 Note th...

Page 115: ...anaged device A network node on a managed network For example routers switches bridges hubs computer hosts printers IP telephones network cameras web server and database Before configuring SNMP settin...

Page 116: ...llows the user to save recorded video clips You can utilize VIVOTEK s Shepherd utility to upgrade the firmware via FTP server By default the FTP port is set to 21 It can also be assigned to another po...

Page 117: ...iscovery utility instead Find the Discovery formerly Bonjour Browser from the Mac App Store Discovery is a utility that displays all the Bonjour services on your local network or on Wide Area Bonjour...

Page 118: ...lphabetic numeric upper case and lower case characters until the password strength is good enough 3 Select the privilege level for the new user account Click Add to enable the setting The privilege le...

Page 119: ...trol You can modify the management privilege as operators or viewers Select or de select the checkboxes and then click Save to enable the settings If you give Viewers the privilege Operators will also...

Page 120: ...munication with the Network Camera a Certificate must be created first There are three ways to create and install a certificate Create self signed certificate 1 Select this option from a pull down men...

Page 121: ...ed connection 6 If your web session does not automatically change to an encrypted HTTPS session click Home to return to the main page Change the URL address from http to https in the address bar and p...

Page 122: ...te certificate to proceed 3 The following information will show up in a pop up window after clicking Create Then click Save to generate the certificate request 4 The Certificate request window will pr...

Page 123: ...py the certificate request from your request prompt and paste it in the CA s signing request window Proceed with the rest of the process as CA s instructions on their webpage 6 Once completed your SSL...

Page 124: ...124 User s Manual 7 Open a new edit paste the certificate contents and press ENTER at the end of the contents to add an empty line 8 Convert file format from DOS to UNIX Open File menu Conversions DOS...

Page 125: ...125 9 Save the edit using the crt extension using a file name like CAcert crt 10 Return to the original firmware session use the Browse button to locate the crt certificate file and click Upload to en...

Page 126: ...been created and installed before you can click on the Save button for the configuration to take effect 12 To begin an encrypted HTTPS session click Home to return to the main page Change the URL addr...

Page 127: ...How much time the client has been at the webpage User ID If the administrator has set a password for the webpage the clients have to enter a user name and password to access the live video The user na...

Page 128: ...arily and will automatically try to re link again IE Explore or Quick Time Player Filter Enable access list filtering Check this item and click Save if you want to enable the access list filtering fun...

Page 129: ...IP address Always allow the IP address to access this device You can check this item and add the Administrator s IP address in this field to make sure the Administrator can always connect to the devic...

Page 130: ...hentication 2 Authenticator an access point or a switch A go between which restricts unauthorized end users from communicating with the authentication server 3 Authentication server usually a RADIUS s...

Page 131: ...rk Camera the supplicant and the RADIUS Server the authentication server 2 A Network Camera requests access to the protected LAN using 802 1X via a switch the authenticator The client offers its ident...

Page 132: ...s exploit of a website in this case the camera Unauthorized commands are transmitted from a user that the web application trusts using the mechanism of forging a trusted user s own request with a requ...

Page 133: ...eration E PTZ Operation The e PTZ control settings section will be displayed as shown below For e PTZ related details please refer to page 135 Auto pan patrol speed Select the speed from 1 5 slow fast...

Page 134: ...viewing region accordingly Moving Instantly If you check this item the live view window will switch to the new viewing region instantly after you move the floating frame If not selected the process o...

Page 135: ...yed on the Patrol locations list 3 Set the Dwelling time for the preset location during an auto patrol 4 If you want to delete a preset location from the Patrol locations list select it and click Remo...

Page 136: ...reset Positions will also be displayed on the Home page Select one from the Go to menu and the Network Camera will move to the selected preset position Click Patrol The Network Camera will patrol alon...

Page 137: ...t is triggered you can specify what type of action that will be performed You can configure the Network Camera to send snapshots or videos to your email address or FTP site Event To configure an event...

Page 138: ...etection mechanism or external digital input devices There are several choices of trigger sources as shown on the next page Select the item to display the detailed configuration options Video motion d...

Page 139: ...tem event The triggering condition can be an input exceeding or falling below a threshold Audio detection can take place as a complement to motion detection or as a method to detect activities not cov...

Page 140: ...network is disconnected Select this option to backup media file on SD card if the network is disconnected This function will only be displayed after you set up a network storage NAS The media to back...

Page 141: ...ra can be associated with another camera with responsive actions For example if a thermal camera detects some abnormal situations e g a fire the camera can tell another camera say a PTZ camera to move...

Page 142: ...detailed configuration options You can configure either one or all of them Server type Email Select to send the media files via email when a trigger is activated Server name Enter a name for the serv...

Page 143: ...dd server Server type FTP Select to send the media files to an FTP server when a trigger is activated Server name Enter a name for the server setting Server address Enter the domain name or IP address...

Page 144: ...client side settings Server address Enter the SFTP server address in either the domain name or IP address Server port By default the FTP server port is set to 22 It can also be assigned to another po...

Page 145: ...ssword or the Public key mode When using SFTP you can authenticate using a public private SSH key pair instead of a password If key authentication is not enabled you need to specify a password instead...

Page 146: ...and upload the public key to the SFTP server A private key is a guarded secret and it can be stored on disk in an encrypted form A passphrase is used in order to decrypt it It is a login password to...

Page 147: ...etting URL Enter the URL of the HTTP server User name Enter the user name if necessary Password Enter the password if necessary To verify if the HTTP settings are correctly configured click Test The r...

Page 148: ...work Storage If you click the View button for an SD card a Local storage page will prompt so that you can manage the recorded files on SD card For more information about Local storage please refer to...

Page 149: ...rded data Click to go back to the previous level of the directory The format is HH 24r Click to open the file list for that hour The format is File name prefix Minute mm You can set up the file name p...

Page 150: ...shots from any of the video streams Send pre event images The Network Camera has a buffer to temporarily hold data up to a certain limit Enter a number to decide how many images to capture before a tr...

Page 151: ...eam as the source of video clip Pre event recording The Network Camera has a buffer to temporarily hold data up to a certain limit Enter a number to decide the duration of recording before a trigger i...

Page 152: ...ence File name prefix Enter the text that will be appended to the front of the file name For example Click Save media to enable the settings Media type System log Select to send a system log when a tr...

Page 153: ...Status is ON the event configuration above is triggered by motion detection the Network Camera will automatically send snapshots via e mail If you want to stop the event trigger you can click on the O...

Page 154: ...of screen for your reference in semi transparent red An intruding object must be larger than the Item size to trigger an alarm Change the item size according to the live view To delete a window click...

Page 155: ...s shown below Another three motion detection windows can be configured on this page Larger than the min item size Photos or videos can be captured instantly and configured to be sent to a remote serve...

Page 156: ...m item size is a threshold value that determines how many alerted pixels can trigger an event When the size of an intruding object is larger than the minimum size and its movement persist for 0 3 seco...

Page 157: ...k Camera to an external device to detect the current connection status Digital output Select Grounded or Open to define the normal status for the digital output Connect the digital output pin of the N...

Page 158: ...r the difference between current frame and pre saved background exceeds the trigger threshold Conditions such as image too dark too bright or too blurry defocused can also be configured as tampering c...

Page 159: ...to configure Audio detection 1 Once the Audio detection window is opened the current sound input will be interactively indicated by a fluctuating yellow wave diagram 2 Use a mouse click to drag the Al...

Page 160: ...Refer to page 94 for Audio settings and page 86 for video streaming settings You can use the Profile window to configure a different Audio detection setting For example a place can be noisy in the day...

Page 161: ...hether the module fits the predefined VADP requirements Please contact our technical support or the vendor of your 3rd party module for the parameters contained within Users can also run VIVOTEK s VAD...

Page 162: ...By then the module status will become OFF and the X button will appear at the end of the row Click on the X button to remove an existing module When prompted by a confirm message Click Yes to proceed...

Page 163: ...age register and activate the license for using VIVOTEK s VADP modules You should acquire the license key elsewhere and manually upload to the network camera Follow the onscreen instruction on VIVOTEK...

Page 164: ...dd to open the recording setting window On this page you can define the adaptive recording recording source recording schedule and recording capacity A total of 2 recording settings can be configured...

Page 165: ...triggered on Camera A will the server record the full frame rate streaming data otherwise it will only request the I frame data during normal monitoring thus effectively saves bandwidths and storage...

Page 166: ...ils in the following NAS server Click Add NAS server to open the server setting window and follow the steps below to configure 1 Fill in the information for your server For example 2 Click Test to che...

Page 167: ...imum capacity is reached the oldest file will be overwritten by the latest one The reserved amount is reserved for the transaction stage when the storage space is about to be full and new data arrives...

Page 168: ...n about folder naming rules please refer to page 148 for details 20190210 20190211 20190212 f you want to enable recording notification please click Event to configure event triggering settings Please...

Page 169: ...tus and reserved space of your SD card Please remember to format the SD card when using for the first time no SD card NOTE It is recommended to turn OFF the recording activity before you remove an SD...

Page 170: ...this item and enter the number of days you wish to retain a file For example if you enter 7 days the recorded files will be stored on the SD card for 7 days Click Save to enable your settings Storage...

Page 171: ...r especially when the cyclic recording function is enabled during the transaction stage when a storage space is full and the incoming streaming data is about to overwrite the previously saved videos E...

Page 172: ...ws the user to set up search criteria for recorded data If you do not select any criteria and click Search button all recorded data will be listed in the Search Results column File attributes Select o...

Page 173: ...sult which will highlight the selected item A Play window will appear on top for immediate review of the selected file For example Download Click on a search result to highlight the selected item in p...

Page 174: ...ch result then click this button The selected items will become Locked which will not be deleted during cyclic recording You can click again to unlock the selections For example Remove Select the desi...

Page 175: ...VIVOTEK User s Manual 175 NOTE Currently this model does not support URL commands...

Page 176: ...H 264 THIS PRODUCT IS LICENSED UNDER THE AVC PATENT PORTFOLIO LICENSE FOR THE PERSONAL AND NON COMMERCIAL USE OF A CONSUMER TO i ENCODE VIDEO IN COMPLIANCE WITH THE AVC STANDARD AVC VIDEO AND OR ii DE...

Page 177: ...dio or television reception which can be determined by turning the equipment off and on the user is encouraged to try to correct the interference by one or more of the following measures Reorient or r...

Reviews: