background image

11

Connecting to SOLIVIA Monitor
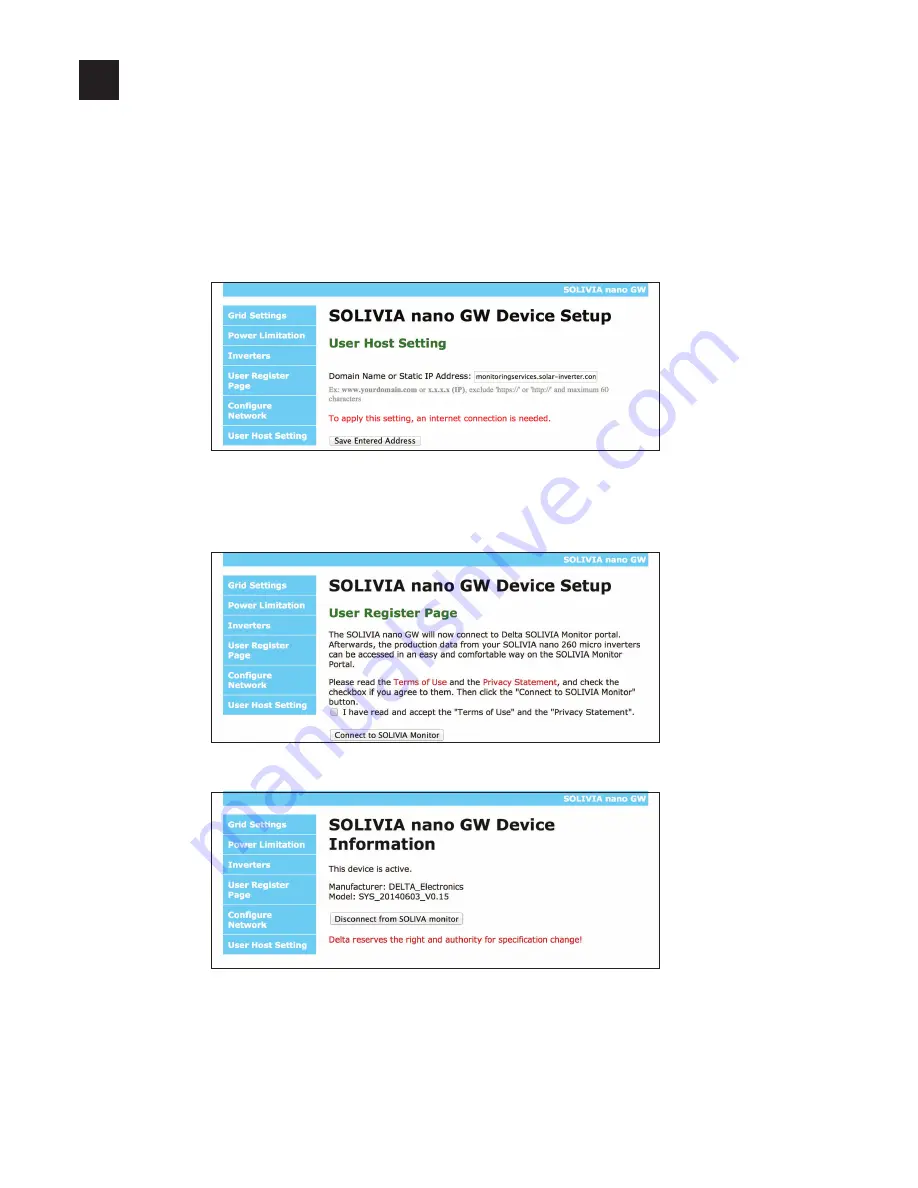
10

1. 

In the address field of your Internet browser, type in the new IP address (which the 

Gateway received from your router) and press the 

ENTER

 button on your PC.

2. 

Click on 

User Host Setting

.

3. 

In the new window, you usually do not need to change the domain name “moni-

toringservices.solar-inverter.com”. So simply click on the 

Save Entered Address


button.

4. 

Click on 

User Register Page

.

5. 

In the new window, read the Terms of Use and the Privacy Statement. Afterwards, 

click on 

I have read and accept...

 and then click on the 

Connect to SOLIVIA Moni-

tor 

button.


→ The Gateway connects to the SOLIVIA Monitor Portal. When the Gateway gets a 

response, the following message is displayed in the Internet browser.

6. 

Now you can go to the SOLIVIA Monitor website and register your PV plant.  

Open a new tab in your Internet browser and in the address field, type in  

monitoring.solar-inverter.com

 and follow the instructions on the website.

Summary of Contents for SOLIVIA nano GW

Page 1: ...Quick Installation Guide for SOLIVIA nano GW Gateway ...

Page 2: ... damage incurred by failure to observe the installation and operating instructions in this manual For this reason be sure to observe and follow all instructions Install the micro inverters that shall be connected to this Gateway according to the manual delivered with the micro inverters The Gateway communicates with the micro inverters via PLC Power Line Carrier The communication quality depends o...

Page 3: ... tor 9 Warranty label Do not remove Otherwise you will lose warranty 10 Power connector To provide the supply power for the Gateway Via the Power cords 12 or 13 the Gateway com municates with the Micro inverters to get their data 11 RESET button To return to default settings and restart the Gateway 12 Power cord EU To connect the Gateway to the Wall socket 18 in EU countries 13 Power cord UK To co...

Page 4: ...8 in UK Communication options 5 The Gateway is used for two tasks a To set up and start the micro inverters mandatory b To connect to the SOLIVIA Monitor Portal where you can monitor your micro inverters optional For both tasks you need a PC with an internet browser Wi Fi works with Windows XP Vista 7 and Mac OS X To connect to SOLIVIA Monitor you need an internet connection e g via a router Ether...

Page 5: ... Micro inverters installed in your PV system 17 Distribution panel Wall socket 18 and Micro inverters 16 are connected to the Distribution panel 18 Wall socket To provide the supply power for the Gateway Also used for communication with the Micro invert ers 16 You choose the connection type after first power up see section 7 Setting up the Gateway You can use either WiFi or Ethernet but not both a...

Page 6: ...ed D I SPLAY CONF I G DEFAULT D I SP I NF0 4 5 DISPLAY CONFIG The display can be set so that it switches to power save mode when no button is pressed for some time Use the SCROLL button 4 to choose an option Press the ENTER button 5 when finished P0WER ALWAYS ON POWER SAVE MODE 4 5 D I SPLAY CONF I G DEFAULT D I SP I NF0 4 5 DEFAULT DISP INFO You can choose which type of information is displayed P...

Page 7: ...et automatically by the portal server Otherwise you have to set date and time manually Use the SCROLL button 4 to choose an option Press the ENTER button 5 when finished DATE 26 05 14 T I ME 13 59 17 4 5 I NFO FORMAT LANGUAGES 4 5 INFO FORMAT You can choose whether the information set in DEFAULT DISP INFO is shown for all micro inverters together TOTAL or for each one individually Use the SCROLL b...

Page 8: ...inverters see section 9 Setting up and Starting Micro Inverters If you finished with that come back to this point If you don t want to use SOLIVIA Monitor configuration is now done and you can disconnect your PC from the Gateway If you want to use SOLIVIA Monitor continue with the next step To connect to your router you need network name and network key of your router Both you can usually find on ...

Page 9: ...ss field type in the IP address shown on the display of the Gateway e g 169 254 0 1 and press the ENTER but ton on your PC It works like for a normal website 172 25 16 133 DHCP I D 2 POWER 0 0W The local website of the Gateway opens 2 Now you can set up your micro inverters see section 9 Setting up and Starting Micro Inverters If you finished with that come back to this point If you don t want to ...

Page 10: ...ick on Power Limitation If your grid operator requires you to set a power limita tion or power factor you can change the default settings When done click on the Submit button 3 Go to the Inverters section Type in the serial number of each micro inverter con nected to the Gateway You can find the serial number on the type label of the micro inverters When finished press the Save Setting button ...

Page 11: ...ess button 4 Click on User Register Page 5 In the new window read the Terms of Use and the Privacy Statement Afterwards click on I have read and accept and then click on the Connect to SOLIVIA Moni tor button The Gateway connects to the SOLIVIA Monitor Portal When the Gateway gets a response the following message is displayed in the Internet browser 6 Now you can go to the SOLIVIA Monitor website ...

Page 12: ...3 047 call free Denmark support danmark solar inverter com 8025 0986 call free France support france solar inverter com 0800 919 816 call free Germany service deutschland solar inverter com 0800 800 9323 call free Greece support greece solar inverter com 49 7641 455 549 Israel supporto israel solar inverter com 800 787 920 call free Italy supporto italia solar inverter com 800 787 920 call free Ne...

Reviews: