Delta ShopMaster DP350 Instruction Manual Download Page 14

14

INSTALLING AND REMOVING DRILL

BITS

DISCONNECT MACHINE FROM POWER
SOURCE.

1.

Insert smooth end of drill bit (A) Fig. 29, into chuck

(B), as far as it will go, and then back the bit out 1/16",
or up to the flutes for small bits.

2.

Make certain that the drill bit (A) Fig. 29, is centered

in the chuck (B) before tightening the chuck with the key
(C).

3.

Turn the chuck key (C) Fig. 29, clockwise to tighten

and counterclockwise to loosen the chuck jaws.

4.

Tighten all three chuck jaws to secure the drill bit

sufficiently so that it does not slip while drilling.

5.

MAKE SURE

chuck key (C) Fig. 29, is

removed from chuck before starting drill press. Your
chuck key (C) is equipped with a self-ejecting pin (D)
which helps minimize the hazard of the key being left in
the chuck.

Fig. 29

A

B

C

D

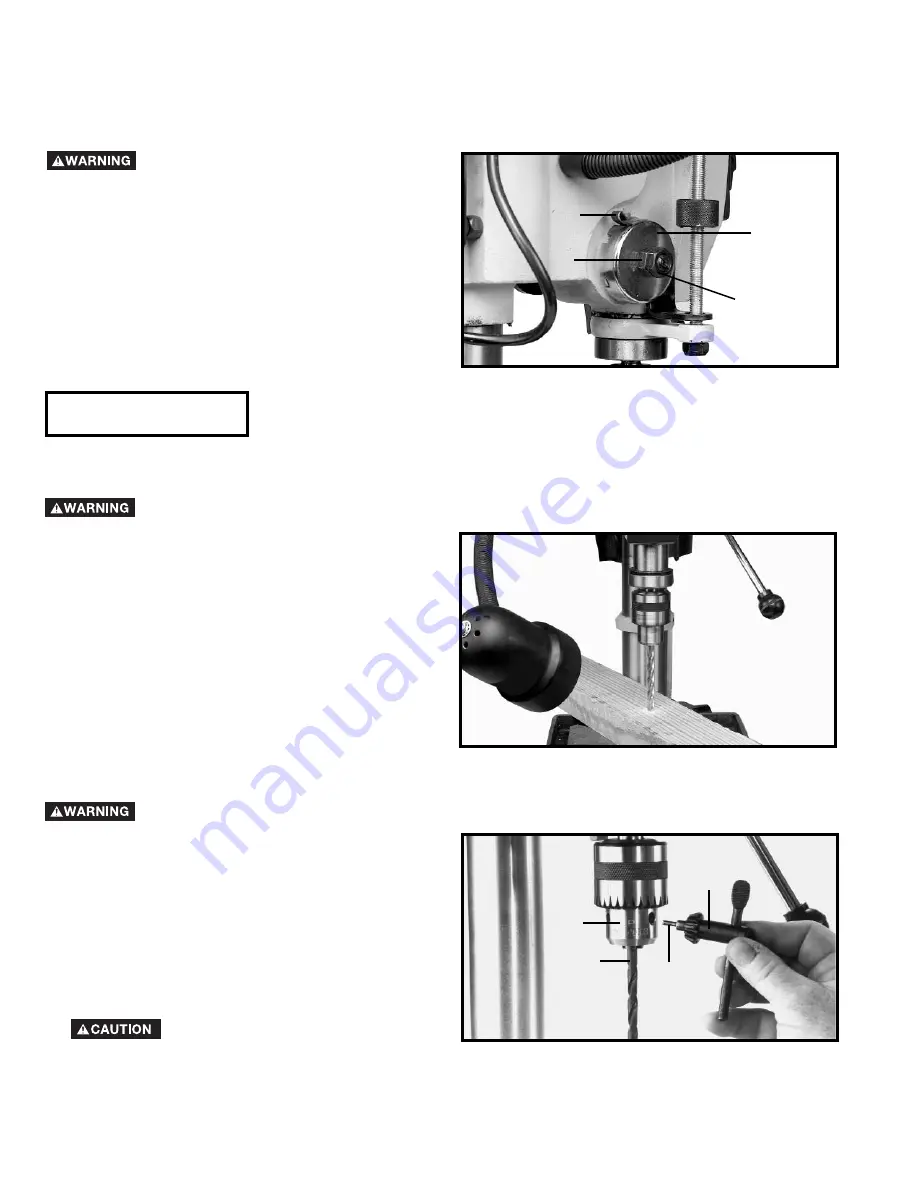
ADJUSTING SPINDLE RETURN SPRING

The spindle is automatically returned to its upper most position when the handle is released. It is recommended that
the handle be allowed to slowly return to the top position after each hole has been drilled in the material.  This spring
has been properly adjusted at the factory and should not be disturbed unless absolutely necessary. To adjust the return
spring:

DISCONNECT MACHINE FROM POWER
SOURCE.

1.

Loosen nuts (B) and (E) Fig. 27. Make sure spring

housing (A) stays engaged with head casting.

2.

While 

FIRMLY HOLDING

spring housing (A) Fig. 27

pull out housing and rotate it until boss (D) is engaged
with the next notch on the housing. Turn the housing
counterclockwise to increase or clockwise to decrease
spring tension. Turn nut (E) until it contacts spring
housing (A), then back nut (E) out a 1/4 turn from spring
housing (A). Tighten nut (B) against nut (E), to hold the
housing in place. 

IMPORTANT: Inside nut (E) should

not contact spring housing (A) when tightened.

Fig. 27

Your drill press is to be used with drill bits with a shank of 1/2" or less in diameter. The following will give the inexperienced
operator a start on common drill press operations. Use scrap material for practice to get a feel of the machine before
attempting regular work.

The use of accessories and attachments not recommended by Delta may result in risk of injury.

IMPORTANT:

When the workpiece is long enough it

should always be positioned on the table with one end
against the left side of the column, as shown in Fig. 28.
This prevents the workpiece from rotating with the drill
bit or cutting tool, causing damage to the workpiece or
personal injury to the operator. If it is not possible to
support the workpiece against the column, the
workpiece should always be fastened to the table using
clamps or a vise.

Fig. 28

A

D

E

B

MACHINE USE

Summary of Contents for ShopMaster DP350

Page 1: ...L PART NO A05751 06 22 05 Copyright 2005 Delta Machinery ESPA OL P GINA 19 To learn more about DELTA MACHINERY visit our website at www deltamachinery com For Parts Service Warranty or other Assistanc...

Page 2: ...l Technical Service Manager Delta Machinery 4825 Highway 45 North Jackson TN 38305 IN CANADA 125 Mural St Suite 300 Richmond Hill ON L4B 1M4 Information regarding the safe and proper operation of this...

Page 3: ...EMS The symbols below are used to help you recognize this information SAFETY GUIDELINES DEFINITIONS SOME DUST CREATED BY POWER SANDING SAWING GRINDING DRILLING AND OTHER CONSTRUCTION ACTIVITIES contai...

Page 4: ...to the machine and or injury may result 13 USE RECOMMENDED ACCESSORIES The use of accessories and attachments not recommended by Delta may cause damage to the machine or injury to the user 14 USE THE...

Page 5: ...achine and or serious injury 13 AVOID AWKWARD OPERATIONS AND HAND POSITIONS A sudden slip could cause a hand to move into the bit 14 KEEP ARMS HANDS AND FINGERS away from the bit Serious injury to the...

Page 6: ...e used only until a properly grounded outlet can be installed by a qualified electrician The green colored rigid ear lug and the like extending from the adapter must be connected to a permanent ground...

Page 7: ...10 12 120 25 50 16 AWG 10 12 120 50 100 14 AWG 10 12 120 100 150 12 AWG 12 16 120 up to 25 14 AWG 12 16 120 25 50 12 AWG 12 16 120 GREATER THAN 50 FEET NOT RECOMMENDED FOREWORD FUNCTIONAL DESCRIPTION...

Page 8: ...protective coating from all unpainted surfaces This coating may be removed with a soft cloth moistened with kerosene do not use acetone gasoline or lacquer thinner for this purpose After cleaning cove...

Page 9: ...de the flange J on drill press base Fig 7 Fig 8 F F J 5 Re assemble ring E Fig 9 which was removed in STEP 1 IMPORTANT Bottom of ring E MUST NOT be pushed all the way down onto top of raising rack F M...

Page 10: ...d N Fig 13 onto the column as far as it will go Align head A Fig 13A to table B and base C Tighten the two head locking screws O Fig 13 with wrench supplied 9 Thread the three pinion shaft handles P F...

Page 11: ...NG AND STOPPING DRILL PRESS The power switch is located at the front of the drill press head To turn the drill press ON press the green start button A Fig 17 To stop the drill press push the red butto...

Page 12: ...tioning of the drill press table should always be from the bottom to the up position 2 The table can be rotated 360 degrees on the column by loosening clamp A Fig 19 rotate table to desired position a...

Page 13: ...aded button F Fig 25 and rapidly move stop nut A until bottom of nut A contacts stop G Then hold the pinion shaft handle and loosen quill locking lever E the chuck and quill will return to the up posi...

Page 14: ...E 1 Loosen nuts B and E Fig 27 Make sure spring housing A stays engaged with head casting 2 While FIRMLY HOLDING spring housing A Fig 27 pull out housing and rotate it until boss D is engaged with the...

Page 15: ...height Feed slowly when the bit is about to cut through the wood to prevent splintering the bottom face Use a scrap piece of wood as a base block under the work this helps to reduce splintering and p...

Page 16: ...parts They could possibly dissolve or otherwise damage the material Wear ANSI Z87 1 safety glasses while using compressed air FAILURE TO START Should your machine fail to start check to make sure the...

Page 17: ...arest service outlet please call 1 800 223 7278 In Canada call 1 800 463 3582 A complete line of accessories is available from your Delta Supplier Porter Cable Delta Factory Service Centers and Delta...

Page 18: ...Delta may require that electric motors be returned prepaid to a motor manufacturer s authorized station for inspection and repair or replacement Delta will not be responsible for any asserted defect...

Page 19: ...7278 y le dirigir n al Centro de Servicio de F brica Porter Cable Delta m s cercano ARIZONA Phoenix 85013 2906 4501 N 7th Ave Phone 602 279 6414 Fax 602 279 5470 CALIFORNIA Ontario 91761 Los Angeles...

Reviews: