background image


HD2013


-   11   -


V1.0


4


MAINTENANCE 

Verify filter cleanliness periodically; check that there is no debris, leaves, dirt in the 
lower filter or anything else that might obstruct the flowing of water. Check that the 
tipping bucket contains no deposits of dirt, sand or any other obstruction. If neces-

sary, the surfaces can be cleaned with non aggressive detergent


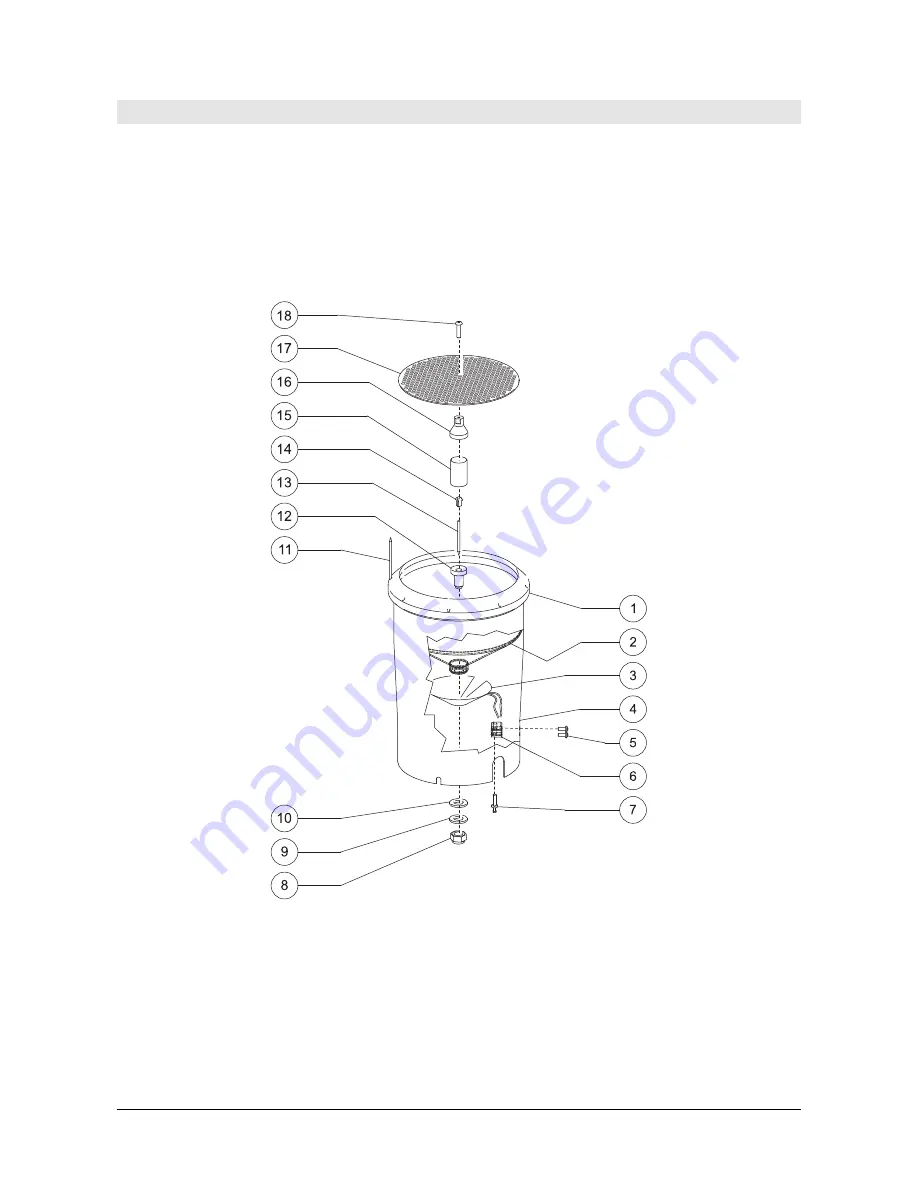
Fig. 10 – Exploded view of the upper part (version with heating) 

1: ring 

2: funnel 

3: heater 

4: housing 

5: screw 

6: connector 

7: contact 

8: nut 

9: washer 

10: gasket 

11: birds dissuader 

12: nozzle 

13: pin 

14: tip 

15: filter 

16: filter support 

17: filter 

18: screw 


Summary of Contents for HD2015

Page 1: ...Operating manual Tipping bucket rain gauge HD2015 www deltaohm com English Keep for future reference Companies Brands of GHM...

Page 2: ...NTS 1 INTRODUCTION 3 2 TECHNICAL CHARACTERISTICS 4 3 INSTALLATION 6 3 1 ELECTRICAL CONNECTIONS 6 3 2 TIPPING BUCKET 7 3 3 INSTALLATION MODES 8 4 MAINTENANCE 11 5 INSTRUMENT STORAGE 13 6 SAFETY INSTRUC...

Page 3: ...ns for a fraction of a second sending an impulse to the counter The quantity of rainfall measured is based on the count of the number of times the bucket is emptied the reed contacts normally closed o...

Page 4: ...the rain gauge label If the amount of rain is calculated using the correction curve as a function of the rainfall rate fig 1 and 2 the error is typically less than 2 in the interval 0 200 mm h If the...

Page 5: ...hat a rain gauge with nominal resolution RN 0 209 mm 50 mm h has generated 25 pulses at the frequency of 1 pulse every 50 seconds The rainfall rate can be estimated considering the nominal resolution...

Page 6: ...nd 8 In order to make the tipping device properly working and the measurements correct it is important that the instrument is placed perfectly levelled The base of the rain gauge is fitted with a bubb...

Page 7: ...the transport of the rain gauge To unlock the bucket remove the holders as shown in fig 4 Fig 4 Locking and unlocking the tipping bucket The oscillation of the tipping bucket can be adjusted through...

Page 8: ...HD2013 8 V1 0 Fig 5 Adjustment of the tipping bucket 3 3 INSTALLATION MODES Fig 6 Mechanical dimensions installation modes...

Page 9: ...HD2013 9 V1 0 Fig 7 Base for ground fastening HD2003 78 Fig 8 Ground installation...

Page 10: ...HD2013 10 V1 0 Fig 9 Installation raised above ground...

Page 11: ...that the tipping bucket contains no deposits of dirt sand or any other obstruction If neces sary the surfaces can be cleaned with non aggressive detergent Fig 10 Exploded view of the upper part versio...

Page 12: ...bush 5 spacer 6 screw 7 cover 8 screw 9 nut 10 filter 11 conveyor 12 circuit 13 washer 14 screw 15 contact 16 connector 17 screw 18 cable 19 heater 20 lock nut 21 cable gland 22 junction 23 support 24...

Page 13: ...and operating safety can be ensured only if all stan dard safety measures as well as the specific measures described in this manual are followed The instrument proper operation and operating safety c...

Page 14: ...lacing the or der absorbed power 50 W HD2013 18 Bird dissuader HD2015 5K Kit of accessories for the installation of the rain gauge raised 500 mm off the ground HD2013 5 1 HD2013 64 HD2013 66 HD2015 5K...

Page 15: ......

Page 16: ...third parties is excluded from the guarantee The instrument shall be returned FREE OF SHIPMENT CHARGES to your dealer The jurisdiction of Padua applies in any dispute The electrical and electronic equ...

Page 17: ...e result of the constant development of the product This may produce some differences between the information written in this manual and the instrument you have purchased We cannot completely exclude...

Page 18: ...GHM GROUP Delta OHM Delta Ohm S r l a socio unico Via Marconi 5 35030 Caselle di Selvazzano Padova ITALY Phone 39 049 8977150 Fax 39 049 635596 www deltaohm com info deltaohm com V1 0 03 01 2019...

Reviews: