From Step 4
Desde el paso 4
21
ASSEMBLY INSTRUCTIONS • INSTRUCCIONES DE MONTAJE
From Step 5
Desde el paso 5
AA x 3
BB x 3
M
Page 1: ...ot Date ___________ ___________ ___________ A REV Before contacting Delta Consumer Experience Center please ensure this information matches the information matches the information found on the label o...
Page 2: ...actar el Centro de Experiencia del Consumidor de Delta por favor aseg rese de que la informaci n de la primera p gina coincida con la informaci n que se encuentra en la etiqueta ubicada en el Panel tr...
Page 3: ...eso de montaje ya utilice pernos o tornillos compruebe cada uno de ellos colocan do el perno tornillo en el diagrama del art culo donde est dibujado el tama o y el dise o real Aseg rese de que utiliza...
Page 4: ...n hour without any help It s very sturdy and we like that it has adjustable levels for the mattress height To top it all off it s so incredibly darling We LOVE LOVE LOVE this crib WRITE A REVIEW for t...
Page 5: ...nda donde haya sido comprado 1 HAGA UNA CAPTURA DE PANTALLA de su cali caci n y c rguela a la pagina www DeltaChildren com Review 2 ES AS DE F CIL En cuanto lo env e ya estar instant neamente PARTICIP...
Page 6: ...tante central 43148 N Left Top Shelf x 1 Estante superior izquierdo 43147 M Right Upper Divider Panel x 1 Panel divisor superior derecho 43140 E Right Lower Divider Panel x 1 Panel divisor inferior de...
Page 7: ...Arandela x 2 ZZ1 Center Middle Shelf x 1 Estante medio central 43149 P P Center Top Shelf x 1 Estante central superior 43150 R Right Bottom Shelf x 1 Estante inferior derecho 43151 S Right Top Shelf x...
Page 8: ...er No hace falta taladrar No utilice destornilladores el ctricos Cam Bolt x 40 Perno de Leva x 40 6252 BB Cam Lock x 54 Bloqueo de Leva x 54 6065 AA Phillips Screwdriver Not Provided Destornillador Ph...
Page 9: ...utilizar el sistema de bloqueo de leva 1 Insert the cams 2 Cam bolts must be screwed down ush 3 Refer to page 9 for instructions on how to use the cam lock system 1 Inserte las levas 2 Se debe atornil...
Page 10: ...m Bolts must be screwed down ush 2 Attach the Left Small Foot Part J and Right Small Foot Part K to the Center Shelf Part N with 2 Cam Locks Part BB Tighten with a Phillips Screwdriver 3 Refer to page...
Page 11: ...11 A S S E M B L Y I N S T R U C T I O N S I N S T R U C C I O N E S D E M O N T A J E N N K J AA x 2 BB x 2...
Page 12: ...t Upper Divider Panel Part E to the Right Lower Divider Panel Part F with 2 Double Ended Dowels Part CC and 4 Cam Locks Part BB Tighten with the Phillips Screwdriver Right Upper Divider Panel x 1 Pane...
Page 13: ...13 A S S E M B L Y I N S T R U C T I O N S I N S T R U C C I O N E S D E M O N T A J E F E BB x 4 CC x 2 CC BB BB...
Page 14: ...Locks Part BB Tighten with a Phillips Screwdriver 3 Attach the other Center Shelf Part N to the assembly from step 2 with 1 Cam Lock Part BB Tighten with a Phillips Screwdriver 4 Refer to page 9 for i...
Page 15: ...From Step 2 Desde el paso 2 15 A S S E M B L Y I N S T R U C T I O N S I N S T R U C C I O N E S D E M O N T A J E From Step 1 Desde el paso 1 AA x 3 BB x 3 N...
Page 16: ...river Cam Bolts must be screwed down ush 2 Attach the Left Divider Panel Part D to the assembly from step 3 with 3 Cam Locks Part BB Tighten with a Phillips Screwdriver 3 Refer to page 9 for instructi...
Page 17: ...17 A S S E M B L Y I N S T R U C T I O N S I N S T R U C C I O N E S D E M O N T A J E From Step 3 Desde el paso 3 AA x 3 BB x 3 D D...
Page 18: ...driver Cam Bolts must be screwed down ush 2 Attach the Left Large Foot Part G to the Left Bottom Shelf Part L with 1 Cam Lock Part BB Tighten with a Phillips Screwdriver 3 Refer to page 9 for instruct...
Page 19: ...19 A S S E M B L Y I N S T R U C T I O N S I N S T R U C C I O N E S D E M O N T A J E L L G AA x 1 BB x 1...
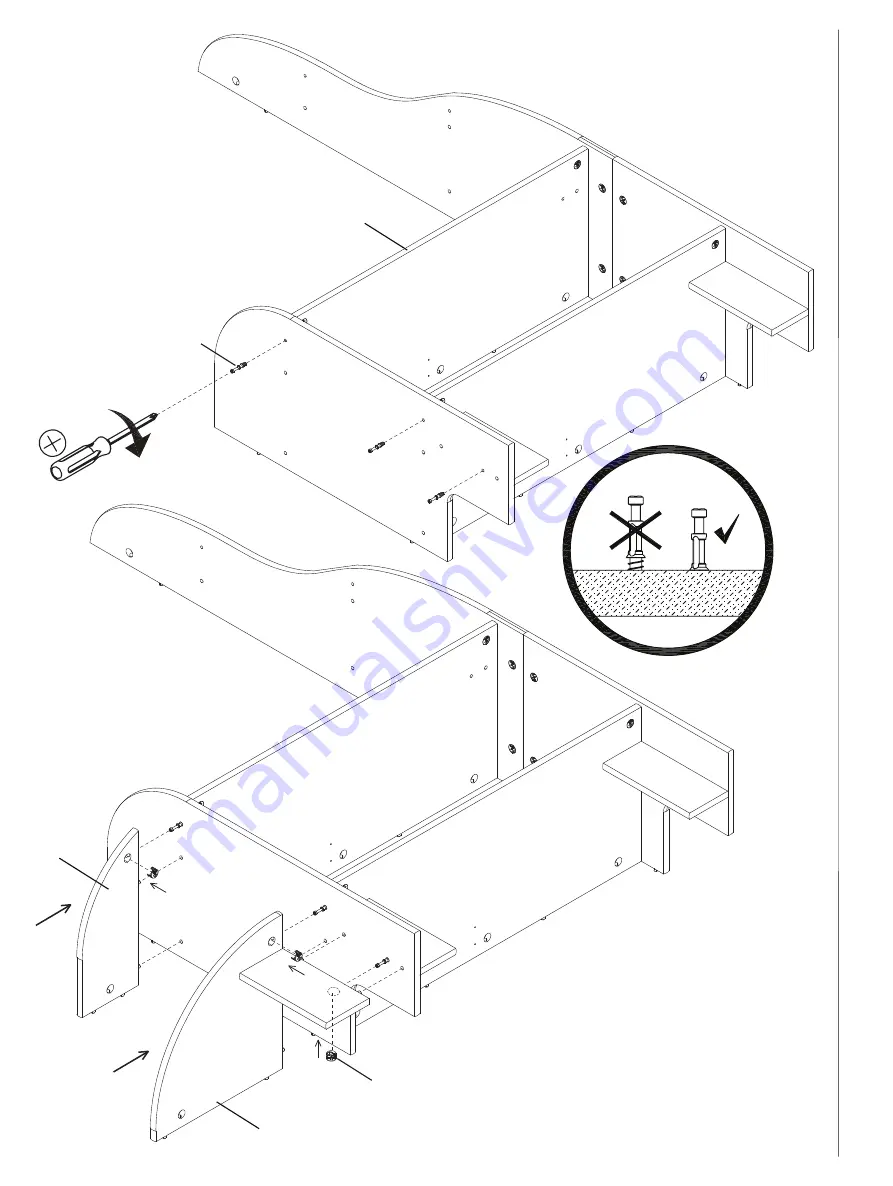
Page 20: ...2 Cam Locks Part BB Tighten with a Phillips Screwdriver 3 Attach the Left Top Shelf Part M to the assembly from step 4 with 1 Cam Lock Part BB Tighten with a Phillips Screwdriver 4 Refer to page 9 fo...
Page 21: ...From Step 4 Desde el paso 4 21 A S S E M B L Y I N S T R U C T I O N S I N S T R U C C I O N E S D E M O N T A J E From Step 5 Desde el paso 5 AA x 3 BB x 3 M...
Page 22: ...ewdriver Cam Bolts must be screwed down ush 2 Attach the Right Large Foot Part H to the Right Bottom Shelf Part S with 1 Cam Lock Part BB Tighten with a Phillips Screwdriver 3 Refer to page 9 for inst...
Page 23: ...23 A S S E M B L Y I N S T R U C T I O N S I N S T R U C C I O N E S D E M O N T A J E S S H AA x 1 BB x 1...
Page 24: ...2 Cam Locks Part BB Tighten with a Phillips Screwdriver 3 Attach the Right Lower Middle Shelf Part T to the assembly from step 6 with 1 Cam Lock Part BB Tighten with a Phillips Screwdriver 4 Refer to...
Page 25: ...From Step 6 Desde el paso 6 25 A S S E M B L Y I N S T R U C T I O N S I N S T R U C C I O N E S D E M O N T A J E From Step 7 Desde el paso 7 BB x 3 T AA x 3...
Page 26: ...am Bolts must be screwed down ush 2 Attach the Right Upper Middle Shelf Part U and Right Top Shelf Part V to the assembly from step 8 with 2 Cam Locks Part BB Tighten with a Phillips Screwdriver 3 Ref...
Page 27: ...From Step 8 Desde el paso 8 27 A S S E M B L Y I N S T R U C T I O N S I N S T R U C C I O N E S D E M O N T A J E BB x 2 U V AA x 2...
Page 28: ...Cam Bolts must be screwed down ush 2 Attach the Center Middle Shelf Part P and Center Top Shelf Part R to the assembly from step 9 with 2 Cam Locks Part BB Tighten with a Phillips Screwdriver 3 Refer...
Page 29: ...From Step 9 Desde el paso 9 29 A S S E M B L Y I N S T R U C T I O N S I N S T R U C C I O N E S D E M O N T A J E BB x 2 P R AA x 2...
Page 30: ...va x 5 Double Ended Dowel x 5 Pasador de doble extremo x 5 CC Right Lower Back Panel x 1 Panel trasero inferior derecho B Attach 5 Double Ended Dowels Part CC to the Right Lower Back Panel Part B with...
Page 31: ...BACK POSTERIOR 31 A S S E M B L Y I N S T R U C T I O N S I N S T R U C C I O N E S D E M O N T A J E B BB x 5 CC x 5 1 2 1800...
Page 32: ...ias para completar este paso 1 Attach 1 Left Back Panel Part A and 1 Right Upper Back Panel Part C to the Right Lower Back Panel Part B as shown 2 Install 20 Cam Bolts Part AA into the Back Panel with...
Page 33: ...33 A S S E M B L Y I N S T R U C T I O N S I N S T R U C C I O N E S D E M O N T A J E AA x 20 B FRONT el FRENTE A C...
Page 34: ...bolts and dowels with the holes Tighten with a Phillips Screwdriver 2 Refer to page 9 for instructions on how to use the cam lock system 3 Cover the exposed Cam Locks with the stickers as shown Sticke...
Page 35: ...O N S I N S T R U C C I O N E S D E M O N T A J E STEP 13 1 PASO 13 1 1 2 From Step 10 Desde el paso 10 6 3 4 5 7 From Step 12 Desde el paso 12 8 9 10 11 12 13 14 NOTE 2 PERSON ASSEMBLY IS NECESSARY...
Page 36: ...STEP 13 2 PASO 13 2 36 18 20 17 16 15 19...
Page 37: ...37 A S S E M B L Y I N S T R U C T I O N S I N S T R U C C I O N E S D E M O N T A J E STEP 13 3 PASO 13 3 2 8 9 11 10 3 4 6 13 5 1 14 15 7 12 16 18 17 DD x 26 19 21 22 23 24 25 26 20...
Page 38: ...este paso 2 people are recommended for this step 1 Attach 5 Cam Locks Part BB as shown Tighten with a Phillips Screwdriver 2 Refer to page 9 for instructions on how to use the cam lock system Se recom...
Page 39: ...NOTE 2 PERSON ASSEMBLY IS NECESSARY NOTA DEBE SER MONTADO POR 2 PERSONAS 39 A S S E M B L Y I N S T R U C T I O N S I N S T R U C C I O N E S D E M O N T A J E 1 BACK POSTERIOR 2 3 4 5 1 2...
Page 40: ...del ramo m s cercana para conseguir un sistema de anclaje que soporte una fuerza de tiraje de hasta 50 LBS 22 7 Kgs para su tipo de muro Si no est seguro sobre c mo encontrar la viga de madera o tien...
Page 41: ...p 6 Feed the Tipover Restarint through the hole as you place the bookcase in it s final position NOTA Aseg rese de fijar todos los accesorios a la carcasa antes de completar este paso 6 Pase el elemen...
Page 42: ...l tanto sobre novedades de su producto por favor visite www DeltaChildren com Fecha de Compra _____________ debe adem s mantener su recibo Para reportarcualquier problema por favor entre a www DeltaCh...
Page 43: ...OR QU ELEGIR A Visita Deltachildren Com Pages Our Story para m s informaci n DELTA DONA 10 de nuestros ingresos est destinado a mejorar la vida de los ni os A DELTA LE IMPORTA Hacemos pruebas por enci...
Page 44: ...S UNE PLACE CAMA SENCILLA BINS ORGANIZERS PANIERS CONTENEDORES MATTRESES MATELAS COLCH N PLAYROOM FURNITURE SALLE DE JEUX CUARTO DE JUGAR TODDLER BEDS LITS POUR ENFANT CAMA PARA NI O WHY CHOOSE DELTA...