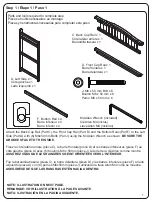
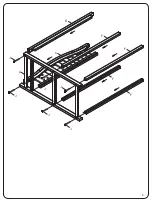
Delta Children Bennington Assembly Instructions Manual Download Page 2

2

NOTES ON ASSEMBLY:

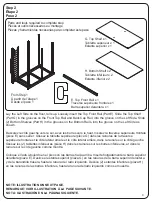
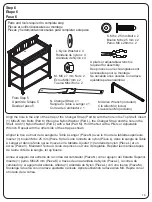
-During the assembly process whenever using screws or bolts, check each by placing the screw/bolt on 

the diagram of the item which is drawn actual size and design. Be sure to use the proper size and shape 

specified in the instructions.

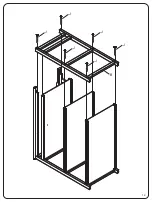
-To assemble this unit you may be required to place the unit on it’s side and face. It is strongly 

recommended that assembly is done on a soft, non-abrasive surface to avoid damaging the finish.

NOTES ON CARE AND MAINTENANCE:

Do not

 scratch or chip the finish.

- Inspect the product periodically, contact Delta Children's Products for replacement parts or questions.

Do not

 store the product or any parts in extreme temperatures and conditions such as a hot attic or a 

damp, cold basement. These extremes can cause a loss of structural integrity.

-To preserve the luster of the high quality finish on your product, it is recommended to place a doily or 

felt pad under any items you place on the finish.

-Clean with a damp cloth, then a dry cloth to preserve the original luster and beauty of this fine finish.  

-

Do not

 use abrasive chemicals.  

-

Do not

 spray cleaners directly onto furniture.

-Lift slightly when moving on carpeting to prevent leg breakage.

-Use of a vaporizer near furniture will cause wood to swell and finish to peel.

NOTES ON USE:

Keep children and others safe by following these simple rules:

Do not

 allow any child to play on furniture

Do not

 allow climbing on any piece of furniture.

Do no

t allow hanging from any piece of furniture.

- Always monitor your child’s activity when in the nursery.
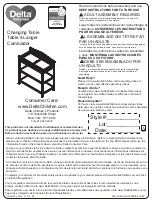
WARNING

FALL HAZARD - to prevent death or serious injury, always keep child within arm’s reach.

Read all instructions before use of the changing table.

KEEP THESE INSTRUCTIONS IN A SAFE PLACE FOR FUTURE USE.

Inspect the changing table periodically.  

Do not

 use the changing table if it is damaged or 

broken. Contact Delta Children’s Products with any questions.

Tighten all loose screws and bolts before each use.

The maximum recommended weight of the child is 30lbs for the changing table.

Use only the pad provided by Delta Children’s Products.

Summary of Contents for Bennington

Page 1: ...fore contacting Delta Consumer Care please ensure that the information above matches the information found on the label on the Top Shelf please reference the information found on the product when cont...

Page 2: ...inish Clean with a damp cloth then a dry cloth to preserve the original luster and beauty of this fine finish Do not use abrasive chemicals Do not spray cleaners directly onto furniture Lift slightly...

Page 3: ...e l emballage pour eviter d endommager les finitions REMARQUES SUR LE SOIN ET L ENTRETIEN Ne pas rayer ou ebrecher la finition Examinez de pres le produit regulierement contactez Delta Children s Prod...

Page 4: ...r da ar el acabado INFORMACI N SOBRE EL USO Mantenga a los ni os y otras personas a salvo siguiendo estas sencillas reglas No permita que ning n ni o juegue sobre muebles No permita que nadie trepe so...

Page 5: ...asera x 1 27213 D Front Cap Rail x 1 Barre frontale x 1 Barra delantera x 1 27013 E Top Front Rail x 1 Traverse sup rieure frontale x 1 Barra superior delantera x 1 27014 F Bottom Rail x 4 Barre inf r...

Page 6: ...Screw x 8 Vis de 15 mm x 8 Tornillo de 15 mm x 8 5529 T Locking Caster x 2 Roulette avec frein x 2 Rueda con bloqueo x 2 S Free Caster x 2 Roulette libre x 2 Rueda libre x 2 Flat Head Screwdriver not...

Page 7: ...shown BE SURE THE GROOVES FACE TO THE INSIDE Fixez le c t lat ral arri re pi ce C la barre frontale pi ce D et les barres inf rieures pi ce F au c t gauche pi ce A avec 6 boulons M6 x 50mm pi ce J l...

Page 8: ...8 J J J A J J C D F F F F J...

Page 9: ...lette sup rieure pi ce G dans les rainures de la traverse sup rieure frontale et le c t lat ral arri re et le c t lat ral arri re dans la rainure sur le c t gauche Glissez les 2 tablettes inf rieures...

Page 10: ...10 H H G E...

Page 11: ...ht Side Part B to the assembly from step 2 with 6 M6x50 mm Bolts Part J using the M4 Allen Wrench as shown Fixez la C t droit Pi ce B l ensemble mont l tape 2 l aide de 6 Boulons 50mm Pi ce J Serrer l...

Page 12: ...12 J J B J J J J...

Page 13: ...lips Screwdriver Fixez 4 supports m talliques pi ce R aux barres l aide de 8 vis 15mm pi ce P Serrez avec le tournevis Phillips Fije 4 soportes de metal pieza R a las barras utilizando 8 tornillos de...

Page 14: ...Casters by pounding the ends of the Changing Table on the floor this will damage the unit Ins rez les 2 roulettes libres pi ce S dans les pieds arri re de la table langer Ins rez les 2 roulettes avec...

Page 15: ...NT OF THE CHANGING TABLE IMPORTANT ASSUREZ VOUS DE PLACER LES ROULETTES AVEC FREIN SUR LE C T FRONTAL DE LA TABLE LANGER IMPORTANTE ASEG RESE DE COLOCAR LAS RUEDAS CON BLOQUEO EN LA PARTE FRONTAL DEL...

Page 16: ...er side of the strap as shown Aligner le trou au bout de la sangle du Table Langer Pi ce N avec le trou de la tablette sup rieure Ins rer 1 boulon M6 x 25 mm Pi ce K dans une rondelle de nylon Pi ce L...

Page 17: ...17 K N M L L K...

Page 18: ...J onto the Top Shelf Part G on top of the attached Strap from step 6 Be sure the buckle on the strap is over the Pad as shown Placer le matelas Langer Pi ce J sur la tablette sup rieure Pi ce G par de...

Page 19: ...e lorsque l on entend un clic sonore Tirer doucement sur la partie l che de la sangle en vue d enrouler l g rement le harnais de s curit autour de l enfant Entretien V rifier r guli rement que les at...

Page 20: ...ue la sangle est bien boucl e pour assurer la s curit de l enfant Para apretar la correa Una los lados del pasador y seguro firmemente asegur ndose de que est totalmente ajustado para as proteger la i...

Page 21: ...chat et sous condition d une utilisation normale Cette garantie concerne seulement l acheteur d origine et est valide uniquement sur pr sentation de la preuve d achat ou si re u en cadeau lorsque l en...

Page 22: ......

Reviews: