background image

2

CONTENTS

CHAP. 1    GENERAL

1.1

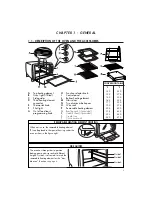
Description and accessories  . . . . . . . . . . . . . . . . . . . . . . . . . . . . . . . . . . . . . . . . . . 2

1.2

Important safeguards  . . . . . . . . . . . . . . . . . . . . . . . . . . . . . . . . . . . . . . . . . . . . . . 3

1.3

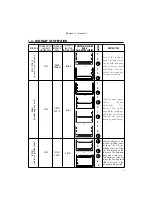
Summary of operation . . . . . . . . . . . . . . . . . . . . . . . . . . . . . . . . . . . . . . . . . . . . . . .6

CHAP. 2

USING THE CONTROLS AND SETTING THE MODES
2.1

Optional accessories  . . . . . . . . . . . . . . . . . . . . . . . . . . . . . . . . . . . . . . . . . . . . . . . .6

2.2

How to keep food warm “KEEP WARM” . . . . . . . . . . . . . . . . . . . . . . . . . . . . . . . . . .6

2.3

Instructions for baking “BAKE” . . . . . . . . . . . . . . . . . . . . . . . . . . . . . . . . . . . . . . . . .6

2.4

Instructions for low baking “SLOW BAKE”  . . . . . . . . . . . . . . . . . . . . . . . . . . . . . . . .7

2.5

Instructions for baking with “DOUBLE BAKE/TOAST” function  . . . . . . . . . . . . . . . . . .8

2.6

Top brown “SINGLE BAKE/TOAST” . . . . . . . . . . . . . . . . . . . . . . . . . . . . . . . . . . . . .9

2.7

Instructions for broiling “BROIL”  . . . . . . . . . . . . . . . . . . . . . . . . . . . . . . . . . . . . . . . .9

2.8

Instructions for toasting  with “DOUBLE BAKE/TOAST” function  . . . . . . . . . . . . . . . .10

CHAP. 3

CLEANING AND MAINTENANCE

 . . . . . . . . . . . . . . . . . . . . . . . . . . . . . . . . . . . . . . . . . .11

ELECTRICAL CONNECTIONS

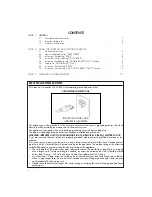
All it requires is a nearby 120 Volt 60 Hz three-prong grounded power outlet.

GROUNDING INSTRUCTIONS

BE SURE THAT YOUR OUTLET 

IS PROPERLY GROUNDED

This appliance must be grounded. In the event of an electrical short circuit, grounding reduces the risk of

electric shock by providing an escape wire for the electric current.

This appliance is equipped with a cord having a grounding wire with a grounding plug.

The plug must be plugged into an outlet that is properly installed and grounded.

WARNING: IMPROPER USE OF THE GROUNDING PLUG CAN RESULT IN A RISK OF ELECTRIC SHOCK.

If you are uncertain that your outlets are properly grounded, please contact a qualified electrician or ser-

viceman.

If it is necessary to use an extension cord, use only a three-wire extension cord that has a 3-blade ground-

ing plug, and a 3-slot outlet that will accept the plug on the appliance. The marked rating of the extension

cord shall be equal to or greater than the electrical rating of the appliance.

• The cord length of this product has been selected to reduce the possibility of tangling in or tripping

over a longer cord. If more cord length is needed, an extension cord may be used. It should be rated

no less than 15 amps., 120 volts, and have Underwriters Laboratories/CSA listing.

• A six foot long, 15 amp. extension cord may be purchased from your local authorized service facility.

When using a longer cord, be sure not to let it drape over the working area or dangle where someone

could accidentally pull or trip over it.

• Handle the cord carefully for longer life; avoid jerking or straining the cord at the plug and appliance

connections.

Summary of Contents for xu1837w

Page 1: ...TH THIRD HEATING ELEMENT FOUR À CONVECTION NATURELLE AVEC CUISSON SIMULTANÉE SUR DEUX NIVEAUX HORNO DE CONVECCIÓN NATURAL CON COCCIÓN SIMULTÁNEA EN DOS NIVELES FORNO A CONVEZIONE NATURALE CON COTTURA SIMULTANEA SU DUE LIVELLI ...

Page 2: ... plugged into an outlet that is properly installed and grounded WARNING IMPROPER USE OF THE GROUNDING PLUG CAN RESULT IN A RISK OF ELECTRIC SHOCK If you are uncertain that your outlets are properly grounded please contact a qualified electrician or ser viceman If it is necessary to use an extension cord use only a three wire extension cord that has a 3 blade ground ing plug and a 3 slot outlet tha...

Page 3: ...ay T Curve wire rack SIDE GUIDES The oven has three guides to position baking pans and wire racks at different heights Guide 2 is also used to insert the removable heating element for the dou ble oven function see page 6 Guide 1 Guide 2 Guide 3 REMOVABLE HEATING ELEMENT HOUSING When not in use the removable heating element P can be placed in the special housing under the oven as show in the figure...

Page 4: ...caution when removing the oven pan or disposing of hot grease 15 Do not clean with metal scouring pads Pieces can break off the pad and touch electrical parts creating a risk of electric shock 16 To assure safe operation oversized foods or utensils must not be inserted into the oven 17 A fire may occur if this appliance is covered or touching flammable material including curtains draperies walls e...

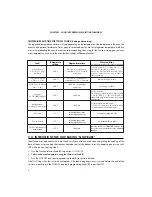
Page 5: ...knob up Ideal for all types of tra ditional grilling ham burgers hot dogs kebabs toast etc Place the food directly on the wire rack The aluminum bake pan is used to col lect any drops of fat Or place the broiling rack Q if included in the aluminum bake pan N 1 2 3 1 3 SUMMARY OF OPERATION PROGRAM POSITION ON OFF AND TOAST PROGRAM KNOB POSITION OF THERMOSTAT KNOB POSITION OF FUNCTION SELECTOR KNOB ...

Page 6: ... ACCESSORIES NOTES TIPS ON UP TO 470 F DOUBLE BAKE TOAST RANGE OF LIGHT TO DARK TOAST BROIL or DOUBLE BAKE TOAST ON UP TO 470 F SLOW BAKE 1 2 3 1 2 3 Use the aluminum bake pan sliding it directly into the lower guide or a pan on the wire rack O in the lower guide RANGE OF LIGHT TO DARK TOAST BROIL SINGLE BAKE TOAST 1 2 3 Chapter 1 General POSITION ON OFF AND TOAST PROGRAM KNOB POSITION OF THERMOST...

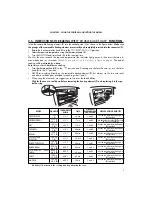
Page 7: ...tly on the removable wire rack O or on the curved wire rack T Use the aluminum bake pan N or cookie sheet if provided to bake such items as cookies biscuits rolls and uncovered casserole dishes Close the door Set the thermostat knob E to the desired position temperature Set the ON OFF knob G to ON position Set the function selector knob H to the BAKE position When baking is finished turn the therm...

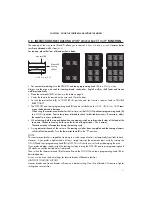
Page 8: ...red 320 F Use metal moulds for cakes Follow traditional recipe timing slightly lowered Cookies rolled and cut sliced formed 375 F Insert the rack as for TOASTING function Use the cookie sheet if provided or the aluminum bake pan 10 20 min 2 4 INSTRUCTIONS FOR LOW BAKING SLOW BAKE Ideal for pastries and cakes with icing Good results are also achieved when completing the cooking of the base of foods...

Page 9: ...cool down before removing the heating element P and replacing it in the spe cial housing CHAPTER 2 USING THE CONTROLS AND SETTING THE MODES CHICKEN AND POTATOES Add about 10 minutes to the cooking time for preheating the oven MUFFINS KEBABS Use the two aluminum bake pans N provided 1200 g 2 5 3 lbs 430 F 45 min 1 and 3 1200 g 2 5 3 lbs 400 F 1 and 3 Use the two aluminum bake pans N provided 1400 g...

Page 10: ...the thermostat knob E and the function selector knob H to BROIL Turn the ON OFF and toast programming knob G to ON When broiling is finished turn the ON OFF and toast programming knob G to the OFF position and the thermostat knob E to the position Care should be taken when turning food removing the aluminum bake pan and disposing of the grease collected while browning Use oven mitts NOTE While smo...

Page 11: ...ement switch on to brown both sides of the food at the same time Condensation may build up on the inside of the glass door This is normal The condensation will evaporate during the toasting cycle A ring indicates the end of the set time The toasting cycle has been completed and the heating elements will shut off automatically Turn the thermostat knob E to the position NOTE This toaster oven broile...

Page 12: ...o not use metal scouring pads as they might mar the finish Always remove cleaning agents by polishing with a dry cloth 5 The wire rack the oven pan and the broiling rack may be washed like other kitchen ware IF YOUR OVEN HAS A CRUMB TRAY Slide the crumb tray out from under the bottom of your oven see figure Wash by hand Should the food particles be difficult to remove rinse the crumb tray with hot...

Reviews: